

Taking on a window screen repair might seem intimidating, but with the right gear, it’s a surprisingly straightforward DIY project. Having your window screen repair tools laid out and ready to go is the secret to avoiding a frustrating afternoon and achieving a clean, professional finish.
Assembling Your Essential Toolkit for Screen Repair

Before you even think about pulling out that old screen, let's talk about getting your toolkit in order. A little prep work here saves you from those dreaded mid-project runs to the hardware store. It’s the difference between a job well done and a job that looks… well, homemade.
It's no surprise that more people are tackling these jobs themselves. The entire door and window repair market, which includes screen services, hit a value of USD 30.26 billion in 2026 and is expected to grow to USD 38.34 billion by 2030. This shows a clear trend: homeowners are choosing smart repairs over expensive full replacements.
For a quick look at everything you'll need, this table breaks it all down.
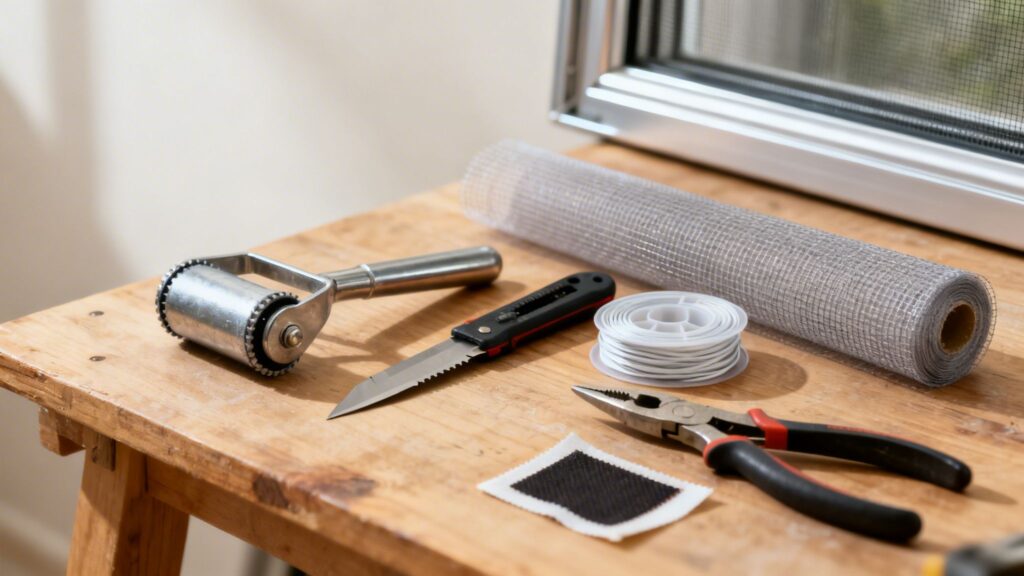
Must-Have Window Screen Repair Tools and Materials
| Tool/Material | Primary Function | Pro Tip |
|---|---|---|
| Spline Roller | Presses the screen and spline into the frame's channel. | A quality roller with both convex and concave wheels is a must. Don't try to use a screwdriver—it just doesn't work. |
| Utility Knife | Trims the excess screen mesh for a clean edge. | Always start with a fresh, sharp blade. A dull knife will snag and ruin your new screen mesh. |
| Screen Mesh | The fabric material that keeps bugs out. | Bring a small sample of your old screen to match the color and material, or use this as a chance to upgrade. |
| Spline | The rubber cord that holds the mesh in place. | The most common DIY mistake is buying the wrong diameter. Take a piece of the old spline with you to the store for a perfect match. |
| Measuring Tape | Ensures you cut the right amount of screen material. | Measure twice, cut once! Add at least two inches to each side to give yourself plenty of extra material to work with. |
| Screwdriver/Awl | Helps pry out the old, brittle spline. | A small flat-head screwdriver or a sharp awl is perfect for digging into the corner and pulling up the old spline to get started. |
This list covers the essentials. Once you have these items, you're well-equipped for most common screen repairs.
Core Tools You Cannot Skip
If there’s one tool you absolutely cannot skip, it's the spline roller. This little gadget has two different wheels: a rounded (convex) one to press the mesh into the channel and a grooved (concave) one to push the spline in on top of it. Trust me, trying to do this job without one is a recipe for a loose, wrinkled screen.
You'll also need a really sharp utility knife. The key word here is sharp. A new blade will give you a clean, precise cut along the frame's edge. Using a dull knife is one of the fastest ways to fray the mesh and make your project look sloppy.
Essential Materials for the Job
Now for the materials. When it comes to the screen mesh itself, you’ve got a few solid choices:
- Fiberglass: This is the standard for a reason. It's affordable, flexible, and doesn't crease easily, making it very forgiving for first-timers.
- Aluminum: A step up in durability from fiberglass, aluminum offers fantastic clarity. Just be careful during installation, as it can dent or crease.
- Pet-Resistant Screen: If you have pets that love to climb or scratch, this is a lifesaver. It’s a tough polyester mesh that’s roughly 7 times stronger than fiberglass.
- Solar Screen: For homes in sun-drenched areas like Phoenix, this is a brilliant upgrade. It blocks a significant amount of heat and UV rays, which can help reduce your air conditioning bills.
The most overlooked yet crucial material is the spline itself. It's the rubbery cord that locks the mesh into the frame. Spline comes in various diameters, and using the wrong size is a classic DIY mistake. Always take a small piece of your old spline to the store to match it perfectly.
A few other basic items will make your life much easier. A measuring tape is non-negotiable for getting your mesh size right, and a small flat-head screwdriver or an awl is perfect for digging out that stubborn old spline, which often becomes brittle over time. If you're looking for other clever ways to use items you already own, you can find great tips on using your common household tools for all sorts of projects.
Quick Fixes for Small Tears and Holes

Let's be realistic—not every little rip in your window screen means you need to replace the whole thing. If you're looking at a small puncture from a clumsy moment or a tiny tear left by a pet's claw, a quick patch is usually your best and most budget-friendly bet. Having the right window screen repair tools on hand makes these simple jobs a breeze and can seriously extend the life of your screens.
Think about the savings here. A DIY repair with the right kit will typically only set you back $20 to $70 per screen. Compare that to a full professional replacement, which can easily top $200. It's no wonder that repairing, rather than replacing, is becoming a more popular choice in the window services market, a trend highlighted in this global window services report.
Getting the Screen Ready for a Patch
Before you even think about slapping a patch on, you need to prep the surface. If you don't, the patch won't stick, and you'll be doing this all over again in a month.
Start by grabbing a clean cloth and some isopropyl alcohol. Gently wipe down the area around the hole to get rid of any dust, pollen, or general grime. A clean surface is key for a strong, lasting bond.
Once it's clean and dry, take a small pair of scissors and carefully snip away any frayed, loose strands of screen around the tear. This gives your patch a solid, clean edge to grab onto and stops the tear from getting any bigger underneath your repair.
Applying a Screen Repair Patch or Tape
For those small, neat holes, a pre-made screen patch kit is your go-to solution. They're designed to be incredibly straightforward.
- Peel-and-Stick Patches: These are the easiest. Just peel the paper backing off and press the patch firmly over the hole. Hold it down with solid pressure for about 30 seconds to make sure the adhesive really grabs on.
- Adhesive-Based Kits: Some kits give you a small roll of screen material and a tube of special adhesive. You'll cut a piece of the new screen just a bit larger than the hole, apply a thin bead of glue around the hole's edges, and press your new piece into place.
- Screen Repair Tape: This stuff is perfect for longer, straight-line tears. Cut a piece of tape that extends at least an inch past the tear on all sides, peel the backing, and carefully lay it down over the damage.
A huge mistake I see people make is trying to patch a screen that's old, brittle, and sun-damaged. If you touch the mesh around the hole and it feels stiff or starts to flake, a patch is just a temporary band-aid. The old material is failing, and it's only a matter of time before it tears again. In that case, you're much better off planning for a full screen replacement.
Learning how to patch a screen is a fantastic skill for any homeowner. It keeps the bugs out and the breeze flowing with very little fuss. If you want to dive deeper into the different repair techniques, our complete guide on how to repair window screens has you covered.
Mastering the Spline Replacement Process
Ever notice your window screen is in perfect shape, but it's sagging or pulling away from the frame? The culprit is almost always the spline. Here in Arizona, the intense sun bakes that rubbery cord until it becomes brittle, cracks, and eventually lets go.
The good news is that a simple spline replacement can bring back that tight, clean look without the cost of a full screen replacement. This is a fantastic DIY skill to have, and with the right window screen repair tools and a bit of patience, you'll have your screens looking sharp in no time.
Tackling the Old Spline Removal
Getting the old spline out can sometimes be the trickiest part, especially when it decides to break off into a dozen stubborn little pieces. You'll need something small and sharp to get started. I usually reach for a scratch awl or a small flat-head screwdriver, but even the sharp corner of a putty knife will do the job.
Find a corner of the screen frame and carefully dig the tip of your tool into the channel to pry up an end of the spline. Once you’ve got a piece you can grab, start pulling. If it's old and brittle, it’ll snap on you. Don't get frustrated; just find the new end and keep going until the entire channel is clear. Take your time here—you don't want to slip and accidentally puncture the mesh.
Choosing and Installing the New Spline
Picking the right spline is absolutely critical. If it’s too thin, your screen will look loose and wavy no matter what you do. If it’s too thick, you’ll fight to get it into the channel and might even damage the frame.
The only surefire way to get it right is to take a small, intact piece of the old spline with you to the hardware store. You can physically match it to the new rolls on the shelf and guarantee you're buying the correct diameter. Guessing here will only lead to a second trip.
With the correct spline in hand, the rest is pretty straightforward. Start at a corner and use the convex (rounded) wheel on your spline roller to gently push the screen mesh down into the empty channel. Next, lay the new spline over the mesh and use the concave (grooved) wheel to firmly press the spline into place over the mesh.
Work your way down one full side, then move to the opposite side, pulling the screen taut as you go to eliminate any wrinkles. Finish the last two sides, always maintaining that gentle tension. This method gives you that satisfying, drum-tight finish.
If you discover the mesh itself is too far gone, our guide on how to replace window screen mesh walks you through that bigger project. Getting the hang of spline replacement first makes that job a whole lot easier.
Your Guide to a Full Screen Replacement
Sometimes a simple patch just won't cut it. When a screen is brittle from years of sun exposure or the damage is too extensive, it's time to replace the whole thing. It might sound intimidating, but a full screen replacement is a fantastic DIY project that can give you professional-looking results with the right window screen repair tools and a bit of patience.
Doing it yourself is a huge money-saver, too. While a professional service might charge you upwards of $150 per window, you can typically get the job done for just $20 to $70 in materials. It’s also worth noting that new energy-efficient screens are becoming more common, and some even qualify for tax credits, as highlighted in recent window replacement industry statistics.
Deciding whether to tackle this yourself or call in a pro often comes down to time, budget, and confidence. Here’s a quick look at how the two options stack up.
DIY vs Professional Screen Replacement Breakdown
| Factor | DIY Approach | Professional Service |
|---|---|---|
| Estimated Time | 1-2 hours per screen (for a first-timer) | 15-30 minutes per screen |
| Estimated Cost | $20 – $70 per screen | $75 – $150+ per screen |
| Difficulty | Moderate. Requires patience and attention to detail. | Easy. Just schedule the appointment. |
While a pro is faster, the satisfaction (and savings) of doing it yourself is hard to beat. If you're ready to give it a shot, let's dive in.
Getting the Frame Ready for New Mesh
First things first, you need a good workspace. Lay the screen frame on a large, flat surface—a workbench or even a clean garage floor will do. This is crucial for keeping the frame from twisting or bending while you work.
Now, let's get that old spline out. Grab a small flat-head screwdriver or a scratch awl and dig into a corner to pry up the end of the rubber spline. Once you have enough to grab, start pulling. Be prepared for it to snap, especially if it's old and sun-baked. Just work your way around the frame, pulling out all the pieces. With the spline gone, the old mesh will come right out.

Before moving on, take a moment to clean out the spline channel with a stiff brush. Getting rid of any caked-on dirt will make installing the new screen much easier.
Installing and Securing the New Screen
Here’s where your new screen comes to life. Roll out the new mesh over the frame, leaving at least a couple of inches of overhang on all four sides. That extra material is your safety net and gives you something to grip.
Pick a shorter side to start with. Use the convex (rounded) wheel of your spline roller to gently press the mesh into the channel. Then, lay the new spline over the top and use the concave (grooved) wheel to press the spline firmly into the channel, locking the screen in place.
Pro Tip: Here's a trick of the trade: don't move to the adjacent side. Instead, go directly across to the parallel side. Pull the screen taut—firmly, but not so tight that you bow the aluminum frame—and repeat the process. This "work-across" method is the secret to a wrinkle-free, drum-tight finish.
Once the two parallel sides are done, you can spline the remaining two sides, always keeping gentle and even tension on the mesh.
Trimming for a Clean, Professional Finish
The last step is to trim off the excess mesh for that clean, factory look. Grab a utility knife with a fresh, sharp blade.
The key is to angle the blade away from your new spline, pointing it toward the outside of the frame. Run the knife right along the outer edge of the spline to slice off the excess screen material.
- Keep the blade at a low angle. This prevents you from accidentally nicking your new screen or spline.
- Apply steady pressure. A smooth, continuous cut is much cleaner than short, choppy ones.
- Take your time around the corners. A little extra care here makes all the difference.
And that's it! Once trimmed, your screen is ready to go back in the window. You’ve not only fixed the problem but also restored your window’s look and function, all while saving a good bit of cash.
Knowing When to Call a Professional
Look, I'm all for rolling up your sleeves and tackling a home project. But with window screens, sometimes putting down the window screen repair tools is the smartest move you can make. It’s not about giving up; it’s about recognizing when a quick fix could become a much bigger, more expensive headache.
The biggest tell-tale sign? A bent or damaged aluminum frame. You can try to bend it back, but aluminum often just creases or snaps. Once that happens, you’re looking at a full replacement, not a simple repair. A twisted frame will never sit flush in the window, leaving gaps for bugs to sneak in and ruining the seal.
When to Leave It to the Pros
Some jobs just aren't worth the risk or frustration. It's one thing to replace a bit of spline; it's another thing entirely to deal with complex issues or safety hazards.
Here are a few scenarios where your first call should be to an expert:
- Hard-to-Reach Windows: Any screen on a second or third story is a job for a professional, period. Juggling tools and materials on a ladder is a recipe for disaster. A pro crew has the right safety equipment, training, and insurance to handle it without risk.
- Custom or Specialty Screens: If you're thinking about upgrading to durable solar screens or need a screen for an arched or oddly shaped window, this is not a DIY project. Pros have access to better materials and the know-how to fabricate a perfect fit that a hardware store kit just can't match.
- Widespread Damage: Got more than a couple of screens with brittle mesh, sun rot, or bent frames? The sheer amount of time and work involved can be staggering. A professional can knock out the entire project in a fraction of the time.
The real value of a professional service isn't just the final product, but the peace of mind it provides. An experienced technician can diagnose underlying issues you might miss, such as a frame that's slightly out of square, and can ensure the job is done right the first time.
At the end of the day, hiring a pro is an investment in a job done right. They have the specialized tools and high-quality materials to deliver a flawless result that will last for years. For those tricky jobs or when you just want a perfect finish without the hassle, finding a reliable window screen repair near you is the way to go.
Common Questions About Window Screen Repair
Once you start tackling your first window screen project, you’ll find a few common questions tend to pop up. This is especially true here in Arizona, where our climate throws some unique challenges at homeowners. Let's walk through some of the things I get asked about most often, so you can handle your repairs with confidence.
What Is the Best Screen Mesh for the Arizona Climate?
For our intense sun, you really have two great choices: standard fiberglass or a specialized solar screen. Fiberglass is the workhorse—it’s affordable, durable, and gets the job done well. It's a solid all-around pick.
That said, solar screen is a fantastic upgrade for any Arizona home. By blocking a significant amount of UV rays and heat before they even hit the glass, these screens can make a real difference in your summer cooling bills. And if you have a dog or cat that likes to paw at the windows? Go with a pet-resistant screen. It's much tougher and can save you from constant repairs.
How Do I Know Which Spline Size to Buy?
This trips up more DIY-ers than anything else. The absolute best way to get it right is to cut out a small, intact piece of the old spline and take it with you to the hardware store. You can physically match it against the new rolls to guarantee you’re buying the perfect size for your frame’s channel.
If you don’t have a piece to work with, measuring the channel is a less reliable backup, but nothing beats having the old spline in hand.
A spline that's too thin will create a loose, saggy screen that flaps in the wind. On the other hand, a spline that's too thick will be nearly impossible to install without damaging the mesh or even the frame itself.
Can I Repair a Bent Aluminum Screen Frame Myself?
Honestly, straightening a bent aluminum frame is incredibly tricky. For a very minor bend, you might get away with gently tapping it straight with a rubber mallet on a flat surface. But be careful—aluminum creases and breaks easily, and once that happens, the frame is usually toast. A bent frame simply won't seal properly against the window.
For anything more than a slight warp, your best bet is to call a professional. We have specialized tools for the job, or we can build you a brand-new frame that fits perfectly.
How Often Should I Inspect My Window Screens?
Here in the Phoenix area, I always suggest giving your screens a good look-over at least twice a year. A great time to do this is when you're doing your seasonal window cleaning. Check for new holes, feel for brittle mesh that's been cooked by the sun, and look for any spots where the spline is pulling away from the frame.
It’s also smart to do a quick inspection after a big monsoon storm, as high winds and flying debris can do a number on them. Catching problems early makes for a much faster, easier, and cheaper fix. While you're at it, knowing about other potential window issues is a good idea. For instance, you can learn how to fix leaking windows to be even more prepared.
Hopefully, these answers help you feel ready to tackle your next screen repair. But for those jobs that are just too big, too high up, or too frustrating, don't hesitate to give us a call. The expert team at Sparkle Tech Window Washing has the right tools and years of experience to get your screens fixed perfectly. Contact us today for a free estimate!