

That ripped or faded window screen is one of those small home projects that’s easy to put off, but it makes a huge difference once it’s done. Swapping out old mesh for new is a fantastic DIY task that not only spruces up your home's appearance but also keeps bugs where they belong—outside.
The whole process is pretty simple: you'll pop out the old spline and mesh, cut a new piece of screen, and then use a special little tool to roll a new spline into the frame's channel. Honestly, with everything ready to go, you can knock this out in less than an hour.
Getting Started with Your Screen Replacement
Before you start pulling things apart, let’s get your workspace set up. Nothing is more frustrating than having to stop midway through a project to hunt for a tool. A little prep work here will make the entire job go smoothly.
You're only dealing with three main parts: the metal or vinyl frame, the screen mesh material, and the flexible rubber spline that locks the mesh tightly into a groove in the frame. That’s it. Pretty much every standard window screen is built this way.
Why DIY This Project?
Sure, you could call a pro, but tackling this yourself is incredibly rewarding. You'll pick up a useful home-repair skill and save a good chunk of cash in the process. With the global window screen market sitting at around $2.8 billion, it's clear there's a lot of this work being done.
While a professional will do a great job, their services come at a cost—often averaging around $317 for a replacement. By doing it yourself, you're in complete control of the budget and the schedule. Plus, there’s a real sense of accomplishment when you step back and look at that perfectly installed, taut new screen. Once you get the hang of this, you might even feel confident enough to tackle other window projects, like learning how to replace a windowsill.
A torn screen is more than just an eyesore; it's an open invitation for insects and a drain on your home's tidy appearance. A fresh screen not only restores the barrier but also enhances natural light and ventilation.
Getting why a good screen matters is half the battle. If you want to dig a bit deeper, check out our guide on why screens matter for your home. Taking a few minutes to prep now sets you up for a flawless installation.
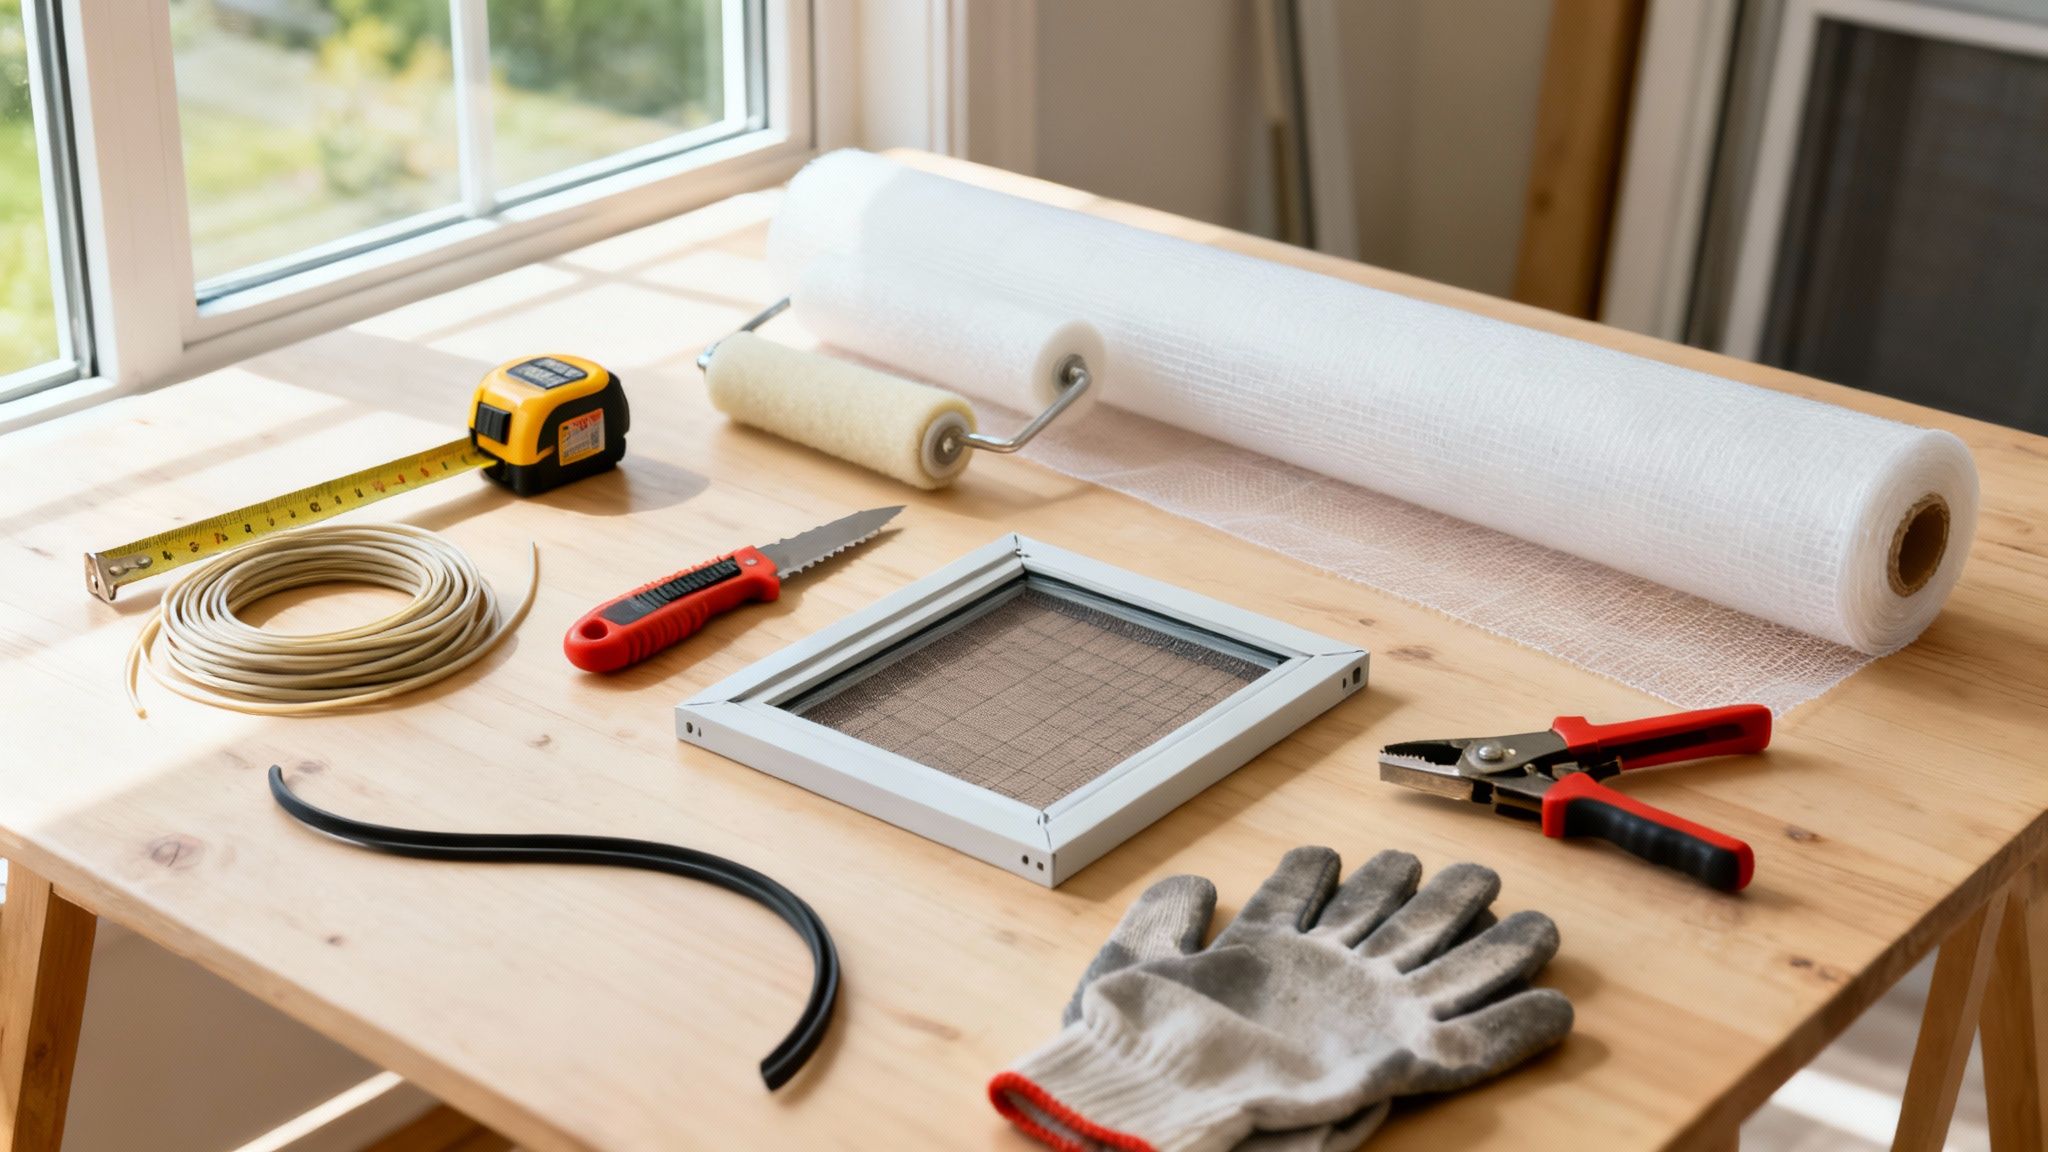
Your Project Toolkit and Materials Checklist
To make sure you're fully prepared, here's a quick checklist of everything you'll need. Having these items laid out and ready will prevent any last-minute runs to the hardware store.
| Item Category | Essential Items | Optional but Recommended |
|---|---|---|
| Tools | Flat-head screwdriver or awl, Utility knife, Spline roller tool, Measuring tape | Scissors, Clamps (for holding mesh), Work gloves |
| Materials | Replacement screen mesh, Replacement spline | Cleaning supplies (for the frame) |
With your tools and materials gathered, you’re ready to dive in and get that old screen replaced.
Choosing the Best Mesh and Spline for Your Home
Picking the right materials for your screen replacement is just as critical as the technique you use to install them. The mesh and spline you choose will directly impact how your window looks, how long it lasts, and how well it keeps bugs (or pets) on the right side of the screen. Think of it like this: the best material is the one that solves your specific problem.
Before you head to the hardware store, take a moment to think about what each window really needs. A screen on a high-traffic patio door is going to take a lot more abuse than one on a small bathroom window you rarely open. Likewise, a window that gets baked by the afternoon sun is a perfect candidate for a specialized solar screen.
With the global insect screen market projected to hit over USD 18.5 billion by 2030, homeowners have more high-quality, specialized options than ever before. This growth has pushed manufacturers to innovate, giving us better and more durable materials to work with.
Finding the Right Screen Mesh Material
Walking down the screen aisle can be a little overwhelming at first, but it boils down to a few key options. Each one strikes a different balance between durability, how well you can see through it, and price.
Here are the most common types you’ll find:
- Standard Fiberglass Mesh: This is the go-to for most homes, and for good reason. It’s affordable, flexible, and very forgiving to work with, which is a huge plus if this is your first time. It won’t crease or dent like metal, and it offers great visibility.
- Aluminum Mesh: If you want something a bit tougher, aluminum is a solid upgrade. It’s more rigid than fiberglass, which gives it a sharp, clean appearance. It won’t sag over the years, but be warned—it can dent if you get too aggressive with it during installation.
- Pet-Resistant Mesh: For anyone with cats or dogs, this stuff is a lifesaver. It’s a vinyl-coated polyester that’s roughly seven times stronger than standard fiberglass. It’s designed to stand up to claws and paws without tearing, so you won't have to redo the job next month.
- Solar or UV-Blocking Screens: These are a fantastic investment for windows that get a lot of direct sun. By blocking up to 90% of solar heat, they do more than just keep bugs out—they can noticeably lower your cooling bills and stop your floors and furniture from fading.
How to Select the Correct Spline
The spline is the humble hero of this whole project. It’s that little rubber cord that wedges the mesh tightly into the frame’s channel. Getting the size wrong is easily the most common mistake people make, and it’s the number one cause of a saggy, loose-fitting screen.
The easiest way to get the right size is to just pull out a small piece of the old spline and take it with you to the hardware store to match it. If the old stuff is gone or has turned to dust, you can measure the width of the channel in the frame itself.
Pro Tip: If you're stuck between two sizes, I almost always recommend going with the slightly larger one. A tighter fit is much better than a loose one, as it will hold the mesh taut and prevent the spline from working its way out of the channel down the road.
Getting Your Hands Dirty: The Replacement Process
Alright, you've got your new mesh and spline, so it's time to dive in. This is where the real work begins, but don't worry—it’s a surprisingly satisfying job. The trick is to be patient and methodical. A little care here goes a long way toward getting that tight, professional finish we're after.
First, find yourself a good workspace. A large, flat table or even a clean patch of garage floor will do the trick. I like to lay down an old blanket or towel to keep the screen frame from getting scuffed up. Gather all your tools so they’re within arm’s reach; it just makes everything go smoother.
Prepping the Frame and Ditching the Old Screen
Start by carefully popping the screen frame out of the window. Most have little tabs you can pull or you can just gently press the frame to release it. Once it's on your work surface, your first job is to get that old, beat-up screen out of there.
Grab a small flat-head screwdriver or an awl and find an end of the old rubber spline. Pry it up out of its channel. Once you get a little bit started, the rest should pull out in one long piece. After that, the old mesh will lift right off. This is the perfect time to give the frame a quick wipe-down with a damp cloth to get rid of any built-up gunk.
Measuring Twice, Cutting Once
Now for the new material. Unroll your replacement mesh and lay it completely over the frame. Make sure you have extra hanging over all four sides—this is non-negotiable.
You'll want to leave about two to three inches of excess mesh around the entire perimeter. This overhang is your best friend; it gives you something to grip and pull taut while you're setting the spline, which keeps the screen from pulling out of the channel halfway through the job. Use a sharp utility knife or a good pair of scissors to cut the mesh to size.
This visual guide breaks down the essential selection process into three simple stages.
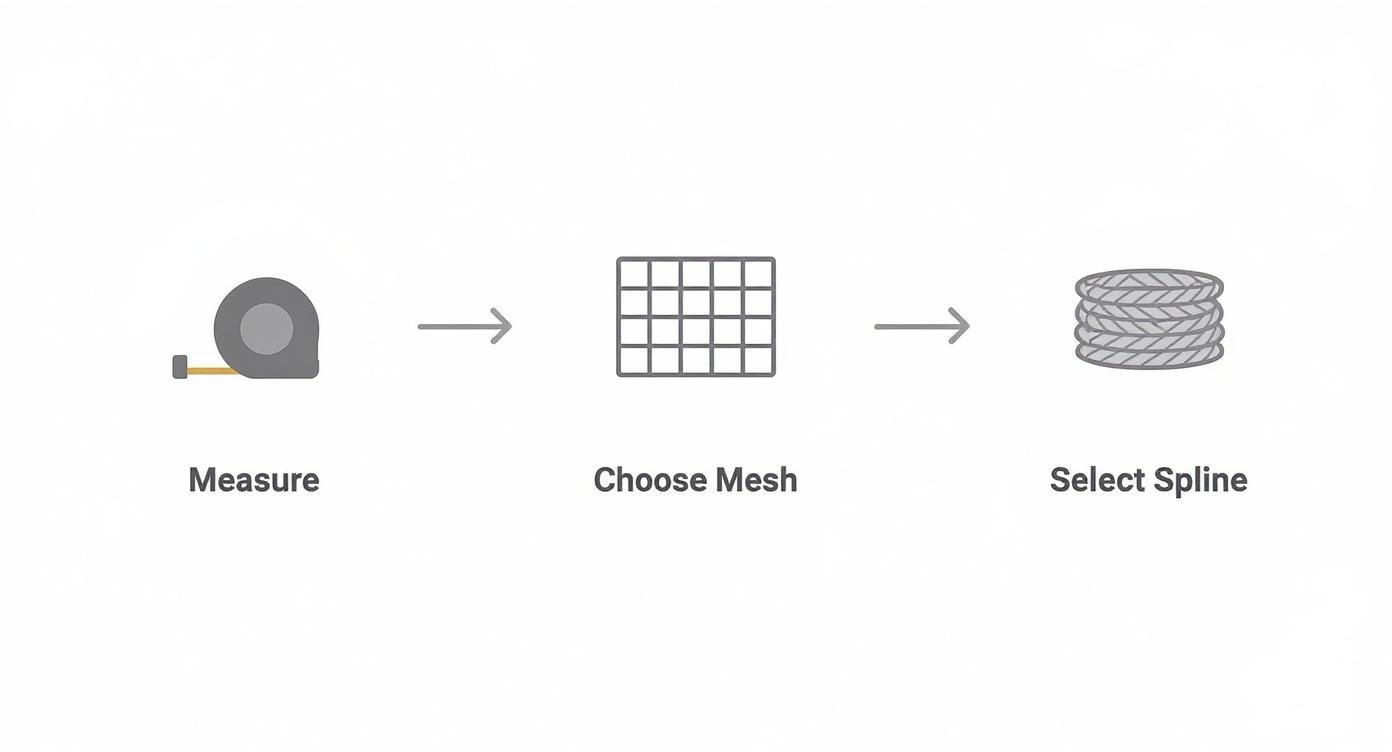
Think of this as your pre-flight checklist. Getting these three things right—measuring, choosing the mesh, and picking the spline—is 90% of the battle.
Installing the New Mesh and Spline
This is where your screen starts to look like a screen again. Lay your oversized piece of mesh flat and smooth over the frame. If you're working solo, a couple of small clamps on one side can be a huge help to keep the mesh from shifting around.
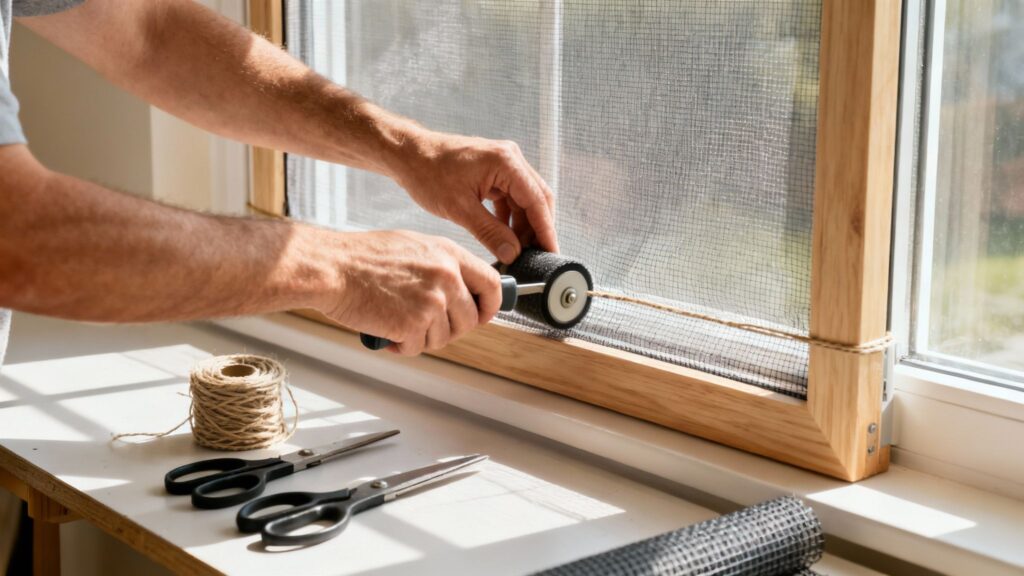
Grab your spline roller and the new spline. Start in one corner. Using the convex wheel (the rounded one), gently press the spline into the channel right over the mesh.
My Two Cents: Don't pull the screen super tight on your first pass. The initial goal is just to get it tacked in place. You'll build the proper tension as you go.
Work your way down one of the long sides first, pressing the spline firmly into its groove. Then, move to the opposite side. This is where you'll pull the mesh gently taut before rolling in the spline. That slight pull is what prevents wrinkles and keeps the screen from sagging later. Repeat this for the last two sides.
For the corners, you might need to use your screwdriver to poke the spline in nice and snug. Once the spline is in all the way around, do one final pass with the concave wheel (the grooved one) on your roller. This really seats the spline deep into the channel for a rock-solid fit.
The Finishing Touch: A Clean Trim
The last step is trimming away that excess mesh. This is what makes it look clean and professional. Take your utility knife and hold the blade at a slight angle, pointing away from the new spline. This is key to avoiding an accidental slice into your brand-new spline.
Run the knife carefully along the outside edge of the spline channel all the way around the frame. Once you're done, your new screen is ready to go back in the window.
Of course, if you find that the frame itself is bent, cracked, or just too far gone for a simple mesh swap, it might be time to think about a full window screen frame replacement.
Common Mistakes and Pro-Level Fixes
Even seasoned DIY-ers run into a snag every now and then. When it comes to replacing window screen mesh, a few common issues can pop up. But don't worry, these little hiccups are usually an easy fix once you know the tricks of the trade.
The difference between a "good enough" job and a professional-looking finish is all in how you handle these small challenges. Let's walk through some of the most common problems and how to solve them like a pro.
Tackling Wrinkles and Loose Mesh
You’ve installed the new mesh, but it’s got a few wrinkles or a bit of a sag. This is probably the most common frustration, and it almost always comes down to uneven tension when you were rolling in the spline.
The fix is surprisingly simple. If you spot a wrinkle, just carefully pull out the spline from that side of the frame. Gently pull the mesh taut to smooth out the wrinkle and then re-roll the spline back into its channel. It’s a five-minute fix if you catch it before trimming the excess mesh.
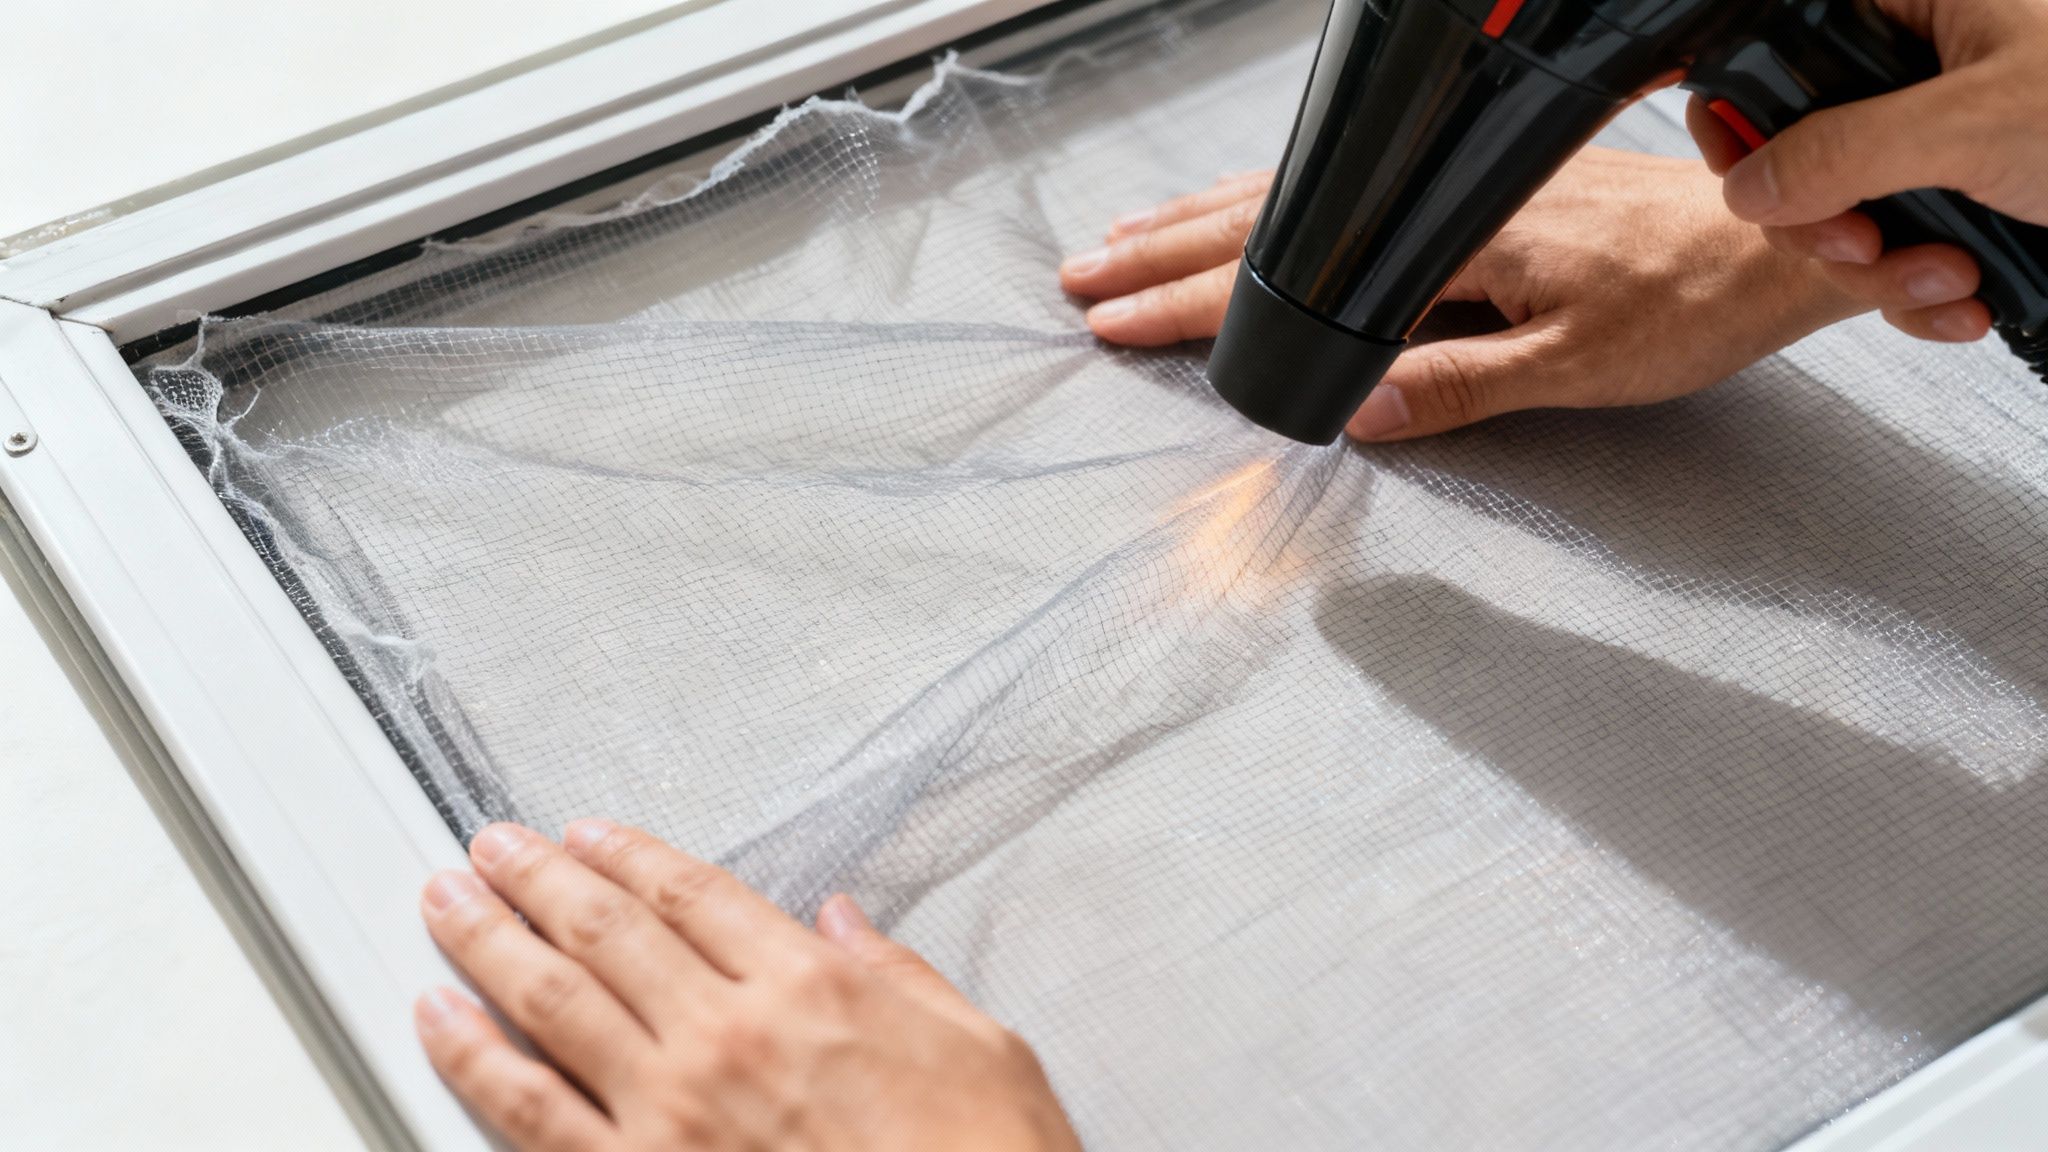
Have some minor sags in your fiberglass mesh? Grab a hairdryer.
- Set it to low or medium heat.
- Keep it about six to eight inches from the screen's surface.
- Sweep it back and forth over the saggy area.
The warmth will cause the fiberglass to contract just enough to pull the mesh tight. Just be sure to keep the hairdryer moving to avoid overheating and damaging the screen.
Solving Spline Installation Problems
Is your spline popping out of the channel or refusing to go in? This is a classic problem, and it usually points to one of two things: the wrong spline size or a tricky installation technique.
If the spline is too thin, it won't create enough friction to hold the mesh securely. If it's too thick, you'll feel like you're wrestling an alligator just to get it into the groove. Always double-check your spline diameter before you start.
A perfectly sized spline needs firm, consistent pressure from the roller to seat properly. If you're fighting it every inch of the way, or if it just falls into the groove with no effort, you've probably got the wrong size.
For those stubborn corners where the roller just can't get a good angle, use the tip of a flat-head screwdriver. It gives you the precision to gently press the spline into place where the bulkier roller can't reach.
Dealing with Different Frame Types
Most window screen frames you’ll see today are aluminum or vinyl, but you might run into older wooden frames. These require a completely different approach. Instead of a spline and channel system, they typically use staples and sometimes a thin strip of wooden molding to hold the mesh.
If you’re working with a wooden frame, you’ll need a heavy-duty staple gun. The basic idea is the same: pull the mesh taut across the frame, staple it down securely, and then trim off the excess material.
Knowing how to handle these variations is a big part of mastering DIY screen replacement. The market itself is always changing, with the plastics coating window screen industry valued at around USD 1.94 billion and growing. Homeowners are increasingly looking for advanced materials, which you can learn more about in this market research on adaptive window screens. Being prepared for different frame types and materials will make your next project that much smoother.
Troubleshooting Your Screen Replacement
Even with the best preparation, things can go sideways. This quick-reference table should help you diagnose and solve any issues that come up during your project.
| Problem | Likely Cause | How to Fix It |
|---|---|---|
| Wrinkles or saggy mesh | Uneven tension during spline installation. | Pull out the spline on the affected side, re-stretch the mesh, and reinstall the spline. Use a hairdryer on low heat for minor sags in fiberglass mesh. |
| Spline keeps popping out | The spline diameter is too small for the channel. | Measure the old spline or the channel width carefully and buy the correct size. A slightly larger diameter is better than one that's too small. |
| Spline is very hard to install | The spline diameter is too large for the channel. | Stop and get the right size. Forcing it can damage the frame or the mesh. You shouldn't have to use excessive force. |
| Screen tears near the frame | Too much tension was applied, or the roller tool slipped and cut the mesh. | Unfortunately, this usually means starting over with a new piece of mesh. Be firm but gentle when pulling the screen taut. |
| Corners are bunching up | Mesh wasn't cut correctly at the corners before installing the spline. | Use a flat-head screwdriver to gently tuck the mesh and spline into the corner. Trim a small diagonal slit in the corner of the excess mesh if needed. |
Most of these problems are minor and easy to correct. The key is to work slowly, pay attention to the details, and don't be afraid to redo a step if it doesn't look right.
When Should You Call a Professional?
https://www.youtube.com/embed/_uJmKVgivA4
Tackling a DIY window screen replacement is a fantastic skill to have. But sometimes, the smartest move is to put down the spline roller and pick up the phone. Knowing your limits can save you a ton of frustration, prevent expensive mistakes, and make sure the job gets done right—and safely.
It all starts with an honest look at the project. Are you really comfortable perched on a ladder trying to wrangle a second-story screen? Do you know how to gently coax a bent aluminum frame back into shape without making things worse? These are the moments when a simple DIY can spiral into a real headache.
If the job feels a bit over your head, don't sweat it. You might want to get in touch with some professional handyman services who have the right tools and experience for these exact situations.
Scenarios That Are Better Left to the Pros
Some screen and frame problems demand a level of skill that just comes with experience. It’s probably time to call in an expert if you're up against any of these issues:
- Bent or Damaged Frames: A minor bend is one thing, but a seriously warped or cracked frame is another beast entirely. A pro can often repair it or will know when it's time for a full replacement to guarantee a proper, bug-proof seal.
- Complex Screen Systems: If you have retractable screens, motorized screens, or even complex sliding screen doors, it's best to leave them alone. Their internal mechanisms are delicate and can be easily broken during a DIY attempt.
- High and Hard-to-Reach Windows: Safety first, always. Professionals have the proper equipment, from sturdy extension ladders to safety harnesses, to work on upper-level windows without taking unnecessary risks.
- Custom or Oversized Screens: Getting the tension just right on a huge or oddly-shaped screen is an art form. It often requires special tools and techniques to pull the mesh taut and avoid any sagging or wrinkles.
A professional brings two huge advantages to the table that you just can't replicate with a DIY job: they have access to commercial-grade materials that last longer than what you'll find at the hardware store, and they guarantee their work.
In the end, it’s a simple calculation of time, cost, and safety. If you're trying to decide if the investment is worth it, take a look at our guide on the average window screen replacement cost. It'll give you a clearer picture of what to expect and help you weigh your options.
Answering Your Screen Replacement Questions
Even the best guides can't cover every little thing that might pop up. When you're in the thick of a project, questions are bound to surface. Here are a few answers to the most common things people ask when replacing their own window screen mesh.
What’s the Best Screen Material for a Beginner?
If this is your first time tackling a screen replacement, go with standard fiberglass mesh. Hands down, it's the easiest to work with.
Aluminum mesh looks great, but it's unforgiving—it will crease and dent permanently if you make a mistake. Fiberglass, on the other hand, is flexible and much more forgiving. It offers a great mix of durability and clear visibility without breaking the bank, making it the perfect starting point for most homeowners. Its flexibility makes rolling the spline a whole lot smoother, which is where most first-timers run into trouble.
How Can I Get the New Screen Nice and Taut?
The trick to a tight screen isn't about brute force; it's about steady, gentle tension. Once you've splined the first side, pull the mesh snug across the frame as you start on the opposite side. You're not trying to stretch it out, just remove any slack. If you pull too hard, you'll actually bow the frame inward.
Working alone? A couple of spring clamps can be your best friend here. Use them to hold the mesh in place on the far side of the frame while you work.
Pro Tip: Don't obsess over getting it drum-tight right away. A good installation looks smooth and flat, with no obvious sags. If you're using fiberglass and notice a little looseness after you're done, a quick once-over with a hairdryer on low heat can often tighten it up perfectly.
Is It Okay to Reuse the Old Spline?
I know it’s tempting to save a few bucks, but trust me on this: don't reuse the old spline. It’s almost always a bad idea.
Years of baking in the sun and dealing with temperature swings make the old vinyl or rubber spline brittle and shrunken. It loses its pliability, and trying to force it back into the channel will only lead to a loose fit, gaps, and a screen that's likely to pop right back out. A new roll of spline is incredibly cheap and is the key to making sure your new screen stays put for years to come.
If you've given it a shot and decided this project is more than you bargained for, or if your windows are just too high to tackle safely, that's when it's time to call in a pro. The team at Sparkle Tech Window Washing handles screen repairs and replacements all the time. We can get you a perfect, professional fit without the headache. Check out our services at sparkletechwindowwashing.com to see how we can help.