


Sometimes, a simple screen patch just won't cut it. If the frame itself is bent out of shape, rusted, or just doesn't sit right anymore, you’re looking at a full window screen frame replacement. Think of it as a solid weekend DIY project that not only spruces up your home's appearance but also tightens up your energy efficiency and keeps the bugs where they belong—outside.
Knowing When It’s Time for a New Frame
Before you break out the measuring tape, let's figure out if you truly need a new frame. A tear in the mesh is an easy problem to spot and fix, but damage to the frame can be sneakier and cause more headaches down the road.
That slightly warped aluminum frame might not look like a huge problem, but even a small gap is like a welcome mat for drafts. Over a whole season, that tiny leak makes your HVAC system work overtime, slowly but surely inflating your energy bills.
Telltale Signs of a Failing Frame
It’s time to look past the screen mesh and give the frame itself a good, honest inspection. You’d be surprised what you might find, and catching it early is always better than dealing with a complete blowout later.
Here are the dead giveaways that you need a full window screen frame replacement:
- Visible Warping or Bending: If the frame isn't perfectly square anymore, it won't create a proper seal. This happens all the time with older aluminum frames that have seen a few too many seasons of rough weather or clumsy handling.
- Corrosion and Rust: Pay close attention to the corners, where water loves to pool. Once rust or corrosion sets in, the frame becomes weak, brittle, and can easily snap.
- Loose Fit or Gaps: A good screen fits snugly in the window channel. If yours rattles every time the wind blows or you can see daylight around the edges, it’s not sealing your home from pests and drafts.
- A Battle to Get It In or Out: Do you have to wrestle the screen into place? A frame that’s a pain to install or remove has likely lost its original shape.
A damaged screen frame is more than an eyesore; it's a weak link in your home's defense against insects and a drain on your energy efficiency. Fixing it now prevents small annoyances from turning into bigger, more expensive window problems.
The Hidden Costs of a Bad Frame
A failing frame hits you right in the wallet, and not just on your utility bills. There’s a reason the window replacement and installation industry is valued at a whopping $12.5 billion in 2024—homeowners are catching on to how much energy-efficient solutions matter. Since windows can be responsible for up to 30% of a home's heating and cooling energy loss, every single component, right down to the screen frame, plays a critical role.
Of course, a simple tear in the mesh doesn’t always mean you need to replace everything. If you're not sure whether a patch will do, our guide on https://sparkletechwindowwashing.com/how-to-repair-window-screens/ can help you decide. But once the frame itself is shot, replacement is the only reliable fix. It’s a worthwhile investment in your home’s comfort, security, and long-term efficiency.
Choosing The Right Tools And Materials
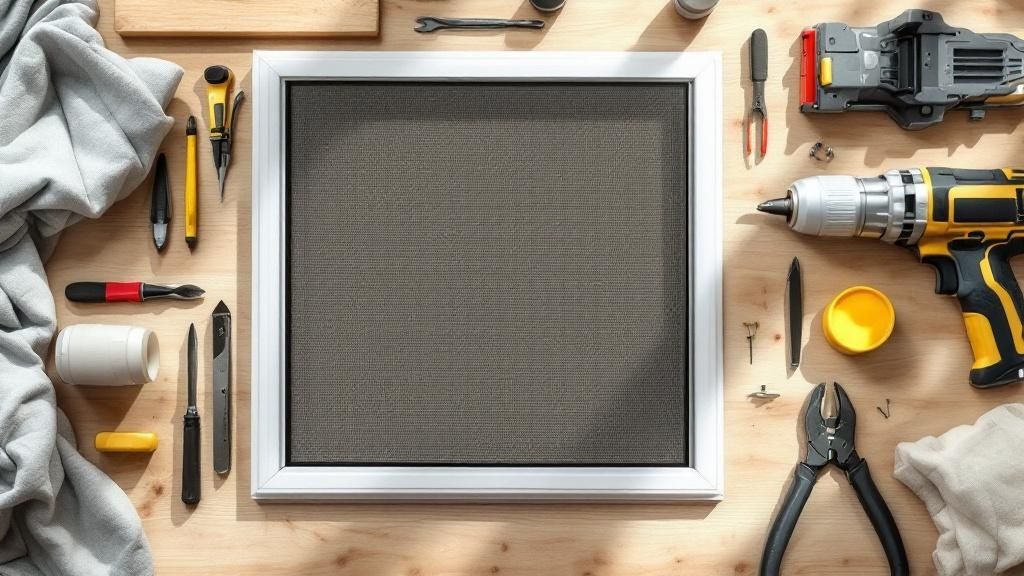
Any good project starts with the right setup. Getting all your tools and materials together before you start replacing a window screen frame is the difference between a frustrating afternoon and a job well done. Think of it as your pre-flight checklist—it saves you from those annoying mid-project runs to the hardware store.
Let's break down exactly what you'll need to pull this off like a pro.
Your Essential Toolkit
You don't need a professional workshop, but a few key tools are non-negotiable. Having these laid out and ready to go will make the whole process feel much smoother.
- Tape Measure: Don't eyeball it. A good, sturdy tape measure is critical for getting those frame cuts perfectly accurate.
- Hacksaw: This is for cutting the new frame pieces to length. A blade with fine teeth is your best bet for getting clean, burr-free cuts on both aluminum and vinyl.
- Utility Knife: A sharp utility knife is a must-have for everything from trimming the excess screen mesh to opening packaging. Start with a fresh blade.
- Spline Roller: This is the one specialty tool you absolutely need. It has a grooved (concave) wheel on one end and a rounded (convex) wheel on the other, designed specifically to push the spline into its channel without tearing the screen.
- Flathead Screwdriver: A small one comes in handy for digging out the old, brittle spline without damaging the frame.
A Quick Word of Advice: Seriously, don't skip the spline roller. I've seen people try to use a screwdriver or a pizza cutter, and it almost always ends in a ripped screen or a wavy, unprofessional finish. This little tool costs a few bucks and is worth every penny.
Selecting Your Frame Material
The frame is the skeleton of your new screen, so what you choose matters. Your main options are aluminum and vinyl, and each has its own set of trade-offs.
Aluminum frames are the old-school standard for a reason. They're incredibly strong and rigid, so they won't sag over time, which makes them ideal for bigger windows or areas that get a lot of wind. They hold up great in the sun, but a stray baseball or a clumsy move can dent them.
Vinyl frames, on the other hand, are a bit more forgiving for the DIYer. They're easier to cut and assemble, and they’ll never rust or corrode—a huge plus if you live somewhere humid or near the coast. The downside? After many years of harsh sun, they can become brittle.
Finding The Perfect Screen Mesh
The mesh is the real hero here, keeping the bugs out while letting the fresh air in. The right choice really depends on where you live and what your daily life looks like.
- Standard Fiberglass Mesh: This is what you’ll find on most homes. It's affordable, flexible, and easy to work with. For most situations, it’s the perfect all-around choice.
- Aluminum Mesh: If you want a super crisp, clear view, aluminum is a great upgrade. It’s much more rigid than fiberglass and won't sag, but you do have to be careful not to crease it during installation.
- Pet-Resistant Mesh: Have a cat who loves to climb or a dog that scratches at the door? This is your lifesaver. Made of a tough, vinyl-coated polyester, it’s about seven times stronger than standard mesh and can take a beating from claws and paws. When thinking about durable options, some plastic screen materials also offer impressive longevity.
- Solar or Sun-Control Mesh: For those of us in sun-drenched places like Texas or Florida, this stuff is a game-changer. It’s a denser mesh that blocks a good chunk of the sun’s heat and UV rays, which can actually help lower your A/C bill and keep your furniture from fading.
To make the decision a little easier, here's a quick breakdown of how these materials stack up against each other.
Screen Frame and Mesh Material Comparison
Choosing the right combination of frame and mesh is key to a long-lasting, effective window screen. This table compares the most common options to help you decide what's best for your home and climate.
| Material Type | Pros | Cons | Best For |
|---|---|---|---|
| Aluminum Frame | Very rigid, durable, won't warp in heat | Can be dented, harder to cut | Large windows, windy climates, long-term durability |
| Vinyl Frame | Easy to cut, won't corrode, affordable | Can become brittle over time with UV exposure | DIY projects, humid or coastal areas |
| Fiberglass Mesh | Affordable, flexible, good visibility | Less durable than other options | General-purpose use in most homes |
| Pet-Resistant Mesh | Extremely durable, resists tears from pets | Thicker weave can reduce visibility slightly | Homes with dogs, cats, or small children |
Ultimately, the best choice is the one that fits your budget, environment, and lifestyle. A home with pets in a coastal area has very different needs than a home in a dry, windy climate.
How to Measure and Assemble Your New Frame

Now that you've got your materials, we're diving into the part of the project where precision is everything. This is where your careful planning turns into a real, functional screen frame. A single miscalculation here can mean a trip back to the hardware store, so taking your time is actually the fastest way to get it done right.
We’ll walk through every detail, from getting the measurements just right to cutting the pieces and putting it all together. Think of it as building with a purpose—every single cut and connection makes or breaks the final fit.
Nailing the Perfect Measurement
You've probably heard the old carpenter's saying, "measure twice, cut once." Well, it has never been more true than right now. If the frame is even a little too small, it'll rattle around in the window channel. Too big, and it just won't go in.
Start by measuring the inside of the window channel where the screen actually sits. You'll need both the height and width. But don't just measure in one spot. Window openings are rarely perfectly square. Measure the width at the top, middle, and bottom, then do the same for the height—left, right, and center. Always use the smallest of your three measurements for both height and width. This little trick ensures it will fit, even if the opening is a bit wonky.
Next, you need to subtract a tiny bit to make room for the corner connectors and any tension springs. A good rule of thumb is to take 1/16th of an inch off your final height and width. That little bit of wiggle room is usually all you need for a snug, but not impossible, fit.
Pro Tip: Before you make any cuts, look at the corner connectors in your kit. Most of them require a specific calculation. You typically need to double the width of the frame material itself and subtract that total from your window opening measurements. So, if your frame material is 3/4 inch thick, you’d subtract 1.5 inches from both the height and width before you mark your cuts.
Making Clean and Accurate Cuts
With your final dimensions figured out, it’s time to cut the frame pieces. A hacksaw with a fine-toothed blade is your best friend here. It’ll give you a clean edge on aluminum or vinyl without chewing it up.
Here’s how to get it right:
- Mark Your Lines: Use a pencil or a fine-tip marker to draw a clear cutting line on each of the four frame rails (two for height, two for width).
- Keep it Stable: Clamp the piece in a miter box or secure it tightly to your workbench. You can't get a straight cut if the rail is wiggling around.
- Cut Slowly and Evenly: Let the saw do the work. Just apply steady, gentle pressure and focus on keeping the cut perfectly straight. If you rush it, you’ll end up with angled cuts that won't form a tight, 90-degree corner.
Once everything is cut, grab a small metal file and gently smooth out any burrs or rough edges. It’s a small step, but it makes a huge difference when you’re trying to slide the corner connectors in.
Assembling a Square and Sturdy Frame
Alright, your four pieces are cut to perfection. Now for the rewarding part where you see it all come together. The goal isn't just to connect the pieces, but to make sure the final frame is perfectly square.
Lay out the four pieces on a flat surface, just like they’ll look when assembled. Pop the corner connectors into one end of each rail, then gently bring the pieces together one corner at a time. The fit should be snug, but you shouldn't have to wrestle with it.
A rubber mallet is perfect for this. Lightly tap the corners to make sure the connectors are fully seated and the joints are flush. Whatever you do, don't use a regular hammer—you'll dent or even crack the frame material.
The demand for quality window frames is on the rise, thanks to new construction and a bigger focus on home energy efficiency. In fact, the market is expected to grow to $61.4 billion by 2032, showing just how much homeowners value durable, well-made components. You can learn more about trends in the window frames market and its growth.
Before you call it done, check your work by measuring the frame diagonally from corner to corner. The two diagonal measurements should be exactly the same. If they’re not, the frame is skewed. Just gently push on the corners of the longer diagonal to nudge it back into square. This final check guarantees your screen mesh will stretch evenly without any weird warping.
For more helpful DIY tips, feel free to check out our guide on how to tackle your own window screen repair.
Installing Screen Mesh for a Professional Finish
With your sturdy, perfectly square frame ready, it’s time for the most satisfying part: turning it into a functional screen. This is where your technique really shines. A bit of patience and the right touch will give you that professional, drum-tight finish you're after.
The real goal here is to get the mesh taut without pulling so hard that you bend your new frame. It's a delicate balance, but once you get a feel for it, you'll be building screens that look like they came straight from a factory.
Prepping the Mesh and Frame
First things first, lay your new screen mesh over the frame on a large, flat work surface. Don't be shy with the material—you want about two inches of overhang on all four sides. This extra bit gives you something to grip while you work and makes sure you don’t come up short.
Smooth out the mesh with your hands to get rid of any initial wrinkles. If you're using aluminum mesh, be extra gentle to avoid creating permanent creases. A good setup here makes the whole installation process much smoother.
This visual guide breaks down the core assembly process for your window screen frame replacement, from measurement to final splining.
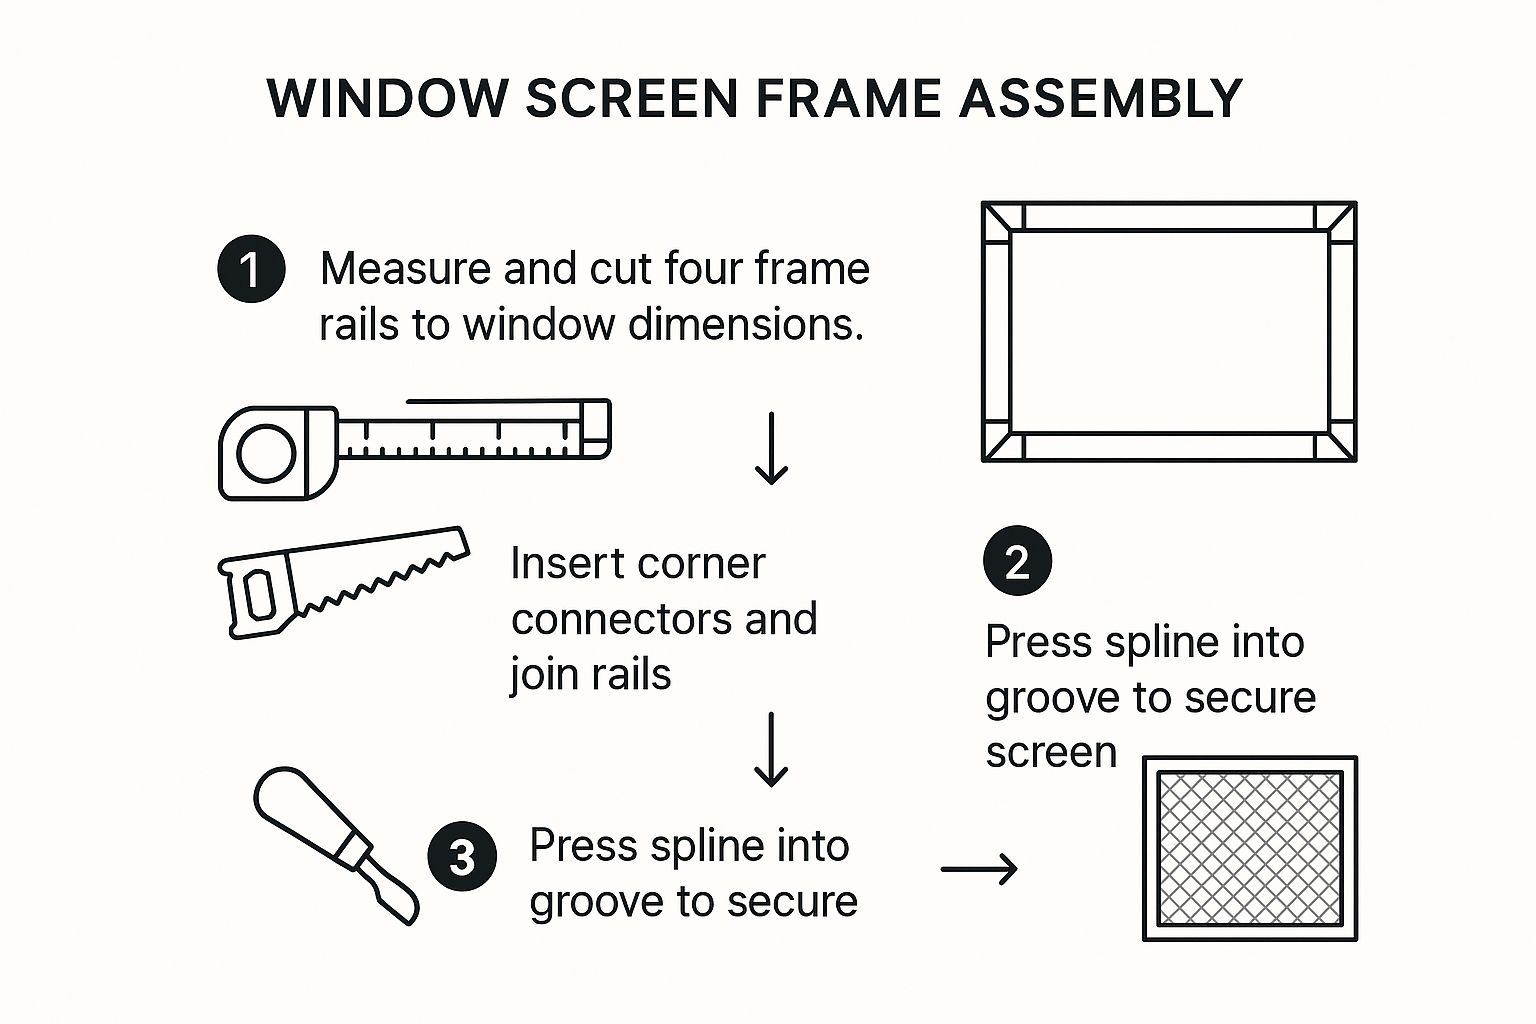
The infographic highlights how each stage—measuring, cutting, and securing—builds upon the last to ensure a precise and sturdy final product.
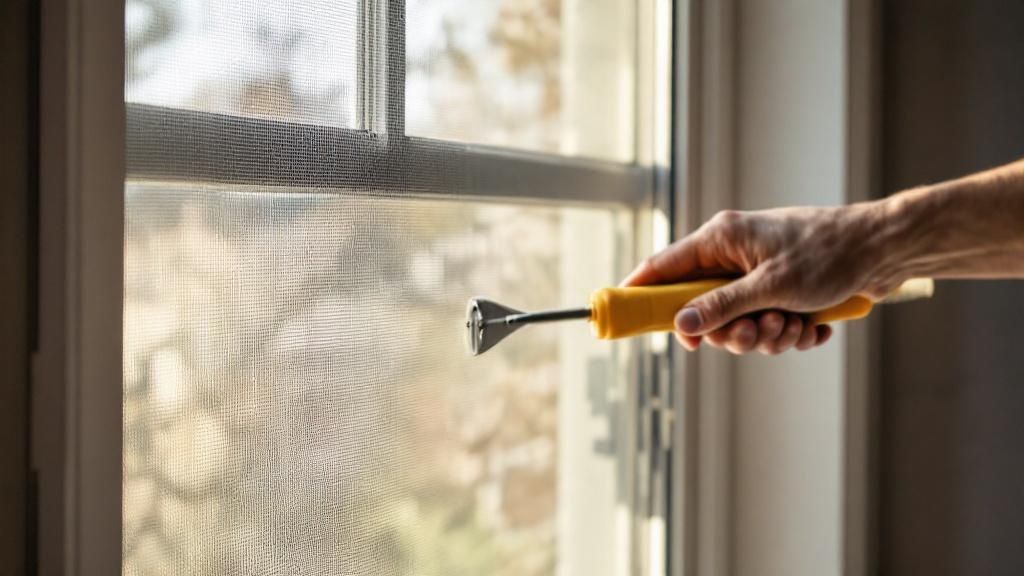
The Art of Splining
The spline roller is the star of the show here. This little tool has two wheels: a convex (rounded) one and a concave (grooved) one. Each has a specific job to do.
Start at one corner. Using the convex wheel, gently press the screen mesh into the frame’s channel for about four to six inches. This pre-forms a little groove and helps hold the mesh in place as you get started.
Now, snip the end of your spline at a 45-degree angle, which makes it much easier to push into the corner. Lay the spline over the mesh you just seated. Switch to the concave wheel on your roller and press the spline firmly down into the groove, locking in that first corner.
Work your way down one of the long sides, rolling the spline into the channel. For now, don't worry about pulling the mesh tight with your free hand. The only goal on this first side is to get the spline seated correctly.
Crucial Tip: Avoid stretching the spline as you install it. If you pull it like a rubber band while rolling it in, it will slowly shrink back to its original length over time. This can cause the corners of your frame to bow inward, ruining all your hard work. Just let the spline feed into the channel naturally.
Building Tension Without Warping
Once the first side is done, move to the opposite side. This is where you start creating the tension. As you roll the spline in, use your free hand to apply gentle, even pressure, pulling the mesh taut away from the side you're working on. You're just looking to remove the slack, not to stretch it to its limit.
With the two long sides done, move to a short side. Continue applying that gentle outward pressure as you roll the spline. By the time you get to the fourth and final side, the screen should be feeling nice and tight. As you install this last run of spline, the mesh will hit its final, firm tension.
If you see the frame start to bow inward at any point, you're pulling too hard. Stop. Pull out the spline on that side and try again with a little less tension. It's a bit of an art, but you'll get the feel for it quickly.
Finishing Touches for a Clean Look
With the spline fully installed, you should have a tight, wrinkle-free screen. The last step is to trim the excess for a clean, professional edge.
Grab a sharp utility knife and run the blade along the outside edge of the spline, cutting away the extra material. Be careful to angle the blade away from your new screen so you don't accidentally slice it. A fresh blade is your best friend here; a dull one can snag and pull the mesh, leaving a frayed, ugly edge.
Once trimmed, your custom screen is done! Take a moment to admire your work. The mesh should be smooth, the frame perfectly square, and the spline seated deep in its channel. A well-built screen not only looks better but also lasts longer. To keep it in top shape, you can find some great pointers on how to clean window screens and extend their life.
Putting It All Together: Installation and Troubleshooting
You've built a brand-new, professional-looking screen. Now for the moment of truth: getting it into the window. This is where all that careful measuring and assembly pays off, creating a snug, secure barrier against insects and outdoor debris.
Most modern window screens don't just sit in the frame; they're held in by a few simple but effective fasteners. Understanding how they work is the key to a quick install and a long-lasting fit that won't rattle every time the wind blows.
Securing Your New Screen in Place
Installing the frame is usually pretty straightforward, but it definitely requires a gentle touch. If you try to force it, you risk bending the aluminum or cracking the corner pieces, which sends you right back to square one.
Here’s what you’ll likely be working with:
- Tension Springs: These are the most common clips you'll see. Found on the top or side of the frame, they compress when you push them into the window channel and then expand to lock the screen in. Always start by inserting the spring side first.
- Pull Tabs: Those little plastic or vinyl tabs aren't just for decoration—they help you flex the frame. When installing, push the side without the pull tabs into the channel. Then, gently tug on the tabs to bow the frame just enough to pop the other side into place.
- Slide Latches: Some screens have small, movable latches that you slide into a groove in the window frame. They provide a really secure fit and are a breeze to operate.
Once the screen is in, give it a little push. A properly fitted screen should feel solid, with almost no wiggle room or rattling.
Your new screen should pop into place with firm, steady pressure—not brute force. If you find yourself really fighting it, stop. Something's off. Double-check your measurements or look for debris in the window channel before you damage the new frame.
Ironing Out the Wrinkles: Correcting Common Problems
Even when you're careful, things can go a little sideways during a DIY window screen frame replacement. The good news is that most issues are easy fixes. Don't get discouraged if it isn't perfect on the first try.
Projects like this are a huge part of the window services market. Valued at roughly $11.56 billion in 2024, this industry is on the rise as more homeowners focus on home improvement. You can dig into more details about the window replacement services market and its projected growth.
For now, let’s tackle the hiccups you might run into.
Fixing a Bowed Frame
If your frame has a noticeable curve or bow in it, the culprit is almost always the same: you pulled the screen mesh too tight when you installed the spline. That constant tension is literally pulling the sides of the frame inward.
To fix it, you just need to release that tension. Use a small flathead screwdriver to carefully pry up the spline on one of the long sides. Once it's out, re-roll the spline, but this time, let the mesh lay naturally without pulling on it. The frame should relax right back into a straight line.
Dealing with Wrinkles or Sagging Mesh
Wrinkles are the exact opposite problem—the screen isn't tight enough. This usually happens if you didn't apply a little bit of gentle, even pressure while rolling in the spline on the last couple of sides.
The solution is similar to fixing a bow. Pop out the spline from the last side you installed. Gently pull the mesh taut (but not too tight!) to smooth out the wrinkles, and then carefully re-roll the spline back into its channel. What you're looking for is a perfectly smooth, drum-like surface.
When the Frame Is Too Loose or Too Tight
So what happens if the screen rattles around in the window, or worse, you can't get it in at all? This is a measurement problem, but it might not be a total disaster.
| The Problem | How to Fix It |
|---|---|
| Too Loose | Try adding a couple of extra tension springs to one side to create a tighter fit. Another trick is to run a thin bead of clear silicone weatherstripping inside the window channel to narrow the gap. |
| Too Tight | If it's just a hair too big, you might get away with filing down the corners a tiny bit. If there's a major size difference, the only real fix is to disassemble the frame and recut one horizontal and one vertical piece. |
By working through these common issues one by one, you can turn a minor mistake into a perfectly installed screen you'll be proud of.
Got Questions About Screen Frames?
You've got the guide, you've got the tools, but a few questions might still be nagging you before you dive in. That's completely normal. Let's tackle some of the most common hang-ups I hear about so you can get started with total confidence and avoid that dreaded mid-project trip back to the hardware store.
A question that comes up all the time is about reusing the old screen mesh. I get it, it seems like a great way to save a few bucks. But trust me on this one: it's almost always a bad idea. After years of baking in the sun, old mesh gets brittle and loses its stretch. Trying to pull it taut in a new frame is a recipe for frustration and a saggy, unprofessional-looking final product.
For the best results, always start with a fresh roll of screen mesh. It’ll make the whole process smoother and look a hundred times better.
How Do I Know What Spline Size to Get?
Getting the spline diameter right is absolutely critical. Think of it like a "Goldilocks" problem—too thin, and the screen will just pop right out; too thick, and you'll fight it every inch of the way, possibly even damaging the frame channel. It has to be just right.
The easiest, most foolproof way to get it right? Snip off a small piece of the old spline before you throw the old frame out. Just take that little piece with you to the store and match it up directly with the new rolls. You can't go wrong.
Don't have a sample of the old spline? No problem. The packaging for your new frame kit should tell you exactly what diameter spline it's designed for. They've taken the guesswork out of it for you.
Can I Really Do This Myself, or Should I Call a Pro?
For a standard, rectangular window screen? Absolutely. This is a fantastic DIY project. It’s one of those rare home repairs that saves you a good chunk of change on labor, doesn't require a ton of expensive tools, and gives you a real sense of accomplishment when you're done.
That said, there are definitely times when handing the job over to a professional is the smart move. You might want to call in a pro if you're dealing with:
- Odd Shapes: Arched, circular, or other custom-shaped windows are a different beast entirely. Pros have the jigs and experience to handle those curves perfectly.
- High-Up Windows: If the screen is on a second story or higher, safety is the number one priority. A professional has the right ladders and safety gear to get the job done without risk.
- Massive Screens: Trying to stretch the mesh on a huge patio door screen by yourself can feel like wrestling an octopus. It’s tough to keep the tension even across a large surface.
And of course, if you're just not comfortable with getting precise measurements and clean cuts, a pro will guarantee that perfect fit every single time.
For any window screen challenges that go beyond a straightforward frame replacement, the team at Sparkle Tech Window Washing is here to help. From tricky repairs to full replacements, we’ll make sure your windows look fantastic. Contact us today for a free estimate!