



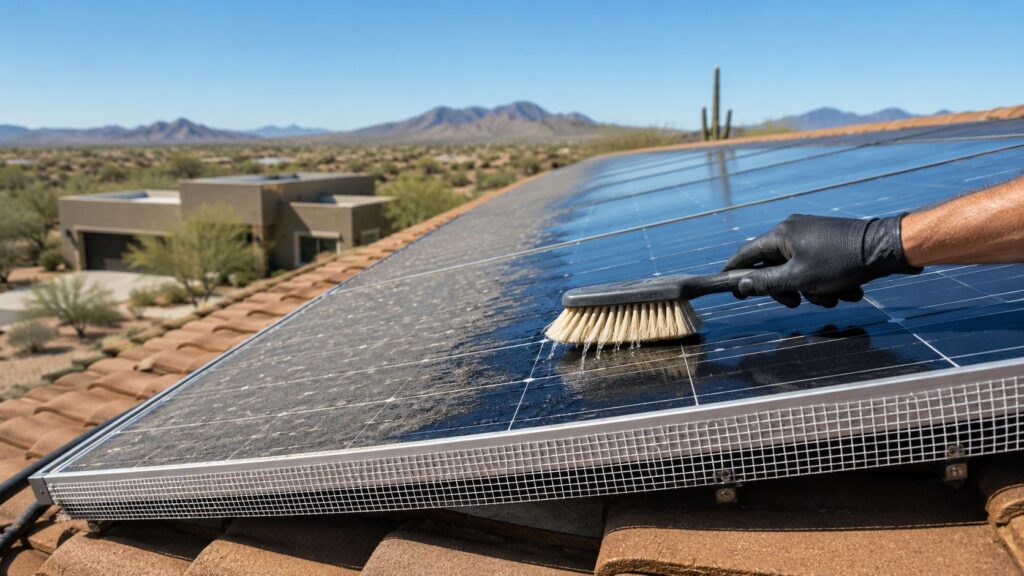
If you're in Phoenix and you've glanced up at your roof lately, you've probably seen the same thing I see on service calls all over the valley. Fine brown dust baked onto the glass. A few white splatters near the lower edge. Maybe birds slipping under the panels in the morning and a utility bill that doesn't feel as low as it should.
That combination matters more than most homeowners realize. Solar isn't a set-it-and-forget-it system in Arizona. The sun is strong here, but so is the dust, and birds treat the shaded space under panels like ready-made shelter. Good solar panel cleaning and bird proofing protects output, prevents repeat mess, and helps you avoid damage that starts small and gets expensive later.
Why Your Dirty Solar Panels Are Costing You Money
Arizona gives solar panels plenty of sun, but that only helps if sunlight can reach the cells. Dust, pollen, bird droppings, and rooftop grime create a film that blocks and scatters light before it gets to the panel surface.

In practical terms, dirt isn't just cosmetic. Dirty solar panels can lose up to 25% of their efficiency, and in dusty regions like Arizona, losses can reach up to 30% within one month if panels aren't cleaned, according to this solar panel cleaning reference. That means the same roof that should be offsetting your power bill starts underperforming during the months when your AC is working hardest.
Why Arizona grime hits harder
Phoenix-area roofs deal with a rough mix:
- Windblown dust: Fine desert dust settles evenly and sticks after dew or light moisture.
- Bird droppings: These don't cover the whole panel, but they create dense shaded spots.
- Debris near roads or open lots: Traffic dust and airborne grit build up faster than most homeowners expect.
A light coating across the full panel is one problem. Thick droppings in one area can be worse because they create concentrated shading. Homeowners usually notice the issue only after production slips, not when the dirt first appears.
Practical rule: If you can clearly see dirt or droppings from the ground, your panels are already dirty enough to justify a closer look.
The real cost isn't just what you see
A lot of homeowners think, "It's just dust. The next rain will handle it." In Arizona, that usually isn't a reliable plan. Rain can leave behind mineral spotting, and it rarely removes baked-on droppings or grime trapped along panel edges.
The bigger point is simple. You paid for a solar system to produce power, not to sit under a layer of rooftop dirt. Cleaning isn't about making the panels look better from the street. It's about restoring access to sunlight so the system can do the job you bought it to do.
Your Guide to Safe and Effective Panel Cleaning
Before anyone starts spraying water on a roof, safety comes first. Solar panel cleaning sounds simple from the ground. On a hot tile roof with electrical equipment nearby, it isn't casual work.
Start with safety, not tools
If your roof is steep, high, fragile, or hard to access, hiring out the work is usually the better call. The panel glass itself is durable, but roofs, ladders, and footing are where people get hurt. Add Phoenix heat and the risk goes up fast.
Use these rules before you clean anything:
- Work in cooler hours. Early morning is usually safer for both the roof surface and the panel glass.
- Shut down only if your system instructions require it. Follow manufacturer or installer guidance. Don't guess around live equipment.
- Stabilize the ladder. One bad ladder setup turns a maintenance job into an emergency.
- Stay off panel surfaces. Never step, kneel, or place weight on the panels.
- Avoid aggressive equipment. Pressure washers, abrasive pads, and harsh chemicals can damage glass, seals, frames, or surrounding roof materials.
For homeowners who want a good overview of cleaning basics, this solar panel cleaning guide is a useful starting point.
A simple setup works best: a hose with gentle flow, a soft-bristled brush or non-abrasive pole brush, clean water, and a way to reach the panels without leaning dangerously.

What to use and what to avoid
The safest cleaning method is usually the least dramatic one.
- Use soft brushes: A flagged soft-bristle brush or dedicated solar cleaning brush lifts dirt without scratching the glass.
- Use low-pressure water: You want rinse flow, not force.
- Use mild cleaning solution only if needed: For stuck-on droppings, a dedicated solar-safe cleaner or mild soap can help. Keep it minimal and rinse fully.
- Skip squeegees with metal edges: They can catch frames or grit and leave marks.
- Never use razor blades or stiff deck brushes: Those create the kind of damage that isn't always obvious until glare hits the glass.
Clean the panel, not your frustration. The more force you use, the more likely you are to damage something.
A practical cleaning sequence
The order matters because dry scrubbing grinds grit into the glass.
Rinse first
Start with a gentle rinse to remove loose dirt. This softens surface dust and cools the panel face if the morning is already warming up.
Loosen the stubborn spots
After the initial rinse, use a soft brush with light pressure. Work from the upper edge downward so dirty water runs off instead of across cleaned areas. For bird droppings, let water and cleaner dwell briefly instead of scrubbing hard right away.
Final rinse
Rinse thoroughly so no soap or loosened residue stays behind. Let the panels air dry. If your water leaves heavy spotting, purified or deionized water produces a cleaner finish, which is one reason many pros use it.
What usually goes wrong
Most DIY cleaning problems come from three mistakes:
- Midday work on hot glass
- Overly aggressive tools
- Trying to reach too far from a ladder
If you can clean from a secure position with the right tools, panel washing is manageable. If you can't, the job gets risky quickly. That's the point where a service company with roof access equipment and insurance makes more sense than improvising.
How to Bird Proof Your Solar Panels for Good
Cleaning solves the surface mess. It doesn't solve the reason the mess keeps coming back.
In Phoenix, birds don't just perch on panels. They get underneath them. Once that starts, you have droppings, nesting material, noise, and repeated cleanup. More important, you have a hidden electrical risk most homeowners never see from the ground.

The problem under the panels
Wiring damage is the bigger threat. Between 12–18% of bird-related solar failures come from birds chewing wires under the panels, and repairs can range from $500 to $2,000, based on this bird-proofing resource. That's the part many cleaning-only articles miss.
Birds use the shaded cavity under panels for shelter. They bring in twigs and debris. They move around the wiring. Some chew or tug at components. By the time a homeowner notices reduced production or system errors, the damage may already be done.
A dirty panel usually lowers performance. Damaged wiring can shut part of the system down or trigger a repair visit.
What actually works
The most dependable solution is a physical exclusion barrier. In most residential systems, that means a coated wire mesh attached around the perimeter of the array. The goal is simple: block access under the panels without interfering with airflow or drainage.
Mesh skirting
This is the method I trust most when it's installed correctly. Good mesh should be durable, fitted tightly to the panel layout, and secured in a way that doesn't damage the frame.
Mesh works because it addresses the core issue, which is entry. If birds can't get under the panels, they can't nest there, foul the area, or reach the wiring cavity as easily.
Spikes on nearby ledges
Bird spikes can help on adjacent roof ridges, parapets, or ledges where birds like to gather before moving under the array. They're a support measure, not a full solution. Spikes do nothing if the under-panel opening stays accessible.
Cleaning plus exclusion
This is the combination that lasts. Remove nests and droppings first. Then install the barrier. If you skip cleanup and just seal the edge, you can trap debris in place and create other problems.
Why DIY bird proofing often fails
Homeowners usually run into trouble at the panel edges and corners. The mesh looks installed from the ground, but small gaps remain. Wind loosens sections. Debris builds up. Birds test the perimeter until they find the weak point.
Over 30% of DIY bird-proofing attempts fail within six months because of improper tensioning, gaps, or similar mistakes, according to this analysis of recurring bird-proofing failures. That's why so many people end up dealing with the same nesting problem again after putting in the effort once.
The fix isn't just "add mesh." It's installing it with consistent fit, proper fastening, clean edges, and follow-up inspection.
What to look for in a proper installation
Use this checklist when evaluating a bird-proofing job:
- Full perimeter closure: Every opening under the array needs coverage, especially corners.
- Secure attachment: The mesh should stay tight in heat, wind, and debris exposure.
- No crushed or pinched wiring: Proofing should protect electrical components, not create new problems.
- Clean-out before closure: Existing nesting material needs removal before the array is sealed.
- Visual neatness: A good install shouldn't look like an afterthought from the street.
If you want a second example of how pest exclusion is handled on buildings more broadly, Vanish Canada professional bird control gives useful context on matching deterrents to the structure instead of relying on one generic fix.
For homeowners focused on system output, this solar efficiency improvement guide is also relevant because bird proofing protects more than cleanliness. It protects the parts of the system you can't see.
DIY vs Hiring a Professional Service
Some homeowners can handle basic cleaning. Fewer should handle rooftop bird proofing. The difference isn't just skill. It's access, safety, and whether the repair holds up through Arizona sun and wind.
A good comparison isn't only about today's price. It's about repeat work, roof risk, and whether the problem stays solved. If you've ever compared recurring home services, the logic is similar to using a local pool maintenance cost guide to understand what you're paying for beyond the surface task. Equipment, inspection, and consistency are part of the true value.
DIY vs. Professional Service Comparison
| Factor | DIY Approach | Professional Service |
|---|---|---|
| Roof safety | Depends on your ladder setup, footing, and comfort on the roof | Crew works with roof access procedures and job-specific safety practices |
| Cleaning tools | Often limited to household hose, brush, and improvised gear | Uses purpose-built brushes, extension tools, and purified water options when needed |
| Bird nest removal | Messy and difficult, especially under low-clearance panels | Typically handled as part of a structured cleanup process |
| Mesh installation quality | Easy to leave small gaps or loose sections | More likely to achieve consistent fit around corners and edges |
| Long-term results | Can work for simple cleaning if access is safe | Better fit for recurring maintenance and under-panel protection |
| Risk of re-nesting | Higher if the barrier isn't tight | Lower when installation and follow-up inspection are done properly |
| Insurance and liability | Your responsibility | A company such as Sparkle Tech Window Washing & window screens can perform this type of exterior maintenance as a bonded and insured Arizona service provider |
When DIY makes sense
DIY is reasonable when all of these are true:
- You have safe access: Low roof, stable footing, and no awkward reach.
- The job is only light cleaning: No nests, no heavy droppings, no signs of pests underneath.
- You're using the right tools: Soft brush, gentle water flow, and no harsh cleaners.
If that's your setup, a careful homeowner can handle routine washing.
When it makes sense to call a pro
Call a professional when you see any of the following:
- Bird traffic under the array
- Droppings concentrated in one area
- Loose debris or nesting material
- A steep tile roof
- A second-story roofline with poor ladder access
The other deciding factor is durability. DIY bird proofing often looks fine on day one. The weak spots show up later, which is why that more than 30% failure rate within six months matters so much in real-world decisions. If you're already climbing up there, it's worth asking whether you want to do the same job again in a few months.
An Arizona-Specific Maintenance Schedule
General solar advice often assumes milder weather and more frequent rain. Phoenix isn't that environment. Dust settles fast, summer heat limits safe working hours, and birds take advantage of the shade under rooftop arrays.
In regions like Arizona, where bird activity is high and dust accumulation is constant, the combination can lead to solar panel efficiency losses exceeding 25% if it isn't managed with both regular cleaning and preventive bird proofing, according to this maintenance discussion focused on dirty panels and bird activity.
A practical schedule for Phoenix-area homes
For most homes, I recommend a schedule built around weather and bird behavior, not just the calendar.
Spring check
Inspect panels for dust film, droppings, and signs of birds using the roofline. This is a good time to catch early nesting activity before summer heat makes roof work harder.
Mid-summer visual review
Don't plan roof work in extreme afternoon heat. Instead, do a ground-level check in the cooler part of the day. Look for new droppings, debris sticking out from under panels, or birds regularly entering the same gap.
Post-monsoon cleaning
This is one of the most useful service windows in Arizona. Monsoon winds can leave a fresh layer of dust and debris across the array. If there has been roof runoff, panels may also have dirty edge buildup that doesn't wash away cleanly on its own.
Fall bird-proofing inspection
Check mesh, clips, and perimeter gaps before cooler weather. Birds often get more active around sheltered spaces when conditions shift, and this is the time to find loose sections before they become entry points.
What homeowners should watch for
These signs usually mean you need more than a rinse:
- Repeated bird presence at the same panel corner
- Twigs or nesting material visible below the array
- Heavy droppings clustered in one section
- Production concerns paired with obvious soiling
For a practical planning tool, this solar panel maintenance checklist is a solid reference for recurring inspections.
In Arizona, timing matters almost as much as the work itself. The same cleaning job is safer and more effective at the right hour and in the right season.
Protecting Your Home's Biggest Energy Asset
Your solar array is one of the hardest-working systems on your house. It sits in full Phoenix sun, takes the hit from dust storms, and has to keep producing through long dry stretches. That means maintenance isn't optional if you want reliable performance.
Cleaning handles the visible problem. Bird proofing handles the recurring one. Together, they protect output, reduce repeat mess, and help you avoid the under-panel issues that homeowners rarely notice until there's already a service problem.

If you're deciding where to put your effort, start with the risks that compound. Surface dirt lowers production. Birds can keep bringing the problem back and create damage below the panels where you can't see it. A clean, sealed, well-inspected array is easier to maintain and less likely to surprise you with preventable repairs.
For most Phoenix homeowners, the right approach is straightforward. Clean panels safely, block bird access correctly, and inspect the system on a schedule that matches Arizona conditions. That's how you protect the investment you already made.
If your panels need cleaning, bird proofing, or a closer inspection after heavy dust and bird activity, Sparkle Tech Window Washing & window screens is one Arizona option for exterior service work, including solar panel cleaning and related screen services.