


Let's face it, nothing transforms a room quite like sunlight pouring through sparkling clean windows. It brightens everything up and can seriously boost your home's curb appeal. But getting that professional, streak-free finish on your own? That can feel like an impossible task.
The good news is that the secret to a crystal-clear shine isn't magic—it's all about having the right tools and, more importantly, the right technique. I'm going to walk you through the exact methods the pros use, so you can skip the frustration and get straight to stunning results.
Your Path to Perfectly Clean Windows
Think of this as your roadmap to mastering a genuinely useful home maintenance skill. We're going to move past the common headaches of smudges and streaks and get you feeling confident enough to tackle any window in your house.
Proper window care is more than just a quick wipe-down. When you let dirt, grime, and hard water spots sit for too long, they can actually etch and permanently damage the glass. Regular, proper cleaning is the best way to prevent that from happening.
Why This Skill Matters
Learning how to wash windows like a pro pays off in more ways than just a better view.
- Boosts Curb Appeal: There's no denying it—sparkling windows make a house look cared for and inviting from the street.
- Maximizes Natural Light: You'd be surprised how much grime can dim a room. Clean glass lets in the maximum amount of sunlight, making your home feel bigger and more cheerful.
- Adds Home Value: If you're thinking of selling, clean windows are one of those small details that send a powerful message to buyers that the home has been well-maintained.
This isn't just a homeowner trend; the demand for high-quality results is growing everywhere. The global market for gutter and window cleaning services is expected to jump from USD 1,459.7 million in 2025 to USD 2,274.3 million by 2033, growing at a steady clip of 5.7% each year. You can see more about this trend over on Global Growth Insights.
A truly pristine finish goes beyond just the glass. While this guide focuses on window washing, achieving sparkling windows by cleaning blinds and other treatments is crucial for a complete transformation.
By the time you're done here, you'll have all the knowledge you need—the right tools, the best solutions, and the proven methods—to get a perfect, streak-free shine every single time.
Gathering the Right Tools for a Flawless Finish
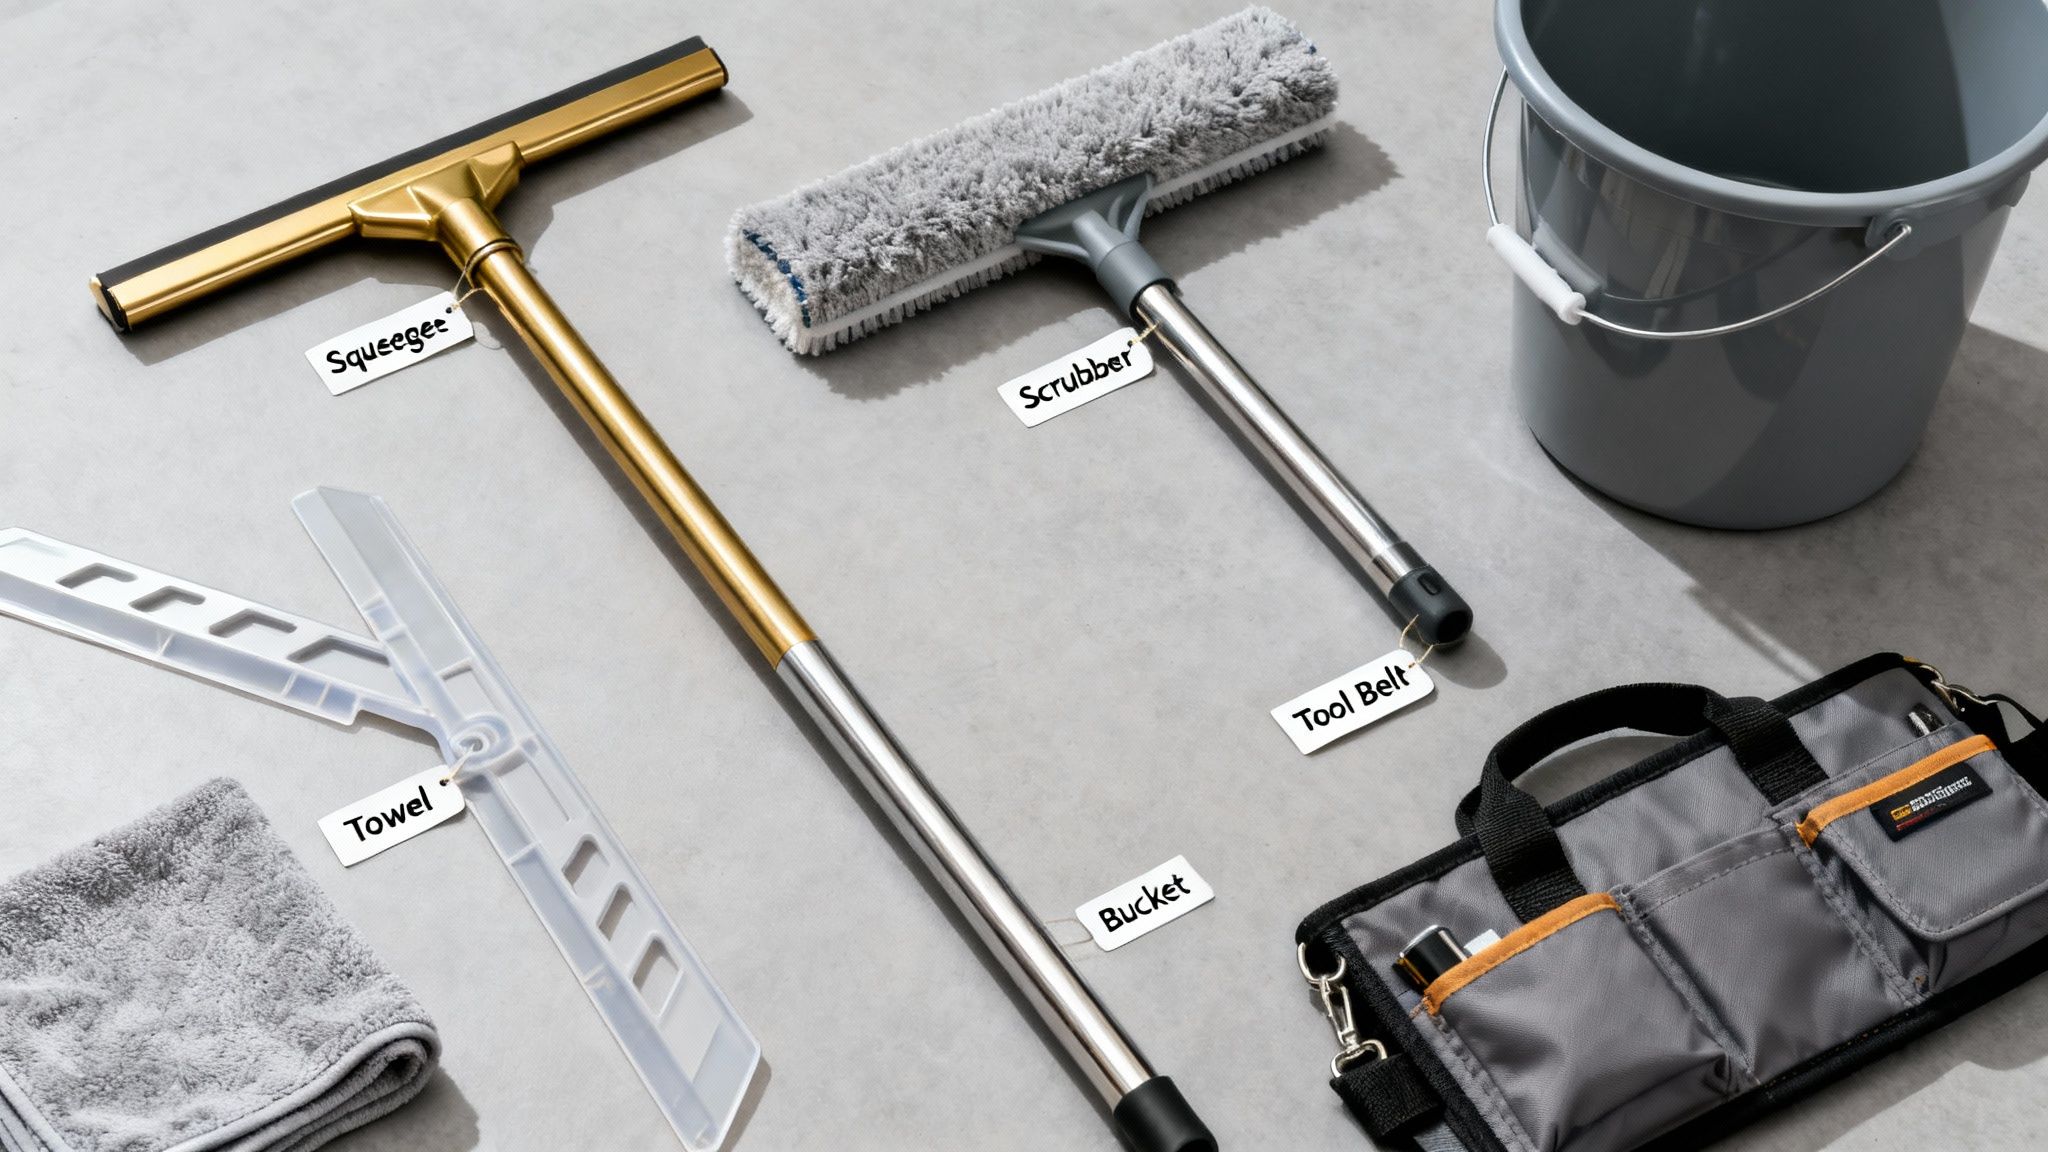
If you're serious about getting a professional, streak-free shine on your windows, it's time to ditch the paper towels and all-purpose spray. Having the right gear isn't just about making the job easier—it’s what separates a frustrating chore from a satisfying project with perfect results. We're talking about building a dedicated toolkit that actually works.
There's a reason the window cleaning services market was valued at USD 4,180 million in 2024 and is projected to hit USD 6,798.81 million by 2033. Homeowners and businesses alike know the value of a crystal-clear view, and using the right equipment is the only way to achieve that professional standard yourself.
The Squeegee: Your Most Valuable Player
Your squeegee is, without a doubt, the most critical tool in your arsenal. A cheap, flimsy model from a big-box store is a recipe for frustration. They almost always leave streaks because of an uneven blade and poor pressure distribution. Investing in a professional-grade squeegee is one of the best moves you can make.
Here's what to look for when you're choosing one:
- The Channel: This is the metal track holding the rubber blade. Brass channels are a classic choice—heavy and incredibly durable—while stainless steel is lighter and rust-resistant. The channel length dictates how much area you can cover in one pass.
- The Handle: Find an ergonomic handle that feels good in your hand and provides a secure grip, even with wet hands. Many professional handles feature a quick-release clip, making it a snap to swap out different-sized channels for different windows.
- The Blade: This is where the magic happens. A high-quality, soft rubber blade will conform to any minor imperfections in the glass, pulling away every last drop of dirty water. Before every job, run your finger along the blade to ensure it's perfectly straight and free of nicks. Even a tiny imperfection will leave a glaring streak.
The Scrubber: For Applying and Agitating
Before you can squeegee the water off, you need to apply your cleaning solution and scrub away the grime. That's the job for a dedicated scrubber, often called a T-bar and sleeve. The T-bar is the handle, and the sleeve is a removable, machine-washable microfiber cover that slips over it.
This tool is far superior to a basic sponge or rag. The dense microfiber pile soaks up a ton of soapy water, letting you wet the entire window quickly. More importantly, it gently lifts grime, pollen, and dust without any risk of scratching the glass.
Essential Supporting Gear
With your core tools sorted, a few other items will complete your kit and make your workflow much smoother, especially when you're perched on a ladder.
To truly achieve a professional finish, you can’t skip these items:
- A purpose-built bucket: A sturdy, rectangular bucket (often called a "window bucket") is designed to perfectly fit your scrubber and squeegee.
- Microfiber towels: You'll want at least two kinds. One set for wiping your squeegee blade clean after each pass, and another completely dry, lint-free set for detailing the edges and wiping down the sills.
- A window scraper: For stubborn gunk like paint flecks or dried bird droppings, a small scraper with a fresh blade is a lifesaver. Just be sure to use it carefully and always on a wet window to avoid scratches.
For a closer look at our favorite brands and models, check out our guide to the best window cleaning tools.
Essential vs. Advanced Window Washing Tools
While anyone can get started with a few basic items, professionals rely on specialized gear to tackle any job efficiently and safely. Here’s a look at the difference between a DIY setup and an advanced toolkit.
| Tool Category | Essential Item (DIY) | Professional Upgrade (Advanced) |
|---|---|---|
| Water Application | Scrubber (T-Bar & Sleeve) | Water-Fed Pole System with Purified Water |
| Water Removal | Professional Squeegee | Multiple Squeegees with Various Channel Sizes |
| Detailing | Microfiber Towels | Surgical "Huck" Towels, Detailing Cloths |
| Reach | Step Ladder | Extension Poles, Multi-Position Ladders, Lifts |
| Tough Spots | Window Scraper | Bronze Wool Pads, Abrasive Solutions |
| Carrying Gear | 5-Gallon Bucket | "Bucket on a Belt" System, Specialized Holsters |
The essential items will let you achieve fantastic results on most residential windows. But as you can see, the professional upgrades are all about boosting efficiency, improving safety on high windows, and delivering flawless results every single time.
A great squeegee can be more than just a cleaning tool. For one window washer on 9/11, the handle of his brass squeegee was instrumental in helping him and five other men break through a wall after being trapped in an elevator, ultimately saving their lives.
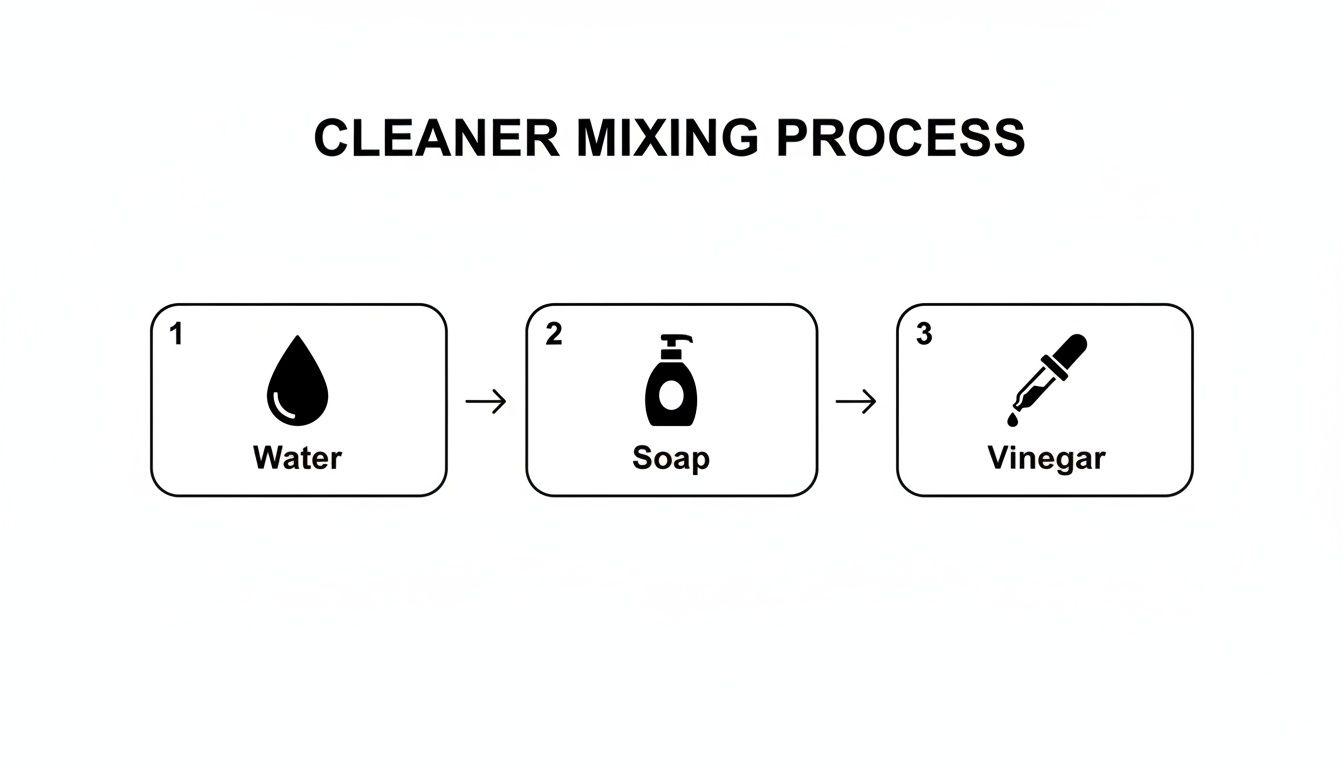
Mixing Your Go-To Window Cleaning Solution
Forget all those brightly colored sprays you see at the store. The real secret to a professional, streak-free shine isn’t in a fancy bottle. In my experience, most commercial cleaners are loaded with chemicals that can leave a sticky film on the glass, which ironically just attracts more dust and dirt.
The best approach is almost always simpler and way cheaper. You can whip up a fantastic cleaning solution with a couple of things you probably already have in your kitchen. The goal is to create a mix with enough "slip" for your squeegee to glide like a dream, but with just enough cleaning power to cut through the grime. It's a balance, but it's an easy one to get right.
The Pro’s Classic Formula
At its heart, the solution the pros use is incredibly basic. It's not about harsh chemicals; it's about lubricating the glass so your squeegee can do its job and whisk away all the dirt.
Here’s the recipe I’ve relied on for years:
- Start with distilled water. Pour about a gallon into a clean bucket. This is a game-changer. Tap water is full of minerals that leave behind chalky white spots when they dry. Distilled water has none of that, which is a huge step toward a perfect finish.
- Add a touch of dish soap. You only need a few drops—seriously, no more than a teaspoon—of a good liquid dish soap. I'm a fan of original Dawn because its grease-cutting power is phenomenal for lifting oily fingerprints and everyday grime.
- Toss in some white vinegar (if you need it). Dealing with stubborn hard water stains or windows that haven't been cleaned in ages? Add about one cup of plain white vinegar to your gallon of water. The mild acid is a champ at dissolving those tough mineral deposits.
This mix is so effective because every ingredient plays a crucial part. The water is your base, the soap gives you that essential glide and lifts dirt off the surface, and the vinegar acts as a gentle solvent for the really stubborn stuff. If you want to get more advanced, we've got a whole breakdown of different recipes in our guide to DIY window cleaning solutions.
The #1 Mistake to Avoid
If I could point to one thing that trips people up, it's going overboard with the soap. It’s so tempting to think more suds equal more cleaning power, but it's actually the opposite. Too much soap is the primary culprit behind those frustrating streaks.
You're not looking for a bucket overflowing with foam. You just want the water to feel slightly slick.
Here's a quick test: dip your fingers in the solution and rub them together. It should feel slightly slippery, but not foamy. If you scrub a window and it looks like a bubble bath, you've definitely used too much soap.
An Alternative Mix for Special Cases
While the classic soap-and-water formula is my go-to for 99% of jobs, sometimes you need a different tool for the task. Maybe you can't stand the smell of vinegar, or you're just doing some quick spot-cleaning inside.
For those times, here's an excellent ammonia-free alternative you can mix in a spray bottle:
- 1 cup of isopropyl (rubbing) alcohol
- 1 cup of water
- 1 tablespoon of white vinegar
The alcohol is the key here—it helps the solution evaporate super fast. This makes it a fantastic choice for cleaning on cooler or more humid days when water is slow to dry. It's also perfect for touch-ups on interior glass and mirrors when you don't want to haul out the whole bucket and squeegee. It's all about picking the right mix for the job at hand.
Mastering Professional Squeegee Techniques
This is where the magic really happens. The squeegee is your most important tool, and learning how to handle it is what separates a frustrating, streaky mess from a flawless, professional finish. It’s not about speed; it's about building smooth, consistent muscle memory.
Before your squeegee even touches the glass, a good scrub sets the stage. Grab your scrubber and apply your cleaning solution generously across the whole window. Don't be shy here. You want the glass thoroughly lubricated to lift every speck of dirt, paying extra attention to the edges and corners where grime loves to accumulate.
The goal is to agitate all that dirt, pollen, and fingerprints, suspending it all in the soapy water. This makes sure that when you make your pass with the squeegee, you're actually pulling everything off the glass, not just pushing it around.
The Art of the S-Method
For larger panes of glass, the "S-Method" (sometimes called the snake or fanning method) is the gold standard for pros. This technique lets you clean an entire window in one continuous, fluid motion, which is the secret to preventing streaks and lap marks. It'll probably feel awkward at first, but stick with it. It quickly becomes second nature.
First things first, you need to create a "dry edge." Take a clean microfiber towel and wipe a narrow, one-inch strip down one side of the window, from top to bottom. This gives your squeegee a dry place to start and stops water from seeping out from the edge and causing runs.
Now, place your squeegee blade in that dry strip at the top corner. Angle it slightly so only about a quarter-inch of the rubber touches the top frame. As you pull the squeegee across the top of the window, gradually flatten it out. Getting this initial move right is crucial for a clean start.
Once you reach the other side, pivot the squeegee down and start pulling it back in the opposite direction. The trick is to overlap your previous stroke by about one inch. This overlap is non-negotiable; it’s what keeps you from leaving those annoying thin lines of dirty water behind. Keep this back-and-forth "S" pattern going all the way down the window, maintaining a consistent angle and light pressure.
The diagram below illustrates the simple mix that creates the perfect slip for your squeegee, which you'll need before any of this work begins.
Straight Pulls for Smaller Panes
Not every window is big enough for the full S-Method. For smaller panes, like the ones in French doors or colonial-style windows, a series of simple straight pulls is often quicker and cleaner. The same basic rules apply, just on a smaller scale.
Here’s the breakdown for a perfect straight pull:
- Angle Your Blade: Start at the very top of the pane, tilting your squeegee at about a 45-degree angle.
- Pull Down Smoothly: In one steady motion, draw the squeegee straight down from top to bottom. Don't push hard; let the tool do the work.
- Wipe the Blade: This is the step people always forget. After every single pull, wipe the rubber blade clean with a dedicated microfiber towel. If you skip this, you will drag a line of dirty water across the glass on your next pass. Guaranteed.
- Overlap Your Strokes: Position your squeegee for the next pull, overlapping the clean, dry area by about an inch. Repeat this across the entire pane.
"A consistent angle, a slight overlap, and a clean blade after every single stroke—that's the entire secret. It's not complicated, but it demands focus. Nail those three things, and you'll get perfect, streak-free results every time."
Finishing Touches for a Perfect Job
Once the main glass is clean, the final detailing is what makes the work look truly professional. Even with the best technique, you'll probably have a little bit of water left along the edges of the window pane.
Use a separate, completely dry, and lint-free microfiber towel to carefully wipe around the perimeter of the glass. This is often called "cutting the edges." A quick, precise wipe soaks up any remaining moisture and stops drips from forming later on.
Finally, take a second to wipe down the window sill and frame. A sparkling clean window sitting above a dirty, water-spotted sill just looks unfinished. This last step takes only a moment but leaves the entire window area looking immaculate, elevating your work from a chore to a craft.
Handling Tough Stains and Tricky Windows
Mastering your squeegee technique is a huge part of the job, but let's be honest, the real world always throws a few curveballs. Every home has those problem spots—stubborn gunk that just won’t budge, or tricky window designs that make cleaning feel like solving a puzzle. This is where a little extra knowledge separates a decent result from a truly professional one.
The good news is that tackling these challenges doesn't mean you have to reach for harsh chemicals or brute force. It’s all about using the right tools and a bit of finesse to safely lift away tough residues without harming the glass. From baked-on sap to stubborn mineral deposits, we’ll get into the specific methods for bringing back that perfect clarity.
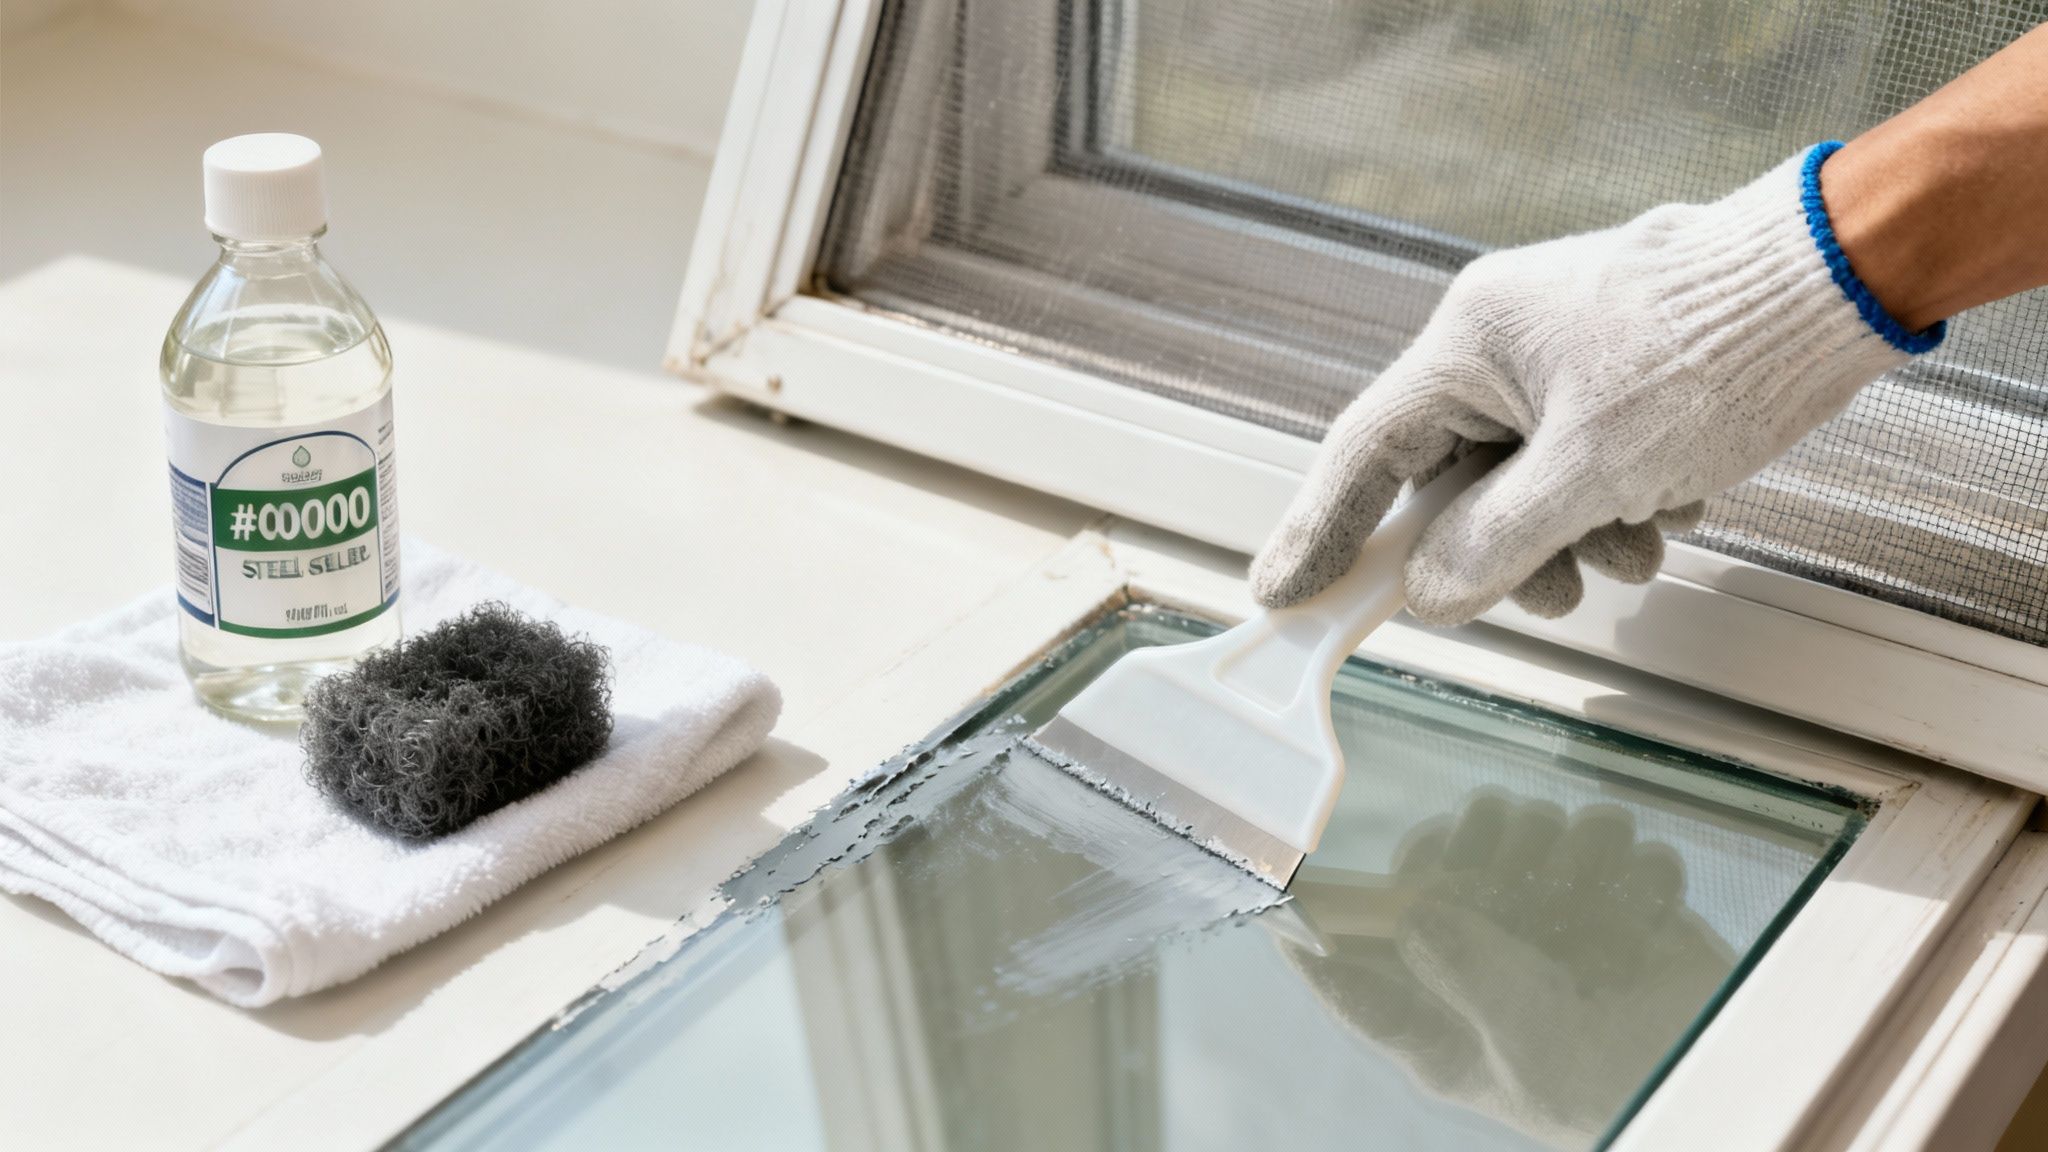
Removing Stubborn Gunk Safely
Sometimes, you’ll run into sticky stuff that just laughs at your standard cleaning solution. I'm talking about tree sap, bird droppings, leftover adhesive from old stickers, or even tiny flecks of paint overspray. These require a more targeted approach. The secret is to use a tool that's hard enough to remove the gunk but softer than the glass itself.
For this job, you really only need two things in your toolkit:
- A Plastic Scraper: This should always be your first line of defense. A simple plastic razor blade is perfect for gently lifting off larger blobs of sap or paint without putting the glass at risk.
- #0000 Steel Wool: For more widespread issues like a light haze of hard water or fine paint mist, super-fine #0000 (that’s quadruple-ought) grade steel wool is a pro’s secret weapon. It’s abrasive enough to scrub off contaminants but won’t scratch the glass surface. Crucially, never use any other grade of steel wool, as coarser types can absolutely cause damage.
Whenever you use these tools, always make sure you're working on a wet, soapy window. That lubrication is absolutely essential for preventing scratches. Just apply gentle, even pressure and let the tool do the heavy lifting for you.
Tackling Hard Water Stains
Hard water stains are those cloudy, chalky spots left behind by mineral-rich water—usually from a rogue sprinkler. These deposits can be incredibly stubborn, and if you let them sit for too long, they can permanently etch the glass. Your standard vinegar solution is a decent place to start, but for tougher cases, you need a specialized approach.
To really dig into this common problem, we’ve put together a full guide on this topic. You can learn more here: https://sparkletechwindowwashing.com/how-to-remove-hard-water-stains-from-windows/
And this isn't just some niche issue; it's a huge part of the cleaning industry. North America holds a dominant 36.8% share of the global cleaning services market, which is on track to hit USD 154.1 billion by 2025. This growth is fueled by high hygiene standards and the simple fact that more people are outsourcing home maintenance. Window washing is a key service in that market, especially in sunny areas where dust and hard water make it a constant battle for homes and businesses.
Cleaning Window Screens and Tracks
A sparkling window framed by a dirty screen and a grimy track just looks unfinished. Cleaning the screens is a critical step that so many people skip over, but a dirty screen will just dump dust and pollen back onto your clean glass the first time it rains.
For the screens:
- First, carefully pop the screen out of the window frame.
- If it’s just light dust, a quick pass with a dry brush or a vacuum’s soft brush attachment is often all you need.
- For heavier buildup, lay the screen on a clean, flat surface and gently scrub it with a soft brush and your soapy water solution.
- Rinse it thoroughly with a gentle spray from a hose and let it air dry completely before putting it back.
Don't forget the tracks! Use a stiff brush or a vacuum crevice tool to clear out all the loose dirt, dead bugs, and other debris from the window tracks and sills. A final wipe with a damp cloth makes a world of difference.
Managing Multi-Pane Windows
Cleaning colonial-style windows or French doors with all those small, individual panes can feel pretty tedious. The key here is to simply adapt your tools to the job. Ditch the large squeegee and grab a smaller one that fits comfortably inside each pane.
Using a smaller squeegee lets you make clean, straight pulls on each section of glass, following the same rules of wiping the blade and overlapping your strokes. Sure, it might take a bit more time, but this methodical approach gives you that crisp, clean finish without smudging the mullions.
While we're focused on traditional windows, these cleaning principles apply to other glass surfaces, too. For example, keeping solar panels clean is essential for their efficiency. If you're looking for information on related topics, you can find valuable insights in resources on solar panel maintenance. Learning to tackle these trickier jobs not only builds your confidence but really elevates the quality of your home maintenance.
Your Top Window Washing Questions Answered
Even after you’ve got the right tools and a solid game plan, a few questions always seem to pop up in the middle of a window washing project. Getting straight answers to these common hang-ups is often the last piece of the puzzle, helping you nail that perfect, streak-free finish every single time.
Let's dive into some of the most frequent questions I hear from homeowners.
How Often Should I Wash My Windows?
For most homes, washing your windows twice a year is a fantastic rule of thumb. A good spring cleaning clears away all the winter gunk, and another round in the fall gets them ready for the colder months ahead. This schedule keeps serious grime from building up and potentially damaging the glass.
But where you live really changes the game.
- City or High-Traffic Areas: Live near a busy road? You’ll see a film from exhaust and dust settle much faster. In that case, you might need to wash them quarterly.
- Wooded or Rural Settings: If your home is surrounded by trees, you’re dealing with a ton of pollen in the spring and sticky sap in the summer. This often calls for more frequent cleanings.
- Coastal Homes: That beautiful ocean view comes with salt spray, which can be corrosive over time. Homeowners on the coast should clean their windows more regularly to protect both the glass and the frames.
The real trick is to clean them before the buildup gets out of hand. Not only does this make the job way easier, but it also protects your glass from getting etched by hard water spots or other contaminants, which ultimately helps your windows last longer.
Can I Wash Windows in Direct Sunlight?
I see this all the time, and it's probably the most common mistake people make. You should always avoid washing windows that are baking in direct, hot sunlight. The heat from the sun makes your cleaning solution evaporate almost instantly.
When the solution dries that fast, it leaves behind soap scum and mineral deposits before you even have a chance to squeegee it off. The result? Guaranteed streaks and smudges. You end up in a frustrating loop of re-wetting and re-wiping the same spots over and over.
The absolute best time to wash windows is on a cool, overcast day. The cloud cover keeps the glass temperature down, giving you plenty of time to soap up, squeegee off, and detail the edges without racing against the sun.
If you have to work on a sunny day, you just need a little strategy. Start on the shady side of the house in the morning and simply follow the shade as it moves around your home. This one small adjustment will make a massive difference in your results and save you a ton of frustration.
What Is the Safest Way to Clean Second-Story Windows?
When you’re working up high, safety is everything. For second-story windows, the safest approach for a DIYer is using a sturdy extension ladder that's been set up correctly. And "correctly" is the most important word here.
First off, make sure your ladder is on solid, level ground—never on soft mud or an uneven patch of lawn. The angle is just as crucial for stability. A good rule to live by is the 4-to-1 rule: for every four feet of height you climb, the base of the ladder should be one foot away from the wall.
Always, always maintain three points of contact while on the ladder. That means two hands and one foot, or two feet and one hand. This is where a good tool belt or a bucket-on-a-belt system becomes a lifesaver, as it frees up your hands for climbing instead of juggling your tools.
But if you ever feel uncomfortable with heights or just aren't sure about your ladder placement, the answer is simple: call a fully insured professional. No clean window is worth a trip to the emergency room. The pros have the training and safety gear to get it done without any risk.
Why Are My Windows Still Streaky After Cleaning Them?
Ah, the dreaded streaks. You put in all that effort, and they're still there. It’s frustrating, but the cause is almost always one of a few simple things, and thankfully, they’re all easy to fix.
Here are the most common reasons you're seeing streaks:
- Too Much Soap: This is culprit number one. It's so tempting to think more suds equal more cleaning power, but too much soap leaves a sticky film on the glass. You only need a couple of small drops of dish soap in your bucket—just enough to give the water a slightly slippery feel.
- A Dirty or Damaged Squeegee Blade: A blade with a tiny nick, a worn-down edge, or caked-on grime can't make clean contact with the glass. It will drag thin lines of dirty water with every single pass. Always inspect your blade before you start, and get in the habit of wiping it with a clean cloth after every pull.
- Cleaning in Direct Sunlight: Like we just talked about, when the glass is hot, your cleaning solution dries too fast, leaving behind residue before you can squeegee it away.
Tackle these three things—use less soap, keep your squeegee blade pristine, and work in the shade—and you’ll eliminate nearly all of your streaking problems for good.
Getting that professional, crystal-clear result is incredibly satisfying, but it definitely takes the right approach and a bit of practice. If you'd rather leave it to the experts and guarantee a flawless shine every time, Sparkle Tech Window Washing is here to help. For a free estimate on our services throughout Arizona, visit us at https://sparkletechwindowwashing.com.