

A torn screen usually gets noticed at the worst time. You crack a window for fresh air, then spend the next hour chasing a fly around the kitchen. Or you look at the front of the house and see one loose, bowed screen making the whole window line look neglected.
Most homeowners start with the same question. Is this a quick fix, or do I need a whole new screen?
That’s the right question to ask first. Screens do more than block insects. They help you ventilate the house without inviting pests inside, and the right screen setup can also help reduce sun exposure on interior spaces. The trick is knowing when a simple repair will hold and when a patch only delays a replacement you’ll end up doing anyway.
Window screen repair and replacement looks simple from a distance. Up close, a lot of the result comes down to small details: frame condition, mesh type, spline fit, tension, and how much Arizona heat has already weakened the materials. Get those right, and the screen looks clean and stays tight. Get them wrong, and you get wrinkles, blowouts, or corners that start lifting not long after the job is done.
Your First Look at a Damaged Window Screen
The first inspection should be quick and honest.
Don’t start by shopping for mesh. Start by removing the screen and looking at it like a technician would. Set it on a flat surface. Check the corners. Press lightly on the frame. Look for tears, loose spline, brittle mesh, rust, or bends that stop the screen from sitting square.
A lot of people focus only on the hole because that’s the obvious problem. The hidden problem is often the condition of everything around it. A small tear in healthy mesh is one job. A small tear in sun-baked mesh inside a twisted frame is a different job entirely.
What to notice right away
- Damage pattern: One isolated puncture suggests a localized issue. Several weak spots usually mean the mesh has aged out.
- Frame shape: If the frame rocks on a flat table, it isn’t true anymore.
- Corner strength: Loose or separating corners often turn a simple re-mesh into a replacement.
- Mesh feel: Healthy screen has some resilience. Brittle screen feels dry, tired, and ready to split further.
A screen can look repairable from the window and still fail the bench test once it’s out of the opening.
In Phoenix and across Arizona, heat, dust, and UV wear screens faster than many homeowners expect. That climate reality matters because repair decisions shouldn’t be based on the visible hole alone. They should be based on whether the rest of the unit can still hold tension and stay seated after the work is done.
If you inspect the screen carefully before buying anything, most of the decision becomes clear. You’re either fixing usable parts, or you’re spending time on material that has already reached the end of its useful life.
Deciding Between Screen Repair and Full Replacement
This stage determines whether money is saved or wasted.
If the frame is still solid, repair is usually the better value. Minor fixes like re-meshing tears or replacing spline on an intact frame typically cost $15 to $50 per screen, while full replacement averages $316, and repair is the right choice for 70 to 80% of common residential issues when the frame remains structurally sound, according to Angi’s window screen cost guide.

Repair when the frame still does its job
Repair makes sense when the screen has a mesh problem, not a structural problem.
That includes a torn panel, loose spline, or a screen that has pulled free while the frame itself is still square and the corners are holding. If the frame sits properly in the window and the mesh is the only failed component, re-meshing is usually the cleanest move.
A patch can work for very small isolated damage, but it has limits. Industry guidance notes that no patch restores full structural integrity the way a new panel does, even though heat-activated patch methods can hold up well on small holes when done correctly.
Replace when the frame has become the problem
Replacement is the better call when the frame is bent, cracked, corroded, or missing components.
If a screen won’t sit flush in the opening, the issue isn’t just cosmetic. A warped frame changes how the screen seals and how well it stays in place. Once corners loosen, rails bow, or corrosion starts affecting the frame body, reusing that frame often creates more frustration than savings.
Arizona homeowners run into this more often than people in milder climates. Heat cycles punish both mesh and frame tension. A screen that looks “close enough” on the workbench can become a rattle, gap, or pop-out once it goes back into a hot window opening.
Use this field-test framework
Before you decide, check these four things:
- Mesh condition: If the mesh is torn but still flexible overall, repair is usually worth it.
- Frame integrity: If the frame is bent enough that it won’t sit flat or seat correctly, replace it.
- Corner condition: If the corners are loose or separating, treat the unit as suspect.
- Fit in the window: If the screen already fits poorly, new mesh won’t fix that.
Practical rule: If new mesh would be going into a frame you don’t trust, skip the repair and replace the unit.
Material choice affects the decision
Not all replacement or repair work uses the same screen cloth. The material changes durability, visibility, and how forgiving the install will be.
For a fuller breakdown of common options, see this guide to window screen material types.
Here’s the practical version.
| Window Screen Material Comparison | Cost | Durability | Best For |
|---|---|---|---|
| Fiberglass | Lower installed cost range | Common and affordable | Standard residential windows |
| Aluminum | Mid-range installed cost | More rigid than fiberglass | Homeowners wanting a sturdier mesh |
| Stainless steel | Higher installed cost range | Strong and durable | Tougher applications |
| Copper or brass | Premium installed cost range | Chosen for appearance and longevity | Decorative or high-end projects |
Material pricing varies. Angi reports installed averages of $60 to $350 for fiberglass, $70 to $400 for aluminum, $60 to $480 for stainless steel, $100 to $900 for copper, and $120 to $980 for brass, all of which can push the repair-versus-replace decision in one direction or the other depending on what you already have and what you want next.
A patch is not the same as a repair
This distinction matters.
A patch covers a defect. A repair restores usable service when the surrounding screen and frame are still worth keeping. If the screen is brittle from sun exposure, a patch often just leaves you with one reinforced spot in a failing panel.
That’s why the best decision usually comes from looking at the whole unit, not the visible tear. Homeowners who make that shift tend to choose better the first time. They stop asking, “Can I save this hole?” and start asking, “Is this screen still worth building on?”
Gathering Your Tools and Screen Materials
A clean screen job starts before the old spline comes out. If your tools are wrong, your cut lines get ragged, your mesh shifts, and the frame takes damage that didn’t exist before.

Core tools for almost every screen job
Set up on a large, flat table or workbench. A screen frame twists easily if you work on an uneven surface.
Keep these basics nearby:
- Spline roller: This is the tool that matters most. It seats the spline without chewing up the mesh.
- Utility knife: Use a sharp blade. Dull blades drag and snag.
- Flat screwdriver or pick: Useful for lifting old spline out of the channel.
- Tape measure: Needed for mesh cuts and replacement planning.
- Clamps or a steady work surface: They help keep the frame from shifting during install.
If you want a more complete checklist before you start, this overview of window screen repair tools is a practical place to compare what’s necessary versus what’s optional.
Repair-only supplies versus replacement supplies
For a basic re-mesh, you mainly need new mesh and the correct spline.
For a full unit replacement, you may also need a new frame kit, corners, pull tabs, springs, or clips depending on the window style. Many DIY projects encounter difficulties at this point. Homeowners buy mesh and forget that hardware compatibility matters just as much as the fabric itself.
Choosing mesh by how the screen gets used
Fiberglass is the common default because it’s affordable and easy to work with. It’s also not the right answer for every house.
Homes with pets should pay attention here. Pet damage accounts for 25 to 35% of screen repair calls in sunny climates, and standard fiberglass often fails within a year against pet claws. By contrast, pet-resistant vinyl-coated polyester screen is up to 10 times more tear-resistant, can last over 10 years, and usually costs 20 to 50% more upfront, according to Statesville Glass.
That doesn’t mean every window needs pet screen. It means the windows your cat climbs or your dog presses against probably do.
Buy mesh based on the abuse that screen takes, not based on what’s cheapest on the shelf.
The spline matters more than most homeowners think
Spline is the flexible cord that locks the mesh into the frame groove. If it’s too small, the mesh won’t hold tension. If it’s too large, you can damage the frame channel or fight the install the whole way.
The safest move is to bring a piece of the old spline when buying replacement material. Match diameter and profile as closely as possible. If the old spline has hardened, flattened, or shrunk, replace it rather than trying to reuse it.
One practical note for local homeowners: Sparkle Tech Window Washing also handles rescreening and screen service, which is useful when you’ve got multiple damaged units or don’t want to sort through material matching yourself.
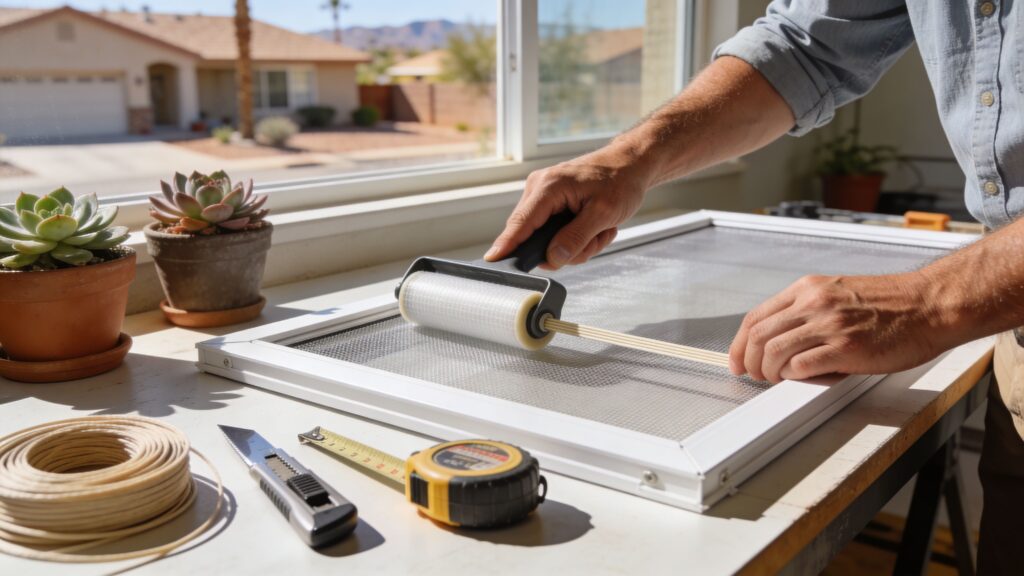
Your Step-by-Step Guide to Re-Meshing a Screen
You set the frame on a table, roll out fresh mesh, and expect a quick swap. Then the frame twists, the spline fights back, and a screen that looked simple starts showing ripples across the middle. That is normal. Re-meshing is manageable for a careful homeowner, but the finished result comes down to setup, tension control, and knowing when the old frame is no longer worth saving, especially in hot, dry climates where materials get brittle faster.
Start with a flat work surface, good light, and enough room to support the entire frame.

Removing the old mesh without damaging the frame
Pull the old spline from a corner with a pick or small screwdriver. Work slowly. If you gouge the groove, the new spline may never sit evenly again.
Once the spline is out, peel off the mesh and clean the channel thoroughly. Dust, oxidized rubber, and stray fibers all interfere with the new install. I usually run a dry brush through the groove first, then wipe the frame so I can spot cracks, bent corners, or corrosion that were hidden under the old screen.
Give the frame one more inspection before you commit new material. A slightly bowed frame can sometimes be reused. A twisted or cracked one usually turns a simple rescreen into a frustrating redo.
Laying out the new mesh
Cut the new mesh larger than the frame on all sides. Extra material gives you control while you set tension. Cutting too close at the start is one of the fastest ways to end up with pullout at the corners.
Lay the mesh over the frame and smooth it lightly with your hand so it sits flat. Do not stretch it hard yet, and do not press it down into the groove with your fingers. Let the roller and spline do that work in order.
If you want a side-by-side look at tool handling and mesh placement, this guide on how to replace window screen mesh is useful for comparing a serviceable DIY result with a cleaner, more consistent finish.
Setting tension the right way
This part decides whether the screen looks professional or homemade.
Start on one long side and roll the spline in a few inches at a time. Move to the opposite long side next and pull only enough to remove slack. Then install the shorter sides. That sequence helps keep tension balanced across the panel instead of dragging the mesh off-square.
A few habits make a big difference:
- Support the full frame: If part of the frame hangs off the table, it can flex while you roll.
- Keep tension moderate: The mesh should lie flat, not stretched to the point that the frame bows.
- Seat spline in short passes: Slow, controlled pressure works better than forcing long runs at once.
- Watch the corners closely: Corners are where wrinkles and loose spots usually start.
Common failure points are easy to recognize once you know what to look for. Overpulling one side creates diagonal waves. Uneven roller pressure leaves sections of spline proud of the groove. Trying to fix wrinkles only after the whole screen is installed rarely works. The correction usually means backing up and resetting one side properly.
A good screen looks flat and even. It does not need extreme tension to do its job.
If you are deciding whether a small defect needs patching or a full remesh, this guide on how to repair minor window screen holes helps clarify where spot repairs make sense and where they stop being worth the effort.
A quick visual helps here:
Trimming without causing future failure
Trim the extra mesh only after the spline is fully seated. Use a sharp utility knife and cut along the outside edge of the spline channel with light, controlled passes. A dull blade snags fibers and leaves a ragged edge.
Do not shave the mesh too tight to the spline. Leave a clean, supported edge. In Arizona and other high-heat areas, brittle mesh and dried-out spline already have less forgiveness, so sloppy trimming shortens the life of an otherwise decent install.
Final checks before reinstalling
Hold the screen up at eye level before putting it back in the window. The flaws show up faster that way than they do flat on a table.
Check for:
- Straight sight lines: No ripples across the field
- Even spline seating: No raised sections or loose corners
- Clean edges: No frayed strands hanging past the frame
- Square frame shape: No twist introduced during the install
If one side is loose, pull that section back out and redo it right away. Fresh mesh is forgiving. Once the screen has been handled, stored, or reinstalled, small mistakes are harder to correct cleanly.
That hidden complexity is why professional screen service still has value. The mesh swap itself is not the hard part. Matching material to climate, keeping old frames square, and getting consistent tension across multiple screens is where experience saves time and waste.
The Complete Process for Full Screen Frame Replacement
Replacing the whole unit is a different job from re-meshing. You’re not just changing fabric. You’re making sure a complete screen assembly fits the opening, seats correctly, and removes easily for future cleaning.
That starts with measurement.
Measure the opening and the old screen carefully
If the old screen fits properly, use it as your baseline. Measure width and height from frame edge to frame edge, not just the visible mesh area.
If the old screen is missing or badly warped, measure the actual window opening where the screen sits. Measure more than once. A small measuring mistake can leave you with a screen that rattles, binds, or won’t install at all.
Take note of hardware, too. Springs, pull tabs, plungers, clips, and corner styles all affect compatibility.
Decide between standard and custom sizing
Some homes use common screen sizes that are easy to source. Others don’t.
Older homes, remodels, and certain builder-grade windows often need custom sizing or specific hardware placement. That’s why buying by rough visual estimate rarely works. Screens aren’t forgiving if they’re off.
The cost range reflects that variation. The average cost to replace a window screen in major U.S. markets in 2025 to 2026 ranges from $147 to $522 per screen, with a national average of about $321, driven by screen size, material choice, and labor rates, according to HomeAdvisor’s window screen installation cost data.

Install hardware that matches the window style
The hardware isn’t an accessory. It’s part of the fit.
Common pieces include:
- Tension springs: These compress during install and hold the screen snug in place.
- Pull tabs: These let you remove the screen without prying on the frame.
- Clips or retainers: These keep exterior-mounted screens secure.
- Plungers or specialty latches: Used on some custom or older window systems.
Match the replacement hardware to the original setup whenever possible. Mixing styles can create fit issues even when the frame dimensions are correct.
Test fit before calling it done
Install the new screen gently and check all edges.
You want a screen that seats fully, sits flat, and removes without forcing. If one corner won’t settle, don’t bend the frame to make it fit. Pull it back out and verify the measurements, hardware placement, and frame squareness.
Full replacement goes smoothly when the measuring is slow and the install is gentle. Most failures happen because someone tries to “make it work” after ordering the wrong size.
For many homeowners, replacement is less about skill than patience. If the screen is standard-sized and the hardware matches, the work is manageable. If the opening is unusual, the windows are high, or the frame style is uncommon, that’s when professional help becomes the simpler route.
When Your DIY Project Needs a Professional Touch
DIY screen work is satisfying when the screen cooperates. It’s frustrating when the frame is bowed, the corners are loose, or the window sits on a second story where one wrong move turns a small repair into a safety problem.
The most common problems show up fast. The mesh won’t stay square. The spline pops back out. The frame twists while you’re rolling. Or the screen goes back into the window and still doesn’t sit right.
Problems that usually mean stop and reassess
Some issues can be corrected with a redo. Others are signs that the project has moved beyond basic DIY.
Call a pause if you run into any of these:
- A bowed frame: New mesh won’t straighten a distorted frame.
- Repeated spline failure: That often points to the wrong spline or a damaged channel.
- Oversized or unusual screens: Large screens are harder to tension evenly.
- High or hard-to-access windows: The install risk matters as much as the repair itself.
- Sliding screen doors or custom assemblies: These usually involve more alignment and hardware issues than a standard window screen.
If you want a sense of what professional handling typically includes, this overview of professional window screen repair services is a useful reference point for comparing DIY effort against outside help.
Arizona conditions change the value equation
In harsh climates, a decent-looking but weakened screen doesn’t stay decent for long.
Heat, dust, and UV wear expose every weak point. A borderline frame becomes a failed frame faster. A loose corner works itself looser. A screen that might survive in a mild climate can become a repeat problem after one Arizona summer.
That’s one reason insured and bonded local help matters on more involved jobs. A technician who works in the Phoenix valley sees the same failure patterns over and over and can spot when a repair will hold versus when it’s just buying a little time.
Home sale timing is one of the most overlooked reasons to fix screens
Screen work often gets pushed down the list until a home is about to be shown, photographed, or inspected.
That’s late, but it’s common. During home sales, inspectors often flag missing or damaged screens, and they appear in up to 20 to 30% of inspection reports in markets like Phoenix, AZ, according to Whitt Inspections. Sellers aren’t always required to fix them, but handling them early can avoid needless negotiation friction and improve curb appeal.
That matters because screens communicate upkeep. Buyers notice the obvious tear on the front elevation. Inspectors note missing units. Small screen issues can make the rest of the window package look less maintained than it is.
When hiring out is the smart move
A professional is usually the better choice when the job involves height, custom sizing, multiple damaged screens, or uncertainty about whether to repair or replace.
That doesn’t mean DIY failed. It means you recognized the point where experience saves time and prevents rework. For homeowners in Arizona, especially around Phoenix, that’s often the smarter line to draw.
Frequently Asked Questions About Window Screens
Common homeowner questions
| FAQ Section | |
|---|---|
| Can I patch a hole instead of replacing the mesh? | Yes, if the damage is small and isolated. If the surrounding mesh is brittle, the patch usually becomes a temporary fix rather than a durable one. |
| How do I know if my frame is too damaged to reuse? | Set it on a flat surface and check for rocking, bowing, cracked corners, or corrosion. If it won’t sit true, re-meshing usually isn’t worth the effort. |
| Is fiberglass always the right choice? | No. Fiberglass is common and easy to handle, but homes with pets or heavy wear often benefit from stronger specialty mesh. |
| Should I reuse the old spline? | Only if it’s still flexible and matches the groove well. Hardened or flattened spline is a common cause of loose new mesh. |
| Why does my new screen look wavy after installation? | Uneven tension is the usual cause. The mesh was likely pulled harder on one side or the spline was seated inconsistently. |
| Do missing screens matter when selling a house? | They can. Missing or damaged screens often get noticed during the showing and inspection process, even when they aren’t a formal seller obligation. |
A good window screen repair and replacement decision usually comes down to one question. Are you restoring a solid screen, or trying to rescue a worn-out one? If the frame is sound and the mesh is the only issue, a careful re-mesh is often enough. If the structure is failing, replacement saves time, money, and repeat frustration.
If you’d rather have a local pro handle the measuring, rescreening, or full replacement, Sparkle Tech Window Washing provides window screen service in the Phoenix valley and across Arizona, including repair, rescreening, and replacement work for residential properties.