

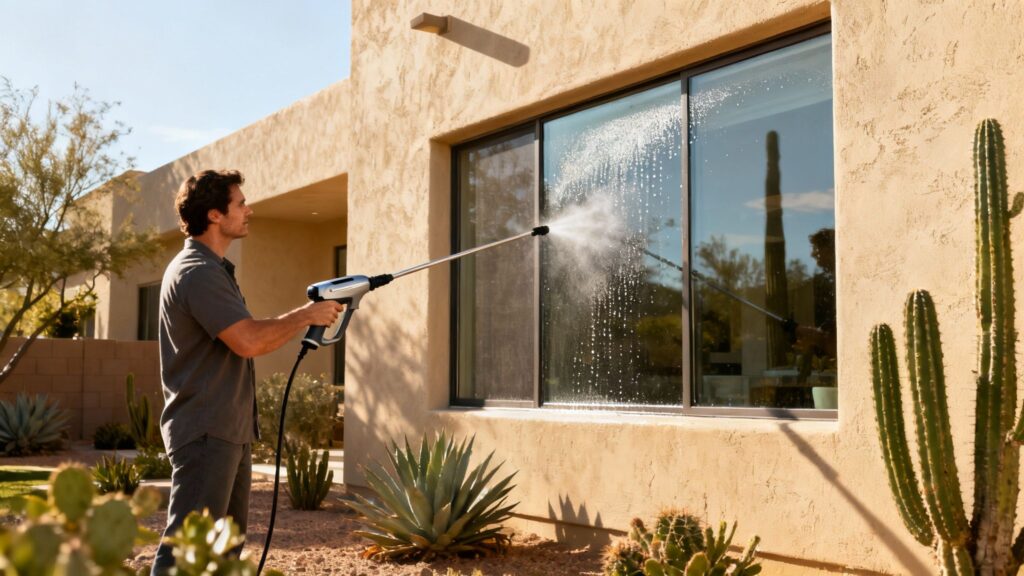
Yes, you absolutely can use a pressure washer to clean your windows, but there’s a critical catch: it's all about using low pressure, not a high-powered blast. The real goal is to gently rinse away the grime, transforming a tedious chore into a quick and satisfying job. It’s a game of finesse, not force.
Can You Pressure Wash Windows Without Breaking Them?
Let's tackle the biggest concern right away. The idea of pointing a pressure washer at glass conjures up images of shattered panes and flooded window sills. Those horror stories usually come from treating a delicate window like a grimy concrete driveway—a mistake that's easy to avoid.
When done correctly, pressure washer window cleaning is perfectly safe and incredibly effective. The whole secret lies in your pressure settings (PSI) and the nozzle you choose. A narrow nozzle concentrating a high-PSI jet can absolutely crack glass or blast water straight through your window seals. But when you switch to a wide-angle nozzle and dial down the pressure, the stream becomes a gentle, effective rinse that simply lifts away dirt and soap.
The Gentle Approach to a Powerful Tool
It helps to reframe the task. Think of it less as "pressure washing" and more like "power rinsing." You're just using the machine to efficiently deliver water and cleaning solution, especially to those tricky second-story windows that are a pain to reach.
Mastering this gentle technique is the key to getting a professional, streak-free shine without the risks. This is especially true here in Arizona, where the relentless sun can bake dust and grime onto glass, and our hard water leaves stubborn mineral spots if not rinsed away completely.
The objective is simple: use the lowest pressure setting that will still effectively rinse the surface. High pressure is not only a hazard to your windows but is almost always overkill for the kind of dirt you find on them.
As these machines have become more affordable, they've become a go-to for homeowners. In the United States, the pressure washer market was recently valued at USD 584 million, a number driven by people looking for efficient ways to handle tasks like window cleaning. It’s all about finding smarter ways to keep your home looking its best.
For those curious about market trends, you can find more data over at Grandview Research.
Preventing Damage Before You Start
A quick visual inspection of your windows is the single best thing you can do to prevent an accident. Older or damaged windows are much more susceptible to problems, so here’s what to look for before you even think about pulling the trigger:
- Cracked or Peeling Caulking: Any gaps around the window frame are an open invitation for water to seep into your walls, leading to much bigger issues down the road.
- Brittle Window Glazing: The putty that holds the glass in the frame can become old and fragile. Even low pressure can be enough to dislodge it.
- Fogging Between Panes: If you see condensation inside a double-paned window, its seal is already broken. A pressure washer can force more moisture inside and make the problem worse.
Being aware of these risks is crucial. The principles are similar to other delicate jobs, like the methods used for safely cleaning surfaces with low-pressure water. If you spot any of these red flags, your best bet is to switch to a hand-washing method or call in a professional.
For a deeper dive into the exact process, take a look at our complete guide on cleaning windows with a pressure washer.
Safe Window Cleaning At a Glance
To make things even clearer, here’s a quick-reference table with the essential settings and tools you'll need. Sticking to these recommendations will help you avoid the most common mistakes.
| Parameter | Safe Recommendation | Why It Matters |
|---|---|---|
| Pressure (PSI) | Under 1500 PSI | Prevents cracking glass, breaking seals, or damaging frames. |
| Nozzle Type | 25° (green) or 40° (white) tip | Creates a wide, fan-like spray that cleans gently without a concentrated blast. |
| Spray Distance | Maintain 2-3 feet | Reduces the force of the water hitting the glass, ensuring a soft rinse. |
| Spray Angle | 45° angle to the glass | Prevents water from being forced directly into seals and deflects the spray safely. |
This table covers the fundamentals. Following these guidelines is your best defense against accidental damage and the key to getting great results.
Selecting the Right Gear for a Perfect Clean
Jumping into pressure washing your windows without the right setup is a recipe for disaster. It's like trying to perform surgery with a butter knife—you're going to do more harm than good. Getting the equipment right from the start is absolutely essential for a safe, effective clean that protects your home's most fragile surfaces. Control is the name of the game here.
The first big choice you'll make is the pressure washer itself. While those heavy-duty gas models are fantastic for blasting grime off a concrete driveway, they're usually far too aggressive for windows.
For this job, an electric pressure washer is almost always the better choice. They operate at a lower, more controllable PSI (pounds per square inch), giving you the finesse you need to avoid shattering glass or blowing out window seals. These user-friendly machines are becoming incredibly popular, and it's easy to see why. The global pressure washer market was recently valued at USD 3.28 billion and is only expected to grow, as noted in a report from MarketsandMarkets.com.
Choosing Your Nozzles
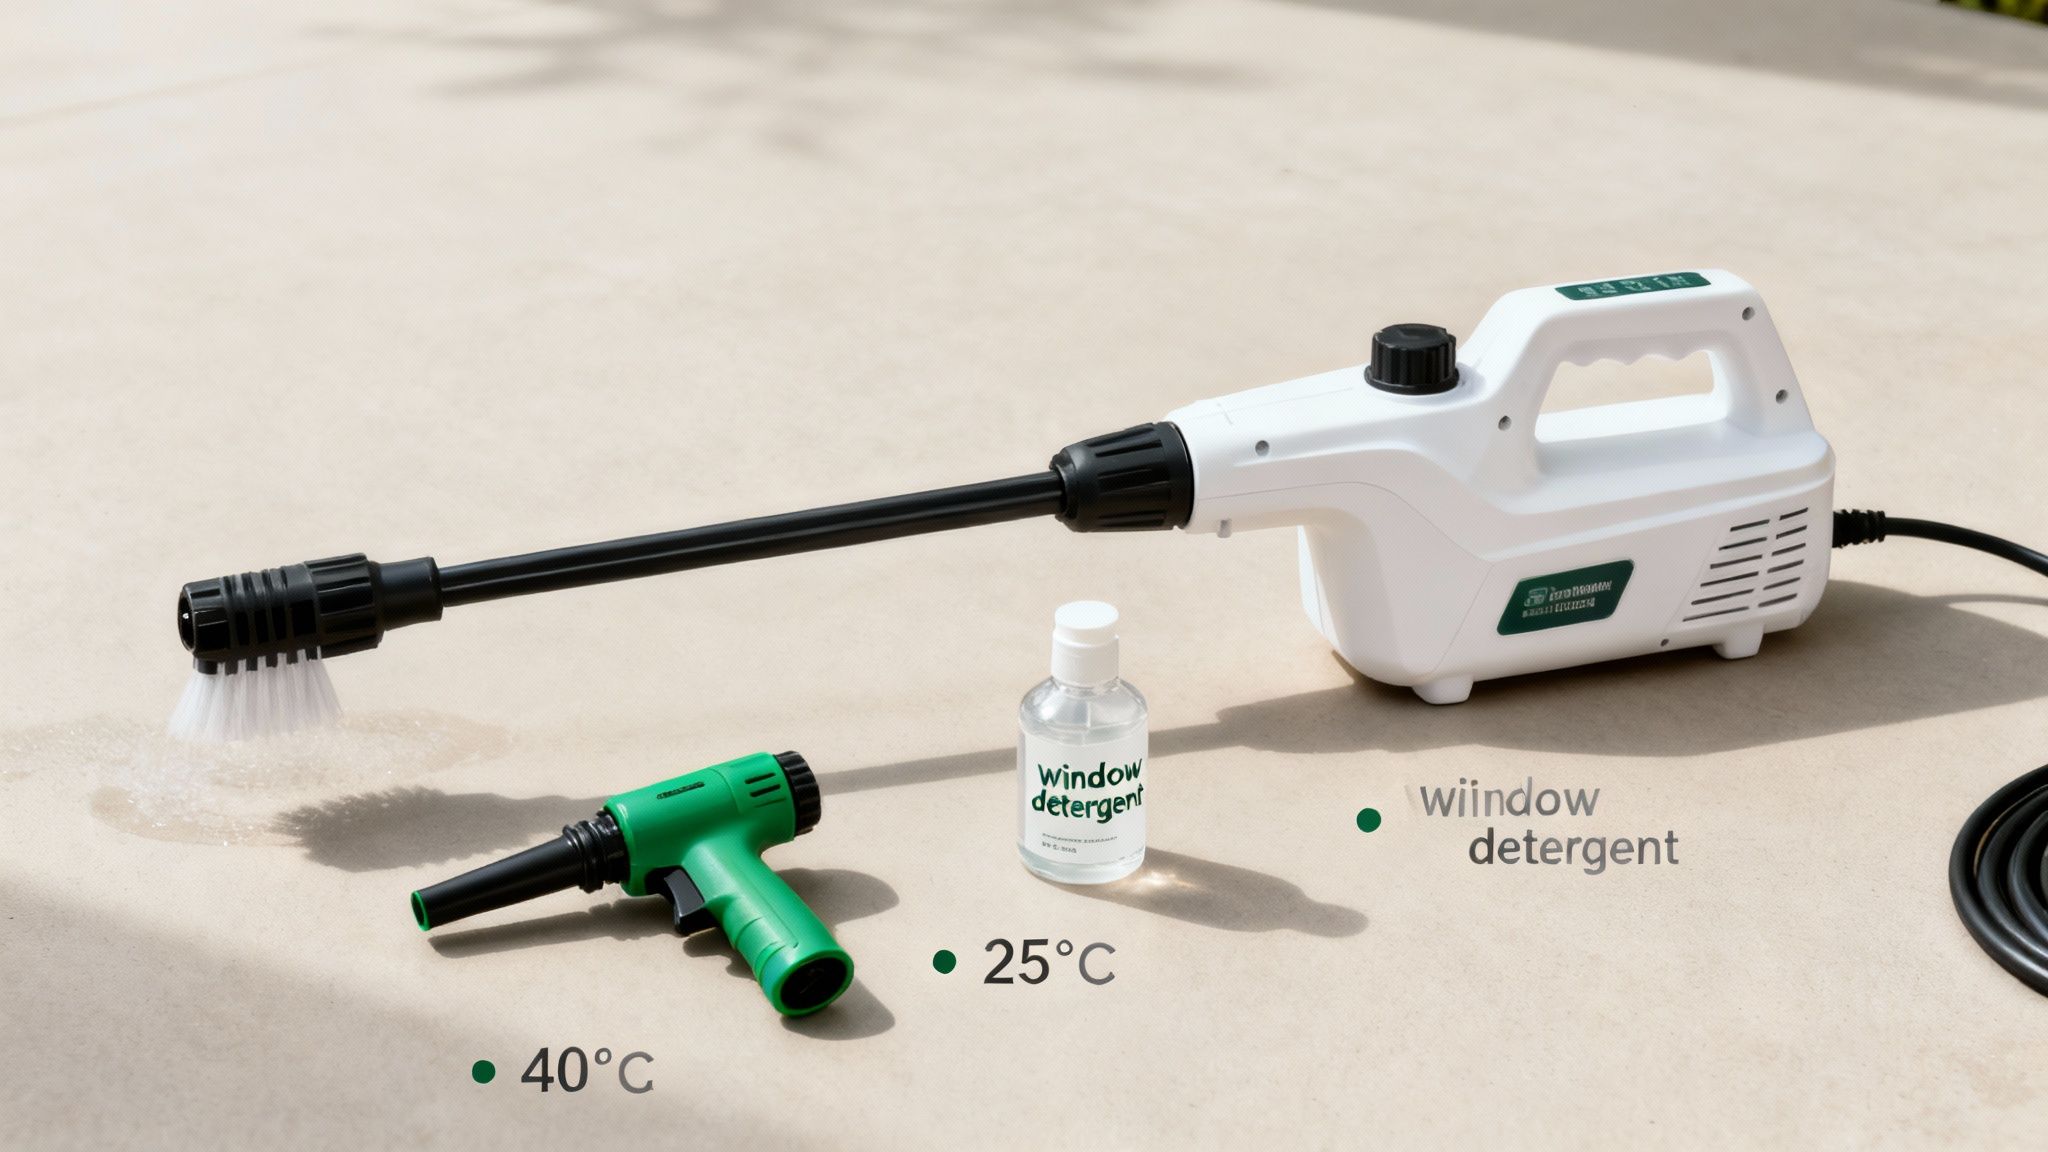
Once you have the machine, the next critical component is the nozzle tip. These small, color-coded attachments are what actually shape the water stream and determine its impact force. Picking the wrong one is hands-down the most common—and most expensive—mistake people make. For windows, you’ll stick exclusively to the gentlest options.
- White Nozzle (40-Degree): This will be your go-to tip. It produces a wide, fan-shaped spray that gently rinses away grime and soap without hammering the glass. It’s more like a firm shower than a high-pressure jet.
- Green Nozzle (25-Degree): This one offers a slightly more focused stream. It has its place for hitting stubborn gunk on window frames from a safe distance, but you have to be extremely careful if you aim it anywhere near the glass.
A Critical Warning: Never, ever use the red (0-degree) or yellow (15-degree) nozzles on or near your windows. Their pinpoint streams are powerful enough to etch glass, shred screens, and destroy seals in an instant. Just don't do it.
Essential Accessories for a Flawless Finish
Beyond the washer and nozzles, a few other pieces of gear will make your life much easier and your results much better. An extension wand is practically non-negotiable for reaching second-story windows safely from the ground, saving you from a precarious trip up a ladder. It helps you maintain the proper distance and angle for a consistent clean.
Finally, let’s talk cleaning solutions. Put the dish soap back under the sink—it leaves behind a sticky residue that becomes a magnet for Arizona dust. You need a specialized, free-rinsing window cleaning detergent made specifically for pressure washers. These formulas are designed to dissolve dirt and then rinse away completely, which is the secret to avoiding spots and streaks in our bright sunshine.
To dive deeper into the tools of the trade, feel free to browse our guide on the best window cleaning tools. Taking the time to select the right gear is what separates a sparkling, professional-looking result from a costly mistake.
Getting Your Home Ready for a Safe Wash
Any pro will tell you that a great pressure washing job starts long before you ever pull the trigger. Honestly, this prep work is your best insurance policy against water damage, broken decor, and other costly accidents. Spending just fifteen or twenty minutes securing the area can make the difference between a smooth, successful project and a complete headache.
This isn't just about moving a few flower pots out of the way. It's about systematically creating a safe zone around your home, ensuring the only thing getting a deep clean is the glass and frames—not your living room carpet.
Lock Down the Interior and Exterior
First things first, do a full walk-around of your house and make sure every single window and door is shut tight. And I mean close and lock everything. Locking the window actually pulls the sash tighter into the frame, creating a much better seal against the high-pressure spray. It sounds basic, but you'd be surprised how easily a slightly cracked-open window can let in a gallon of water before you even notice.
Once the inside is secure, focus on the outside. Anything that could be damaged by a blast of water or get tangled in the pressure washer hose needs to be moved well out of the way.
- Patio Furniture: Get those chairs, tables, and especially the cushions moved to a dry spot.
- Grills & Decor: Pull them back at least 15-20 feet from the house.
- Potted Plants: Delicate plants and flowers can get shredded by the pressure, not to mention the detergent.
- Doormats: They’ll just turn into a soggy, muddy mess. Move them.
This is also the perfect time to pop out your window screens. You'll want to clean them separately anyway so they don't leave streaks on your sparkling clean glass. We have a great walkthrough on the best way to do that, so check out our guide on how to clean window screens before you start spraying.
Shield Vulnerable Spots
Some things on your house can't be moved, and these are often the most vulnerable. I'm talking about outdoor electrical outlets, security cameras, smart doorbells, and landscape lighting. Grab some heavy plastic sheeting and good painter's tape to create a completely waterproof seal around them. A few minutes of careful taping can save you from a short circuit or a fried piece of expensive tech.
Don't forget to look down. If you've got prized rose bushes or a vegetable garden right under the windows, lay down a plastic tarp. This will protect your plants from detergent runoff and the force of the overspray.
Finally, give the windows themselves a quick once-over. Are there any small cracks in the glass? Is the caulking around the frames peeling away? Are the seals looking brittle or damaged? Finding these issues before you start washing helps you avoid making them worse. If you spot a problem, you might decide to wash that specific window by hand instead. It’s a simple check that ensures your cleaning day goes off without a hitch.
Your Guide to a Streak-Free Washing Technique
With your gear ready and the area prepped, it's time to get down to business. This part is all about technique. A methodical approach is what separates a quick, sloppy rinse from that professional, streak-free shine everyone's after.
The first step is always applying your cleaning solution. For this, you’ll pop on the dedicated soap nozzle—it’s usually the black one. This special tip drops the pressure way down, which lets the machine’s injector system pull detergent from the tank and mix it with the water stream.
Applying Detergent the Right Way
Here's where a lot of people go wrong. The instinct is to start spraying from the top and work your way down, but for applying soap, you need to do the exact opposite. Start spraying at the bottom of the window and work your way up. Use smooth, overlapping horizontal passes.
So, why the counterintuitive method? If you start at the top, the soapy water runs down the dry, dirty glass, creating little "rivers." If that soap starts to dry in those patterns, it's a nightmare to rinse off evenly, and you're pretty much guaranteed a streaky mess. By starting at the bottom, you get the whole surface wet at once, preventing any part from drying out before you're done.
The Critical Rinsing Process
Once the windows are completely covered in soap, give it a few minutes to work its magic and break down all that Arizona dust and grime. But—and this is a big one—never let the detergent dry. The sun here can bake it on in no time.
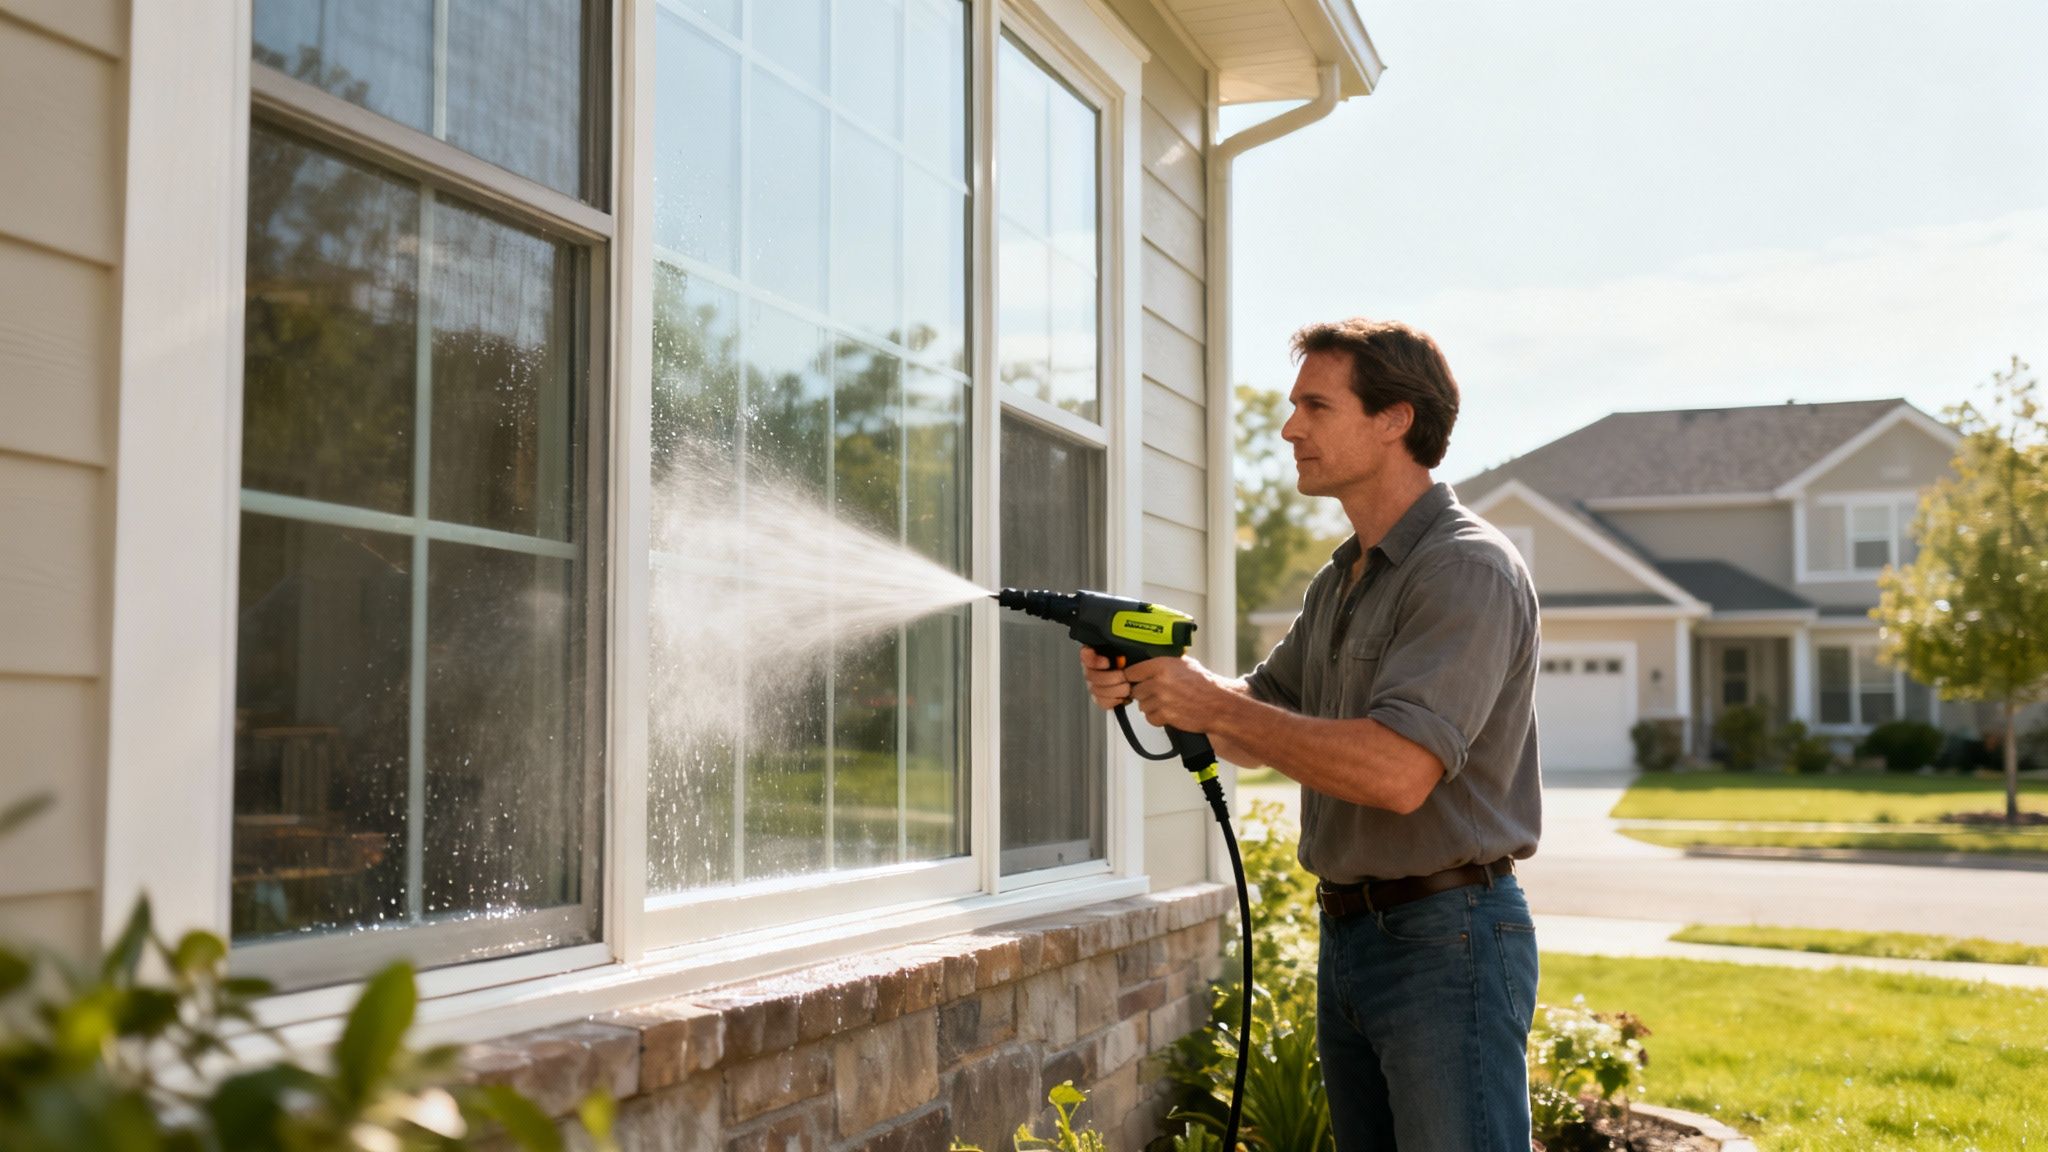
Now for the most important part of the job: the rinse. Switch out that black soap nozzle for your white 40-degree tip. This is where you create that perfect, spotless finish.
- Keep Your Distance: You're not trying to blast the dirt off. Stand back at least three to four feet from the glass. This gives the water spray enough room to fan out, cleaning gently instead of hitting the window like a hammer.
- Angle the Wand: Never aim the nozzle straight at the window (a 90-degree angle). Always hold it at a 45-degree angle. This deflects the pressure and, crucially, keeps water from being forced into the window seals, which can cause leaks and serious damage over time.
- Top-Down rinsing: Now you can reverse the process. Start rinsing at the very top of the window frame, again using those steady, overlapping horizontal sweeps. Gravity becomes your best friend here, pulling all the dirt and soap down and away from the areas you've just cleaned.
This graphic lays out the simple prep work that prevents the biggest headaches before you even pull the trigger.
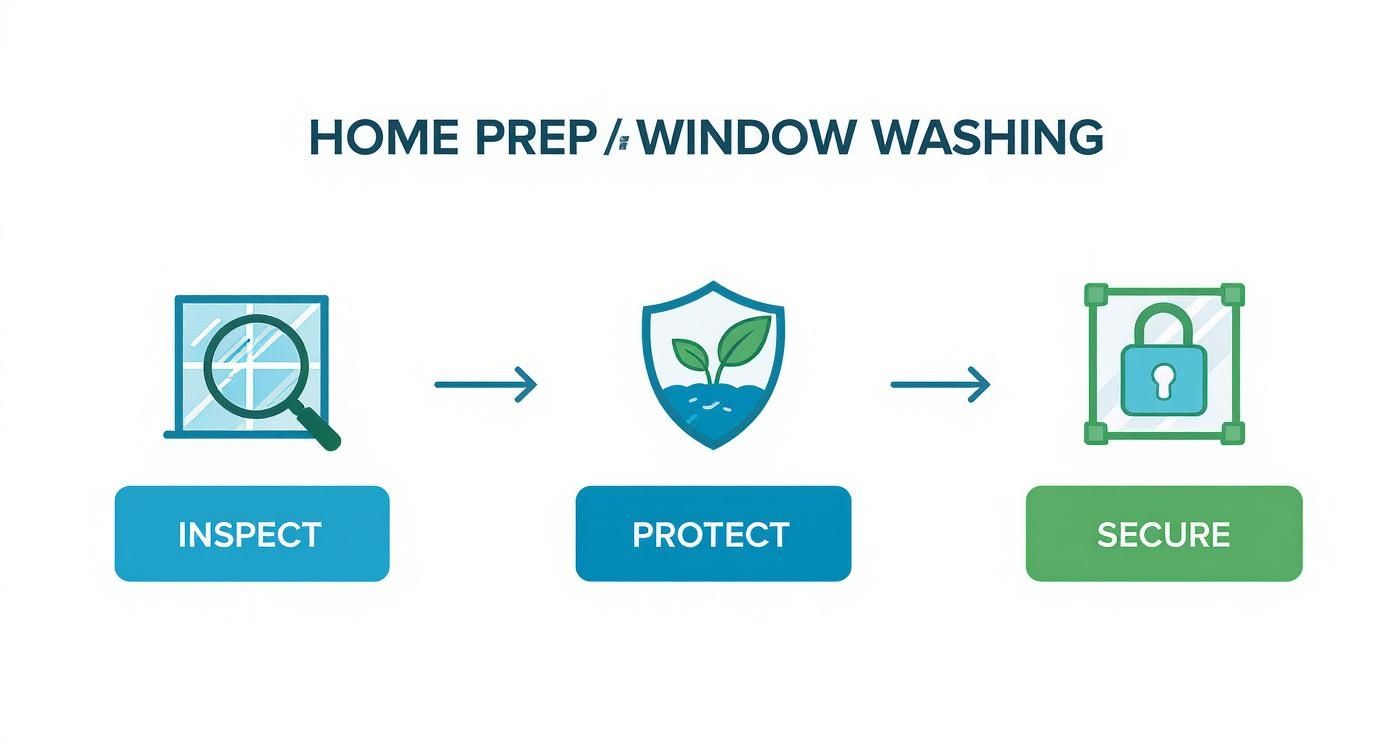
This quick flow—inspecting for damage, protecting your stuff, and securing the windows—is your best defense against common, costly mistakes.
A thorough rinse is absolutely non-negotiable. Leftover soap residue is the number one cause of streaks and spots. It acts like a magnet for new dust. Be meticulous here; rinse until you’re positive every last bit of detergent is gone. It’s always better to over-rinse than under-rinse.
Don't forget to rinse the surrounding frames and sills, too. Soap loves to hide in those little crevices and will drip down onto your perfectly clean glass later, undoing all your hard work. Stick to this bottom-up soaping and top-down rinsing method, and you'll get a flawless finish every time.
Solving Common Window Cleaning Problems
Even when you do everything right, you can still run into a few snags, especially with the kind of intense sun we get here in Arizona. Don't sweat it—most of these common issues are pretty easy to fix once you know what's causing them.
The number one complaint I hear? Those stubborn white spots that show up after everything dries. You’ve just spent all this time cleaning, and now the glass looks like it’s been dusted with chalk. That’s our notoriously hard water for you; the mineral deposits left behind cling to the glass and ruin a perfectly good job.
Tackling Hard Water and Mineral Buildup
Here’s a trick that works wonders for that mineral buildup. Before you even power up the washer, mix a 50/50 solution of plain white vinegar and water in a garden sprayer or spray bottle. Give the windows a good, thorough spray and let that solution sit for a few minutes. It'll start breaking down the minerals, making them much easier to wash away when you follow up with your detergent and rinse.
Another classic headache is streaking. This almost always comes down to two culprits: you either didn't get all the soap off, or the water is evaporating too quickly in the heat.
The secret to a streak-free finish is all in the rinse. You need to be meticulous. Rinse from the top down, and when you think you’re done, rinse it again. Any leftover soap will dry into a hazy, streaky film.
On a hot Arizona day, water can turn to vapor in seconds, leaving spots before it has a chance to run off. Try to work on the shady side of the house, or get your cleaning done early in the morning before the sun is beating down. For any windows you can reach, following up with a good-quality squeegee right after rinsing is the only surefire way to get a flawless, spot-free dry.
What to Do If You Spot a Leak
Now, sometimes a problem pops up while you're in the middle of the job. If you see water trickling in around a window frame as you're rinsing, stop immediately. That's a huge red flag that your window seal has failed. If you keep spraying, you’re just forcing water inside your walls, which is a recipe for a much more expensive problem down the road.
After you stop, let everything dry out. Then, get up close and inspect the caulking and seals around that window. Look for any visible cracks or gaps. Often, it’s a simple fix with a new bead of exterior caulk, but it’s definitely not something you can afford to ignore.
It's worth noting that the equipment itself is getting better and easier to use all the time. For instance, new battery-powered models, which recently made up 13.5% of global demand, are gaining popularity fast. As you can see in this pressure washer market analysis, this shift towards more controllable, user-friendly machines makes delicate jobs like window cleaning much more approachable for the average homeowner. Knowing how to handle these little hiccups means you can get that professional look with total confidence.
When to Call a Professional Window Cleaner
Taking on a window cleaning project with your pressure washer can be incredibly satisfying. But, as with any big home project, knowing when to put down the tools and call in an expert is just as important as knowing the right technique. Sometimes, it's simply the smartest and safest call to make.
The biggest factor? Height. If you have second or third-story windows, trying to manage a pressure washer wand while balanced on a ladder is asking for trouble. It's a genuine safety hazard. Pros have the specialized ladders, safety harnesses, and experience to work at heights without risking a fall or damaging your home.
Red Flags for a DIY Job
Beyond just a healthy fear of heights, certain types of windows just don't play well with pressurized water, no matter how careful you are. It’s time to find an expert if you're dealing with any of these situations:
- Older or Delicate Frames: Think twice before aiming a pressure washer at old wooden frames. The water can easily strip away paint, blast out old glazing putty, and cause the wood to swell. A pro will have gentler, more precise methods.
- Visibly Failing Seals: If you can see condensation or fogging between the panes of a double-pane window, the seal is already compromised. Hitting it with pressurized water is a surefire way to force moisture deep into the window unit and potentially into your wall cavity.
- Specialty or Coated Glass: Many modern windows have special low-E coatings or tints to help with that Arizona sun. These can be surprisingly easy to scratch or damage with the wrong technique or cleaning solution.
The Professional Advantage
It's not just about avoiding disaster; professional window cleaners bring an entirely different level of quality to the job. They're using commercial-grade tools and, more importantly, have access to a game-changing piece of equipment: water purification systems.
A professional's secret weapon is often a deionization or reverse osmosis system. This technology removes all the minerals from the water, meaning your windows can air dry to a perfectly clear, spot-free finish—something nearly impossible to achieve with Arizona's hard tap water.
When you start looking for a service, pay attention to their online presence. It often reflects their overall work ethic and attention to detail. It helps to know the common website mistakes contractors make, because a professional, easy-to-use site is often a good sign. In the end, it’s about weighing the DIY satisfaction against the guaranteed, risk-free results a pro can deliver.
Got a Few More Questions? We've Got Answers
Even with the best instructions, you're bound to have a few questions when you're trying something new—especially when it involves something as delicate as glass. That's perfectly normal. Let's tackle some of the most common things we get asked by homeowners here in Arizona.
What's the Absolute Highest PSI I Can Safely Use on Glass?
This is a big one, and the answer is critical. You should never exceed 1200 PSI on residential windows, period.
Honestly, we recommend staying in the 800-1000 PSI range to give yourself a nice safety buffer. Always, and I mean always, start with the lowest pressure setting and your widest nozzle—usually the 40-degree white tip. The whole point is to gently rinse the dirt away, not to sandblast your windows into oblivion.
Can I Just Squirt Some Dish Soap in There?
We hear this all the time. It seems like a simple hack, but trust me, it’s a bad idea. Dish soap is engineered to create tons of suds, which makes it incredibly difficult to rinse off completely.
You’ll almost always be left with a sticky, hazy film that attracts every speck of dust in the air. A few days later, your windows will look worse than when you started. Do yourself a favor and stick with a proper pressure washer detergent designed to rinse clean.
How Do I Deal With That Thick Layer of Arizona Dust?
After a big haboob rolls through, it’s tempting to just crank up the pressure to cut through the grime. Don't do it. There's a much better way that doesn't risk your glass.
The secret is adding a pre-rinse to your routine:
- First, give the window a very gentle, low-pressure rinse with just plain water. This will knock off the heaviest layer of dust and grit.
- Then, apply your cleaning solution and just let it sit for a few minutes. Give it time to work its magic and break down the stubborn grime.
- Finally, do your normal top-to-bottom rinse to get everything sparkling. A little patience will always give you better—and safer—results than brute force.
Quick pro-tip for a truly flawless finish: don't let the windows air dry. Our hard Arizona water will leave mineral spots every time. If you can reach them, a quick once-over with a good quality squeegee is the difference between "clean" and "invisible."
Of course, if you'd rather get that professional, streak-free shine without all the hassle, you can always trust the experts at Sparkle Tech Window Washing. Schedule your service with us today and see the difference for yourself.