

A torn screen always seems to show up at the wrong time. In Phoenix, it might be the day you notice guests can see the faded mesh from the patio, or the morning a monsoon gust pushes dust through a loose corner and reminds you that “close enough” was never going to hold.
Most homeowners can measure a screen opening themselves. The catch is that window screens are not forgiving. A frame that is a hair too big binds in the channel. One that is too small rattles, bows, or never seats correctly in the first place. Arizona sun makes that even less forgiving because older frames and tracks tend to show every little warp, bend, and dry-brittle edge.
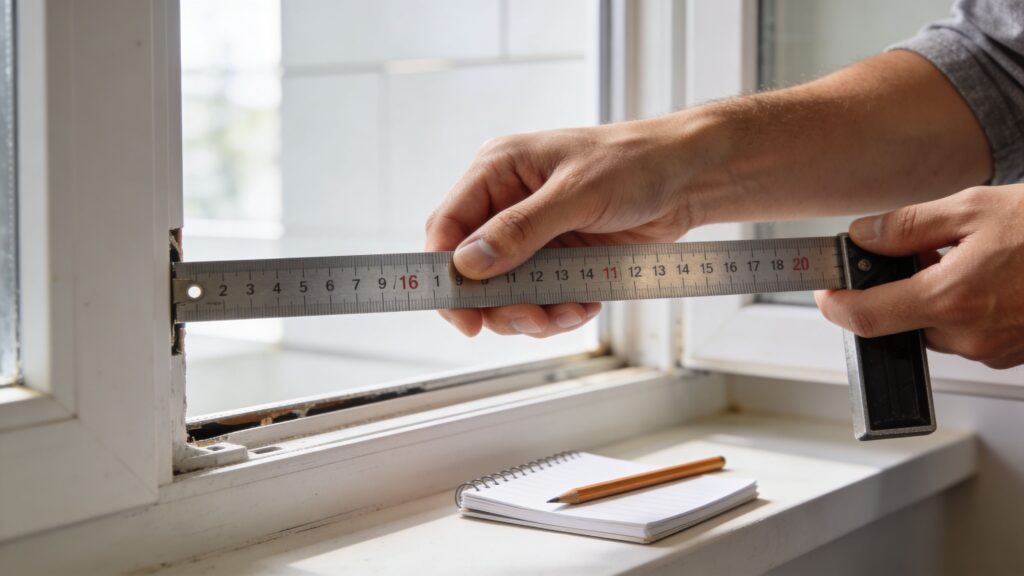
If you want to know how to measure window screen size the way a pro would, the job comes down to three things: use the right tools, measure the opening instead of the old screen, and record everything carefully. That is what separates a quick guess from a screen that fits.
A Perfect Fit Starts With a Perfect Measurement
A lot of screen problems start with a very normal homeowner assumption. The old screen came out, so the old screen must be the size to copy. In practice, that is one of the fastest ways to order the wrong replacement.
Old frames get bent. Corners loosen. Pull tabs break. In Arizona, strong sun and dust wear can make a screen look square when it is not. If you measure a tired old frame instead of the opening itself, you can end up chasing the old problem into the new order.
That is why pros measure the window opening and channel, not just the screen sitting in your garage. The process is precise, but it is manageable when you slow down and work in fractions instead of rough estimates.
There is a reason this precision has been around for so long. The principles behind screen measuring, including tolerances down to 1/16 inch, go back to the 1920s with mass-produced aluminum window frames, and that standard is still used in over 70% of screen installations in sunbelt states like Arizona according to Metro Screenworks.
What works is simple. Measure carefully, write down exactly what you see, and treat the opening like a fit problem instead of a guessing game.
Tip: If a screen has to be forced into place, the measurement is usually the issue, not your technique.
Gathering the Right Tools for the Job
You do not need a full service truck to measure a screen. You do need the right basics.

What to set beside the window
Metal tape measure
A metal tape measure is essential. Professional measuring is done to 1/16-inch increments, and a flexible cloth tape is not reliable for that level of accuracy according to the Ritescreen measurement whitepaper.Notebook and pen
Write down each reading immediately. Width and height are both taken in multiple places, and memory is not a system.Flathead screwdriver or putty knife
Helpful for removing an existing screen carefully if you need a clearer look at the channel, lip, or hardware.Phone camera
Not for measuring. For photos. A quick picture of the track, pull tabs, springs, and frame profile can save confusion later.
If you want a fuller rundown of hand tools used for this kind of work, this guide to window screen repair tools is a useful reference.
What not to use
A soft sewing tape. A promo tape measure with a sloppy hook. A marker scribble on scrap wood. All three cause avoidable mistakes.
The biggest tool lesson from field work is boring but true. Accurate jobs usually start with boring tools used carefully.
The Core Measurement Process Step by Step
Start at the window opening itself. That is the measurement that matters when a new screen has to slide into an existing track, not when it just looks close on paper.
A warped old screen frame can throw you off, especially in Phoenix where years of sun can dry out corners, bow aluminum, and leave dust packed into the channel. Measure the opening the screen has to fit.

Measure width in three spots
Hook your tape inside the screen channel and measure left to right near the top first. Then measure across the middle, then near the bottom.
Write down all three numbers exactly as they read. Keep the smallest width because that tightest point is the one the screen still has to pass through.
This is one of the biggest differences between a quick DIY measurement and a clean professional order. Window frames shift a little over time. In Arizona, heat expansion and hard sun exposure can make that more obvious on older vinyl and aluminum units.
Measure height in three spots
Measure from the bottom support point, usually the lip, ridge, or ledge where the screen rests, up to the top channel where the frame compresses into place during installation.
Take that reading on the left side, then the center, then the right. Again, keep all three numbers, then use the smallest height.
Homeowners often measure the visible glass area by mistake. That gives you a number for what you can see, not the path the screen frame has to travel.
Identify the correct channel and support points
Before you trust any number, make sure you are measuring the right pocket.
On a standard single hung or horizontal slider, look for the upper channel the screen pushes into and the lower lip where it lands. On some slider windows, there may be more than one recess, and only one is meant for the screen. If you grab the wrong groove, the finished screen may be built for a pocket it will never fit.
Pay attention to frame style while you are there. Different window screen material types and frame setups can affect how the finished screen sits, especially if you are replacing an older unit with something newer.
A good cross-check comes from nearby trades too. If you are also planning shutters, the guide on how to measure windows for shutters is helpful because it trains your eye to look at the opening itself, not just the visible frame.
Here is a quick visual walk-through if you learn better by watching the process:
Check whether the opening is square
Take one diagonal measurement from the top left corner of the opening to the bottom right. Then measure the opposite diagonal.
If those numbers are noticeably different, the opening is out of square. That does not always stop a replacement, but it does tell you to slow down and verify every note before ordering. I see this on older homes where settling has changed the opening just enough to create a rub point in one corner.
Record frame profile and hardware details
Width and height are only part of the job. Look at the old screen, if you have it, and note the frame thickness, corner style, spring placement, pull tabs, plungers, and which side each part sits on.
Those details decide how the screen installs and how it comes back out for cleaning. In Phoenix, that matters more than people expect because screens get removed more often for dust, monsoon cleanup, and wash-downs.
A clean notes page might look like this:
| Window | Width readings | Height readings | Keep | Notes |
|---|---|---|---|---|
| Kitchen left | top, middle, bottom | left, center, right | smallest width and height | spring side right, pull tabs bottom |
| Bedroom south | top, middle, bottom | left, center, right | smallest width and height | slider window, shallow lip |
Good notes save reorders. A missing note about spring side or tab location can turn a correct size into the wrong screen.
Applying Tolerances and Recording for Your Order
Once you have the smallest width and smallest height, you still are not done. A screen usually is not ordered as the exact raw opening size.

Why the fractions matter
Industry guidance consistently recommends applying a tolerance of 1/16 inch to 1/8 inch, depending on the window type and installation method. One example from Affordable Window Screens is straightforward: for a window with tracks, measure the full width and subtract 1/16 inch. That small deduction helps prevent binding during install, as explained in this guide on window screen sizing.
That is the part many homeowners skip because it feels like tiny math. In the field, those tiny fractions are the whole game.
A screen needs enough room to move into the top channel and drop into place without scraping the frame every time you remove it for cleaning. In Phoenix, where screens get handled more often because of dust and seasonal cleanup, that fit matters.
A simple way to write the order
Use one line per window and record it the same way every time:
- Location: Kitchen sink
- Raw opening: write your smallest measured width and smallest measured height
- Tolerance applied: note what you subtracted or added based on the channel style
- Final order size: the dimensions you are submitting
- Frame details: thickness, spring side, pull tabs, slider or single-hung
Tip: Label each screen by room and wall. “Bedroom” is not enough when there are several windows with different hardware.
If you are still deciding between fiberglass, solar, pet-resistant, or other options, this overview of window screen material types helps match the material to how the window is used.
Keep the notes boring and exact
Do not write “about 35 inches.”
Do not write “standard size.”
Do not trust a photo without written measurements.
A good order sheet is plain, repetitive, and easy to read. That is what prevents callbacks and replacement headaches.
Common Mistakes That Lead to Misfit Screens
A Phoenix homeowner measures fast, orders fast, and then finds out the new screen binds in the track or leaves a gap in one corner. I see that pattern all the time. The mistake usually happens before the order is placed.

Mistake one. Measuring the old screen
Old screens lie.
A frame that sat for years in Arizona heat can bow, rack slightly at the corners, or loosen just enough to change the reading. Dust buildup and repeated removal for cleaning do not help. Measure the window opening and channel, not the screen you are replacing.
Mistake two. Rounding the numbers
A lot of homeowners round to the nearest quarter inch because it feels close enough. For screens, close enough is often wrong.
That small fraction is the difference between a screen that slips into the top channel and one that has to be forced. If you are ordering a replacement, record the exact number to the nearest 1/16 inch and keep it that way on your notes.
Mistake three. Trusting a bad tool
A flexible sewing tape is the wrong tool here. A beat-up tape measure can be wrong too if the hook is bent or loose.
Use a rigid metal tape and check that it catches the edge cleanly. If the tape is questionable, the order is questionable.
Mistake four. Measuring only one spot
Openings are not always consistent from top to bottom. Stucco movement, older frames, and sun stress can all change the shape enough to matter.
One width and one height do not tell the full story. Measure more than one point so you can catch a tight middle, a pinched top, or a frame that drifted out of square over time.
Mistake five. Skipping the frame check
The professional difference is most apparent when the opening looks simple but the frame is not. A replacement screen has to match the existing condition of the window, not the condition you hope it is in.
Check the diagonals. Look at the channel depth. Confirm how the screen stays in place, including springs, pull tabs, plungers, or a lip at the bottom. If the opening is worn out, bent, or confusing, a local window screen repair service near you can save you from ordering the same wrong part twice.
A quick reality check helps here too. If the frame damage has you wondering whether the screen is only part of the problem, read what homeowners should know about replacement windows.
Phoenix pro tip: If a new screen only fits after you bend the frame, shave the corners, or force the springs, the measuring or frame inspection was off. A properly sized screen should install firmly and cleanly without a wrestling match.
When to Skip the DIY and Call a Professional
Some screen jobs are perfect for a homeowner with a tape measure and patience. Some are not.
If the window is a straightforward rectangle at an easy height, DIY can work well. If the opening is unusual, damaged, or difficult to access, the smart move is to hand it off.
Situations where DIY stops making sense
Upper-story windows
Measuring from a ladder while trying to inspect channels and hardware is where a low-cost screen project turns into a safety issue.Frames with visible damage
If the wood is rotted, the metal track is bent, or the channel is chewed up, the screen may not be the problem.Custom shapes
Arched and specialty windows are much less forgiving than standard rectangles.Confusing replacement projects
If you are starting to suspect the whole window unit may be past its best days, this article on what homeowners should know about replacement windows is a solid next read before you spend money on screens alone.
The professional difference
Before ordering, pros verify more than just width and height. They also check diagonal alignment, and those corner-to-corner measurements should be within a small range of each other. They assess channel depth and hardware type because failing to do that can leave you with a replacement screen that will not install, as covered in Home Depot’s measuring protocol earlier.
That kind of assessment matters most when the window has a history. Sticky sash. Repainted channels. Bent tracks. Missing tabs. Homes in Arizona see a lot of that.
If your project has any of those warning signs, getting local help is usually faster than ordering twice. Homeowners looking for hands-on service can compare options for window screen repair near me and decide whether the time savings and fit confidence are worth it.
If you would rather skip the measuring guesswork, Sparkle Tech Window Washing can help with screen service across Arizona. We handle the details that usually trip people up, from channel inspection to accurate fit, so you are not stuck ordering the same screen twice.