

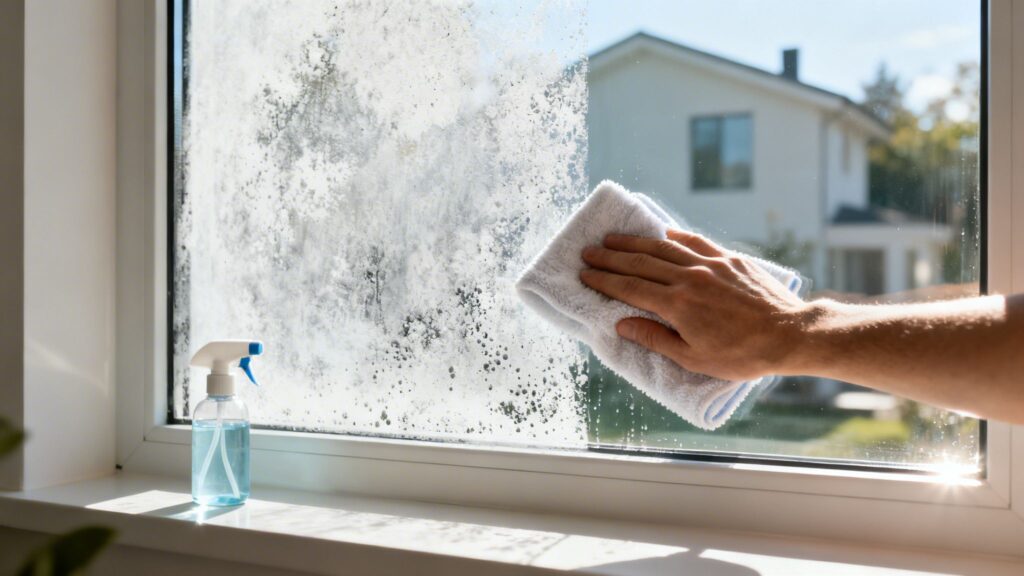
Before you even think about grabbing a bottle of cleaner, the first step in getting your windows sparkling again is figuring out exactly what you're up against. Those annoying white spots are mineral deposits—usually calcium and magnesium—that get left behind when hard water evaporates. They cling to the glass and create a stubborn, chalky film that your average Windex just can’t touch.
But here's the crucial part: are you dealing with a simple surface stain, or has the glass itself been damaged?
Decoding Those Stubborn Spots on Your Glass
Knowing the difference is everything. It's the key that unlocks the right solution and saves you from hours of scrubbing with zero results.
Most of the time, the culprit is obvious. Maybe your sprinklers have been dousing the same window every morning, or rain is washing minerals down from the roof, siding, or concrete patio onto the glass below. This isn't just dirt; it's a chemical bond forming between the alkaline minerals and the naturally porous surface of the glass.
Surface Stains vs. Permanent Etching
So, how can you tell what you've got? A surface stain is what you're hoping for. It looks like a cloudy, white film and might feel a little rough if you run your finger over it. These are the spots we can tackle with the methods in this guide.
Glass etching, on the other hand, is a whole different beast. This is permanent, physical damage. When mineral deposits sit on glass for too long, their high alkaline content literally eats into the surface, creating tiny pits and corrosion. It often shows up as a faint, almost rainbow-like shimmer that you can’t feel and definitely can’t wash away. If you've got etching, the glass itself is damaged, and you're looking at a job for a professional—or even a full window replacement.
To make it easier, here's a quick side-by-side comparison to help you diagnose the problem.
Stain vs Etching: What's the Difference?
| Characteristic | Surface Stain (Removable) | Glass Etching (Permanent Damage) |
|---|---|---|
| Appearance | Chalky, white, or cloudy film | Faint, iridescent, or rainbow-like sheen |
| Texture | Can feel slightly rough or gritty | Smooth; damage is embedded in the glass |
| Visibility | More obvious when dry | Sometimes only visible from certain angles |
| Removability | Can be removed with acids or abrasives | Cannot be removed with standard cleaning |
| Solution | DIY or professional cleaning | Professional glass polishing or replacement |
Getting this right from the start saves you a world of frustration. No one wants to spend a Saturday afternoon scrubbing a window only to realize the mark isn't coming off because it's in the glass, not on it.
This handy flowchart can also walk you through the diagnostic process.

The takeaway is simple: If you can scrub it off (even with a lot of effort), it’s a stain. If it doesn’t budge no matter what you do, you’re almost certainly looking at etching.
This common household headache is a big deal. The market for hard water stain removers is expected to double, growing from USD 1.2 billion in 2025 to USD 2.5 billion by 2033. And with over 60% of that demand coming from households, it's clear that homeowners everywhere are fighting this same battle. You can read more about the hard water remover market trends to see just how widespread the problem is.
Gathering Your Tools for a Streak-Free Finish
Trying to tackle water stains on your windows without the right gear is just asking for a headache. It's like trying to paint a masterpiece with a toothbrush. Having everything you need on hand from the start not only makes the job go faster but is the key to getting that crystal-clear, professional-looking result.
Your most important ally in this fight is a high-quality squeegee. I'm not talking about the cheap ones from the dollar store. A professional-grade model with a fresh, sharp rubber blade is the secret weapon for a truly streak-free finish. When you pair it with a good handle, you can pull all that dissolved grime and mineral buildup off the glass in one clean, satisfying swipe.
The Essentials for Application and Safety
Now, let's talk about what you'll use to apply your cleaner and do the actual scrubbing. Please, step away from the old t-shirts and paper towels. They're notorious for leaving behind a frustrating film of lint.
Instead, make sure you have these items ready to go:
- Microfiber Cloths: You can never have too many. I use one for applying the cleaning mix, another for a preliminary wipe-down, and a third, completely dry one for buffing the edges and catching any last drips.
- Non-Abrasive Scrub Pads: Look for the white, non-scratch pads. These are perfect for gently working your cleaner into those stubborn mineral spots without worrying about scratching the glass.
- Spray Bottle: If you're using a homemade vinegar solution, a decent spray bottle is a must for getting even coverage across the window.
- Bucket: A simple five-gallon bucket is indispensable. You'll use it for mixing up your cleaning solution and for rinsing your tools as you go, which helps prevent spreading dirt around.
Your safety is non-negotiable, especially when you're dealing with acidic solutions like vinegar or stronger commercial cleaners. This stuff can be harsh on your skin and eyes.
So, before you even mix your first batch of cleaner, get your protective gear on. Waterproof gloves are a must to keep your hands from getting irritated. I also never work without safety glasses or goggles—splashes happen, and you don't want cleaning agents anywhere near your eyes. If you're working inside, crack a window or turn on a fan for some ventilation.
For a more comprehensive look at the gear the pros use, take a look at our guide to the best window cleaning tools. It covers everything you'll ever need.
Everyday Solutions for Light Water Stains

When you're dealing with newer, less-stubborn water spots, the fix is probably already sitting in your kitchen pantry. Before you even think about reaching for harsh chemicals, give these simple household staples a try. They can do a surprisingly good job on light mineral buildup without putting your glass or window frames at risk.
You don't need a complicated chemical formula here. The whole idea is to use the natural properties of everyday items to dissolve the alkaline mineral deposits—the stuff that leaves those chalky white spots behind. Let's walk through two of the most reliable methods I've used time and again: a simple distilled white vinegar spray and a gentle baking soda paste.
The White Vinegar Method
Distilled white vinegar is a go-to for a reason. Its mild acidity is just right for breaking down the calcium and magnesium that have bonded to the glass. Forget the "little bit of this, little bit of that" approach; getting the mixture right is what makes it work.
Here’s the recipe: combine equal parts distilled white vinegar and distilled water in a clean spray bottle. It's really important to use distilled water because it’s free of the minerals you're trying to get rid of. Using tap water can actually put more deposits right back on the glass.
Once it's mixed, spray the solution generously onto the stained areas. Don't hold back—you want the glass to be completely saturated. Now for the most important step: walk away. Let that solution sit and do its thing for at least 10 to 15 minutes. This "dwell time" is what allows the acetic acid in the vinegar to really penetrate and break down those mineral bonds.
After you've waited, grab a non-abrasive scrub pad or a microfiber cloth and gently work on the stained spots. You should be able to feel the gritty deposits breaking loose. To finish, just squeegee the window clean and wipe the edges with a separate, dry microfiber for a perfect, streak-free shine.
Pro Tip: Got stubborn streaks on a vertical window where the solution just runs right off? I’ve run into this a hundred times. Just soak a few paper towels in your vinegar mix and press them directly against the glass. They'll cling to the window and keep the solution locked in place, giving it the time it needs to work on tougher spots.
The Baking Soda Paste Technique
Sometimes a spray just doesn't have enough oomph. That's when a mild abrasive can make all the difference, and baking soda is perfect for the job. It's gentle enough that you don't have to worry about scratching the glass, but it has just enough grit to scrub away stubborn mineral rings.
To make the paste, just mix baking soda with a tiny bit of water until you get a thick consistency, almost like toothpaste. Dab this paste right onto the hard water stains, focusing on the areas with the heaviest buildup.
Let the paste sit on the glass for a few minutes. Then, using a damp sponge or microfiber cloth, scrub the area with a gentle, circular motion. The combination of the paste’s fine grit and your scrubbing action is fantastic for lifting those deposits right off the glass.
Finally, you'll want to rinse the window thoroughly with clean water to get all the baking soda residue off. A quick pass with a squeegee and a final wipe with a dry cloth will leave you with a clear, spotless finish. This method is especially good for those isolated, crusted-on spots that a vinegar spray just can't handle on its own.
It's no surprise that so many homeowners prefer these simple, effective DIY solutions. That said, the market for specialized cleaning products is massive. In 2024, the global glass cleaner market was valued at an incredible USD 3.29 billion and is expected to climb to USD 6.14 billion by 2033, with North America leading the demand. This just goes to show how much people value a proven formula that promises a flawless, streak-free result. You can find more details on the glass cleaner market on grandviewresearch.com.
Advanced Tactics for Tough Mineral Buildup
So, you’ve tried the vinegar spray, made the baking soda paste, and those stubborn, chalky stains are still clinging to your glass. Don't throw in the towel just yet. When years of hard water have baked onto your windows, the home remedies just don't have enough muscle. It’s time to bring in the bigger guns.
For those severe, seemingly permanent stains, you need one of two things: more focused scrubbing power or a stronger chemical solution to break down the minerals. These next-level methods require a bit more caution, but they can bring clarity back to glass you thought was a lost cause.
The Professional’s Trick: Using Steel Wool (The Right Way)
Putting steel wool anywhere near glass sounds like a recipe for disaster, I know. But professional window cleaners have been using this trick for decades. The secret isn't just any steel wool; it’s #0000 steel wool, the finest grade you can get. Its fibers are actually softer than glass, allowing it to shave off mineral deposits without scratching the surface.
There's one golden rule here: never, ever use it dry.
- Lubrication is non-negotiable. A simple solution of soapy water or even your trusty vinegar spray will do the trick. The key is to keep the glass wet while you work.
- Go easy on the pressure. You don't need to muscle it. Use gentle, circular motions and let the fine steel wool do the heavy lifting, paying extra attention to the areas with the worst buildup.
- Stop, rinse, and check your work. After a bit of scrubbing, rinse the area completely and wipe it dry with a squeegee. This lets you see your progress and keeps you from overdoing it.
This technique is a game-changer for thick, crusty layers of minerals that just laugh at chemical sprays. It physically lifts the deposits right off the glass.
Always Test First. This is critical. Before you tackle an entire window, find a small, out-of-the-way corner to test your method. Once it’s rinsed and dry, check it from different angles and in different light to make sure there are no scratches or hazing.
Choosing a Commercial Hard Water Stain Remover
Walking down the cleaning aisle can be dizzying. With the stain remover market valued at a whopping USD 24.98 billion in 2024 and expected to hit USD 38.46 billion by 2033, it's clear there's a huge demand for products that actually work. You can read more about the growth of the stain remover industry on straitsresearch.com.
So, how do you pick the right one? Look for a product specifically formulated for hard water stains, which usually means it contains a mild acid or special agents that dissolve minerals.
- Check the label for active ingredients. Things like sulfamic acid or phosphoric acid are fantastic at breaking down the calcium and magnesium that cause the stains.
- Steer clear of aggressive acids. Products containing harsh chemicals like muriatic acid are best left to professionals, as they can easily damage your glass, window frames, siding, and even the plants below.
- Read and follow the directions to the letter. These products aren't like all-purpose cleaners. They often need to sit on the glass for a specific amount of time to work their magic. Cutting corners can lead to disappointing results or even damage.
Typically, you'll apply the cleaner, let it dwell, then gently scrub with a non-abrasive pad before rinsing it all away. A final pass with a squeegee will tell you if you’ve found the right solution for your problem.
Stain Removal Method Comparison
To help you decide which path to take, here’s a quick breakdown of how these advanced methods stack up against the common household remedies.
| Method | Best For | Effort Level | Risk of Damage |
|---|---|---|---|
| Vinegar & Water | Light, recent mineral spots and general cleaning. | Low | Very Low |
| Baking Soda Paste | Mild to moderate stains that need a bit of grit. | Medium | Low |
| #0000 Steel Wool | Thick, chalky, and stubborn mineral buildup. | Medium-High | Low (if used correctly with lubricant) |
| Commercial Cleaner | Severe, widespread hard water stains. | Medium | Medium (if instructions aren't followed) |
Ultimately, the best method depends on the severity of your stains and how much elbow grease you're willing to put in. Starting with the gentlest option is always a smart move.
How to Keep Water Stains from Coming Back

Winning the battle against existing water stains feels great, but the real victory is keeping them from coming back. The best way to deal with water stains is to stop them before they start. A few proactive tweaks can save you from hours of scrubbing down the road.
Think of it as playing defense. By managing how water hits your glass, you stop mineral deposits from ever getting a chance to stick. This means less work, clearer views, and windows that stay looking their best for longer.
Control Your Water Sources
More often than not, the prime suspect behind stubborn water stains is your own sprinkler system. A sprinkler head aimed just a little too high can soak your windows every single day, letting the sun bake those minerals right onto the glass. Luckily, this is an easy fix with a massive payoff.
Spend a few minutes watching your sprinklers run. See where the water is actually going. If you spot any heads spraying your windows or glass doors, adjust them. You want to water the lawn, not the house. I've seen this one simple check eliminate 50% or more of a homeowner's recurring stain problems.
Another thing to look out for is runoff from roofs or concrete ledges. This water often carries a payload of dirt and minerals straight down onto the glass below. While you can't stop the rain, you can make sure your gutters are clean and working correctly to channel water away from your windows.
Apply a Hydrophobic Glass Sealant
For a truly effective preventative shield, look into applying a hydrophobic glass sealant. These products are a game-changer for exterior glass care. They create an invisible, ultra-slick barrier that forces water to behave differently.
Instead of clinging and spreading out, water beads up and rolls right off the pane, taking dirt and dissolved minerals with it. This drastically cuts down on the evaporation that leaves those familiar white spots behind.
Applying it is usually a simple process:
- Start with spotless glass. The sealant needs a perfectly clean surface to bond correctly, so make sure all existing grime and stains are gone.
- Wipe on the product. Following the specific product's instructions, use a clean applicator to apply a thin, even coat.
- Buff it out. After it dries to a haze, just buff it away with a clean, dry microfiber cloth. You’ll be left with a crystal-clear, protective coating.
A single application of a quality glass sealant can last for months, providing continuous protection against hard water, rain, and grime. It’s a small investment of time that pays huge dividends in clarity and cleanliness.
This is the same principle that informs a lot of professional techniques. For instance, you might see a guide to pure water window cleaning that explains how pros use demineralized water to prevent spots. Applying a sealant is your DIY version of that—making sure nothing can stick to the glass in the first place. By combining smart water management with a protective coating, you can keep your windows looking pristine with far less effort.
Knowing When to Call in a Professional
While rolling up your sleeves and tackling a home project can be incredibly satisfying, sometimes the smartest tool you can use is the phone. Recognizing when to step back and call a professional window cleaner isn't throwing in the towel; it's a savvy decision that saves you time, protects your property, and often, your own safety.
The Problem is Out of Reach (Literally)
Let's be realistic. Are the stains caked onto second-story windows that you can only reach with a tall, shaky ladder? This is the most obvious sign to call for backup. The risk of a fall is just not worth any potential savings.
Professional crews come equipped with the right gear—stabilized ladders, safety harnesses, and often water-fed pole systems—that let them work safely and efficiently at heights.
When the Job is Just Too Big
Another time to call for help is when the scale of the problem is just overwhelming. If you're looking at years of mineral buildup covering every single window on your house, a DIY approach can quickly turn into a grueling, multi-weekend project.
A pro team, on the other hand, arrives with industrial-strength cleaners and specialized polishing tools. They can achieve in a few hours what might take you an entire weekend of frustrating, back-breaking work.
The Stain Won't Budge
Have you tried every home remedy and store-bought cleaner, only to find the stain is still there, mocking you? This is a strong indicator that you're no longer dealing with a simple surface stain. You've likely got etching, where the minerals have physically damaged the glass surface itself.
A professional can quickly diagnose the difference. More importantly, they may have access to advanced glass restoration techniques and compounds that are far beyond the scope of any DIY kit.
If your window water stains are exceptionally stubborn, extensive, or indicate a deeper underlying moisture issue, it might be time to consider professional help. This guide can assist you with finding the right water damage restoration contractor.
Ultimately, hiring a professional service buys you peace of mind. They have the experience to get the job done right without causing accidental damage to your window frames, seals, or siding.
For a deeper dive into making this choice, check out our guide on knowing when to call a professional window washing company.
Got Questions? We've Got Answers
Even the best-laid plans can leave you with a few questions. When it comes to tackling those stubborn water spots on your windows, you're not alone. Here are some of the most common things people ask us.
Is it Okay to Scrape Hard Water Stains with a Razor Blade?
I'm going to give you a hard "no" on this one. It's tempting to grab a razor blade for a tough, crusty deposit, but the risk of permanently scratching your glass is just too high. A deep scratch is a much bigger problem than a mineral stain.
Instead, reach for a pad of #0000 steel wool (that's "quadruple-aught," the finest grade you can get) and plenty of your cleaning solution as a lubricant. It has the abrasive power you need without the risk of gouging the glass.
Can I Use Bathroom Cleaners Like CLR on My Windows?
Technically, some of these products can work, but you're playing with fire. Cleaners formulated for tubs and tiles are often incredibly aggressive. They can easily eat away at the rubber seals around your window, discolor vinyl frames, or strip the paint right off your trim.
If you're determined to try it, please, please test it on a tiny, hidden spot first. And I mean tiny. When you're done, you have to rinse the area completely with clean water to make sure no corrosive residue is left behind.
How Often Should I Clean My Windows to Keep Stains Away?
In a perfect world, a good, deep clean at least twice a year will keep most mineral buildup at bay, especially if you have hard water.
The real secret weapon, though? It’s all about a little preventative maintenance. If your windows are constantly getting sprayed by sprinklers, the best thing you can do is grab a squeegee and wipe them down right after the sprinklers turn off. It takes just a few seconds and stops those minerals from ever getting a chance to dry and bond to the glass.
When you've tried everything and the spots just won't budge, it might be time to call in the pros. The team at Sparkle Tech Window Washing has the tools and expertise to make your glass crystal clear again. Get your free quote today!