


It's a frustrating sight: a splash of unwanted spray paint across your otherwise clean glass. But don't panic. In most cases, getting it off is simpler than you think. The go-to method for pros, and your best starting point, is a careful scrape with a sharp razor blade. It's a surprisingly simple tool that, when paired with the right technique, can often lift the paint right off without needing any harsh chemicals.
Your First Steps After Finding Spray Paint on Glass
When you first see that unwelcome paint, the urge is to grab whatever cleaner is under the sink and start scrubbing. Hold on. Taking just a few minutes to assess the situation can save you a ton of elbow grease and, more importantly, prevent you from accidentally damaging the glass. What you do before you touch the paint is just as important as the removal itself.
The first thing to figure out is what you're dealing with. Is the paint still a bit tacky, or has it been sitting there for a week, baking in the sun? Is this a standard window, or are you working with something more delicate like tempered glass, a tinted window, or even a solar panel? Each type of glass and paint condition calls for a slightly different game plan.
Assess the Paint and Glass Type
Start by gently touching a tiny, out-of-the-way corner of the paint. If it feels wet or soft, your cleanup method will be different than if the paint is fully cured and hard as a rock.
Next, get a good look at the glass itself. Regular window glass is pretty tough, but things like tinted films or special Low-E coatings are incredibly easy to scratch or damage with the wrong chemical.
Pro Tip: Be extremely careful when using a razor on tempered glass. It's notorious for having tiny bits of "fabricating debris" on the surface from the manufacturing process. A razor blade can catch on these and drag them across the glass, leaving a permanent scratch. Always, always test your blade in a small, hidden corner first.
Making these quick checks helps you grab the right tools from the get-go and sidestep a costly mistake. This flowchart breaks down the basic decision-making process for wet versus dry paint.
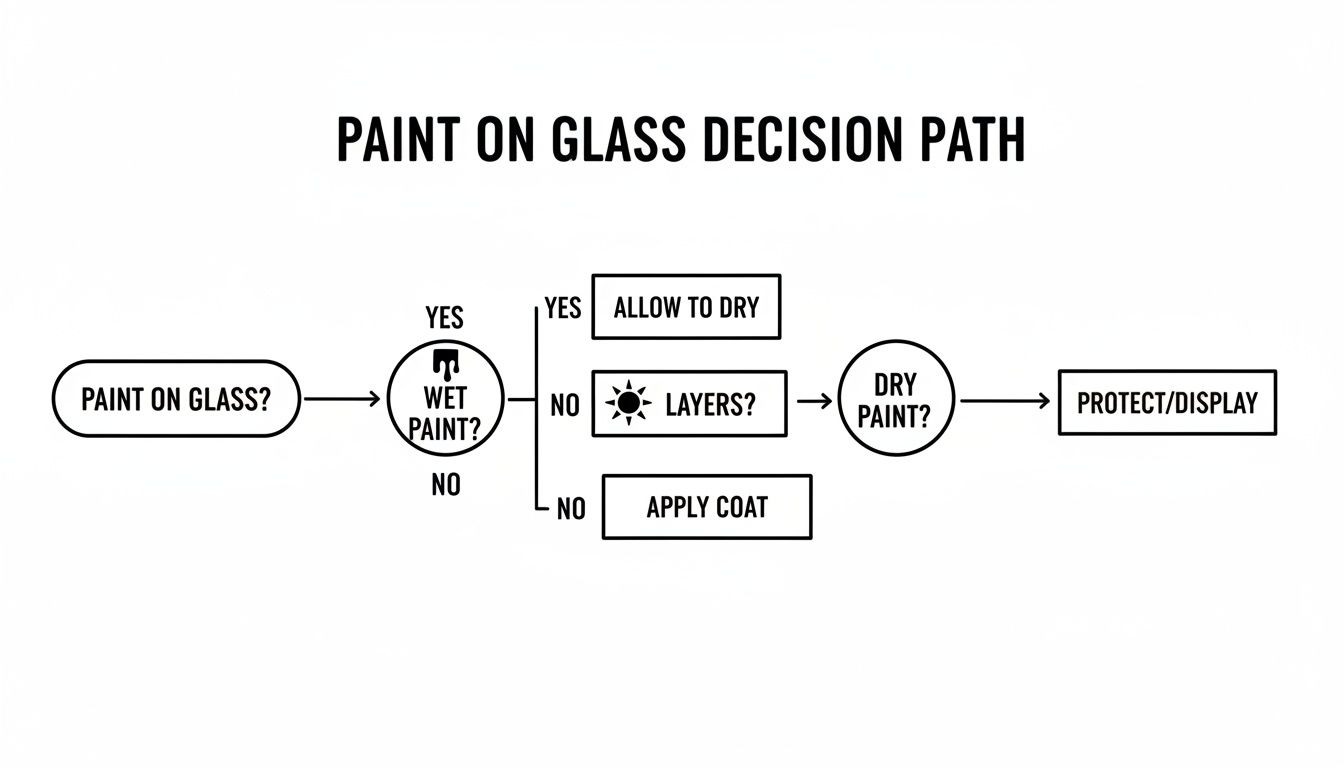
As you can see, the sooner you can get to the paint, the better. Acting quickly usually means you can avoid the more aggressive removal methods down the line.
Use this quick guide to assess the situation and determine your best first move for removing spray paint from glass.
Initial Paint Removal Assessment
| Situation | Recommended First Action | Key Consideration |
|---|---|---|
| Fresh Paint (Wet/Tacky) | Blot gently with a solvent-dampened cloth. | Avoid wiping or smearing; you'll just spread the mess. |
| Dried Paint on Standard Glass | Use a razor blade with soapy water for lubrication. | Keep the blade angle low (30-45 degrees) and the glass wet. |
| Dried Paint on Tinted Glass | Start with a gentle solvent (e.g., isopropyl alcohol) on a microfiber cloth. | Never use a razor blade, as it will destroy the tint film. |
| Dried Paint on Tempered Glass | Test a razor blade cautiously in an inconspicuous corner. | The risk of scratching from fabricating debris is high. |
| Paint on Solar Panels | Consult the manufacturer's cleaning guide; if unavailable, use isopropyl alcohol and a soft cloth. | Aggressive methods can damage the anti-reflective coating and void the warranty. |
This initial check is your roadmap. It ensures you start with the least aggressive method that's most likely to work, protecting your glass in the process.
Why a Razor Blade Is Your Best First Move
So, why the razor? For dried spray paint on a standard, uncoated pane of glass, nothing beats the efficiency of a fresh blade. It's not just an old trick; it's proven effective. Cleaning trials have shown that razor scraping has a 92% success rate on fresh paint (less than 24 hours old) and leaves minimal residue behind.
The secret is using a brand-new blade, keeping it at a low angle, and using plenty of lubrication—something as simple as soapy water works perfectly. This technique allows the blade to get under the paint and lift it off the non-porous surface, instead of just smearing it around. It's a clean, physical removal that avoids introducing chemicals that could damage the window's frame or seals. For a deeper dive into cleaning industry trends, the market analysis from Grandview Research offers some great insights.
Mastering the Art of Scraping Glass Safely
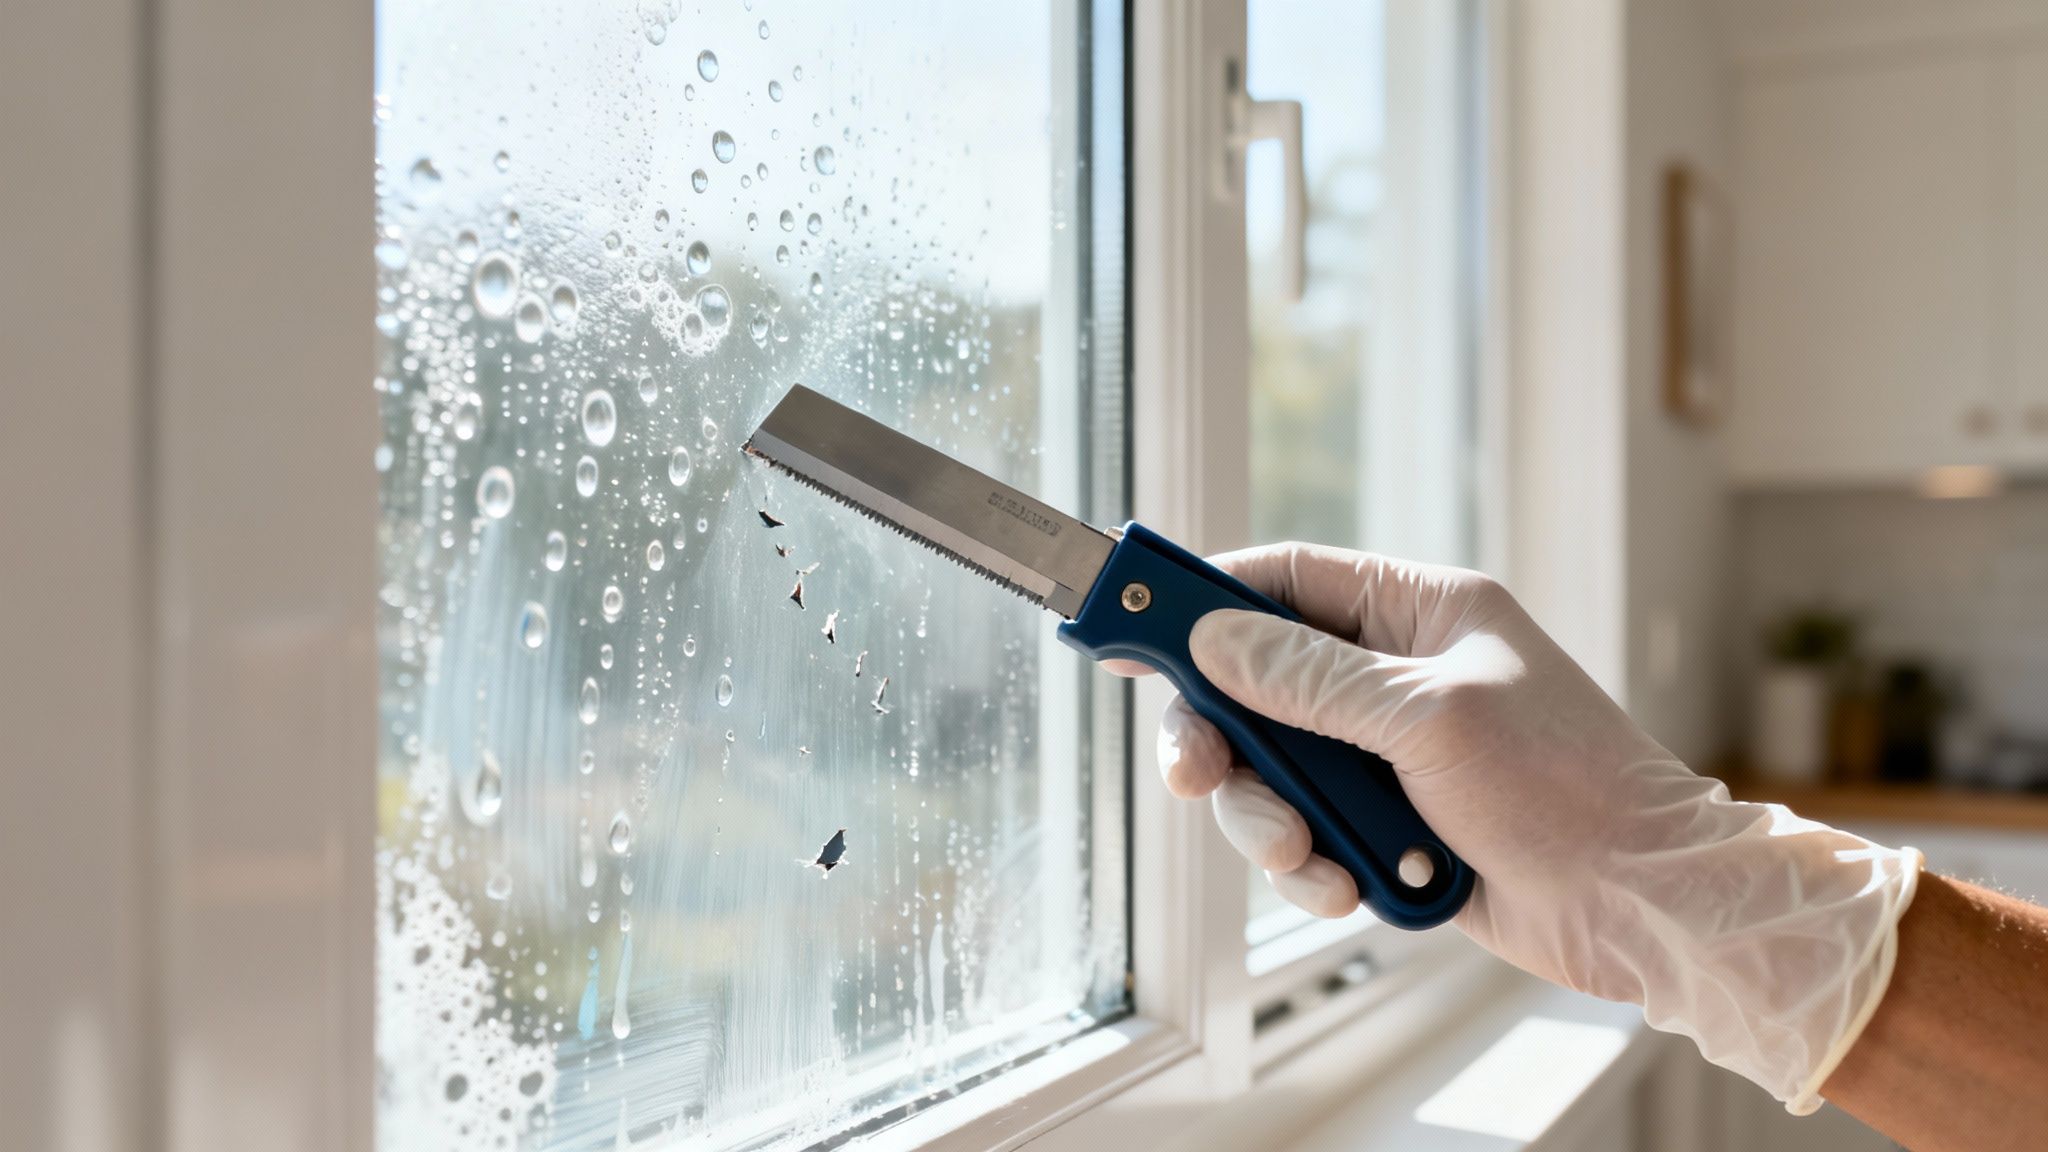
When you’re staring down a window tagged with spray paint, a razor blade is often your best friend. But this isn't about brute force; it’s a delicate operation that calls for the right tools, a bit of patience, and the proper technique. Professional window cleaners use this method every day because, when done right, it lifts the paint clean off without leaving a single mark on the glass.
The most critical tool here is a brand-new, sharp razor blade. Seriously, don't even think about using that old, rusty blade from the bottom of your toolbox—that's a surefire way to etch a permanent scratch into your window. For both safety and control, always secure the blade in a proper scraper handle. Never, ever hold a loose blade.
The Role of Lubrication and Proper Angle
Let’s get one thing straight: never scrape a dry window. I can’t stress this enough. Dry scraping is practically a guarantee you’ll damage the glass. The real secret to a flawless finish is generous lubrication. This lets the blade glide smoothly over the surface instead of chattering and skipping across it.
You don't need anything fancy. A simple spray bottle filled with warm water and a few drops of dish soap works perfectly. This simple mix cuts down on friction and helps lift away the paint flakes as you work.
A veteran window cleaner once told me, "You should be able to hear the difference. A properly lubricated blade makes a smooth, quiet 'swoosh' sound as it lifts the paint. If you hear a scratchy, gritty noise, stop immediately. You're either dry or dragging debris."
With the glass wet, your blade angle is everything. You want to hold the scraper at a shallow 30 to 45-degree angle to the glass. This low angle allows the blade’s edge to get under the paint and lift it in sheets. Come in too steep, and you dramatically increase the risk of gouging the glass.
A Methodical Approach to Scraping
It's tempting to just go to town on the whole window, but that’s a rookie mistake. The best way to tackle it is in small, manageable sections, maybe six inches at a time. This gives you far better control and ensures your soapy water doesn't dry up before you get to that spot.
Here’s how the pros do it:
- Spray and Saturate: Give a small section of the window a good soaking with your soapy water solution. Make sure the entire area is dripping wet.
- Position and Glide: Place your blade at that low angle on the wet glass. Use gentle, even pressure and push the blade forward in one smooth, continuous stroke. No back-and-forth sawing motions.
- Lift and Wipe: After each pass, lift the blade completely off the glass. Wipe the edge clean with a microfiber cloth to get rid of any paint flecks or grit. This tiny step is crucial—it stops you from dragging abrasive bits across the next section of glass.
- Repeat and Overlap: Spray the next section, overlapping your last stroke just a bit to ensure you don’t leave any thin lines of paint behind. Keep this up until the job is done.
This controlled technique is the gold standard, but a razor isn't always the answer. For delicate surfaces like tinted or specialty glass, you may need to explore other options for removing paint from glass without razors to play it safe.
Common Mistakes to Avoid at All Costs
Even with a solid technique, a few simple mistakes can lead to disaster. Keep these in mind to make sure your project is a success.
- Using a Dull or Damaged Blade: Any nicks, rust, or a worn-down edge will scratch glass. It’s worth the few cents to start every job with a fresh blade.
- Scraping on a Dry Surface: This is the cardinal sin of glass scraping. Always, always keep the surface wet and slick.
- Applying Too Much Pressure: Let the blade’s sharpness do the heavy lifting. Mashing down on the scraper won't get the paint off any faster, but it will increase your chances of slipping and scratching the window.
- Ignoring the Corners: Be extra careful around the edges and corners of the window pane. It's incredibly easy to chip the glass or slice into the rubber seals and window frame. Slow down and use just the corner of the blade to carefully work in those tight spots.
Bringing in Solvents When Scraping Isn't Enough
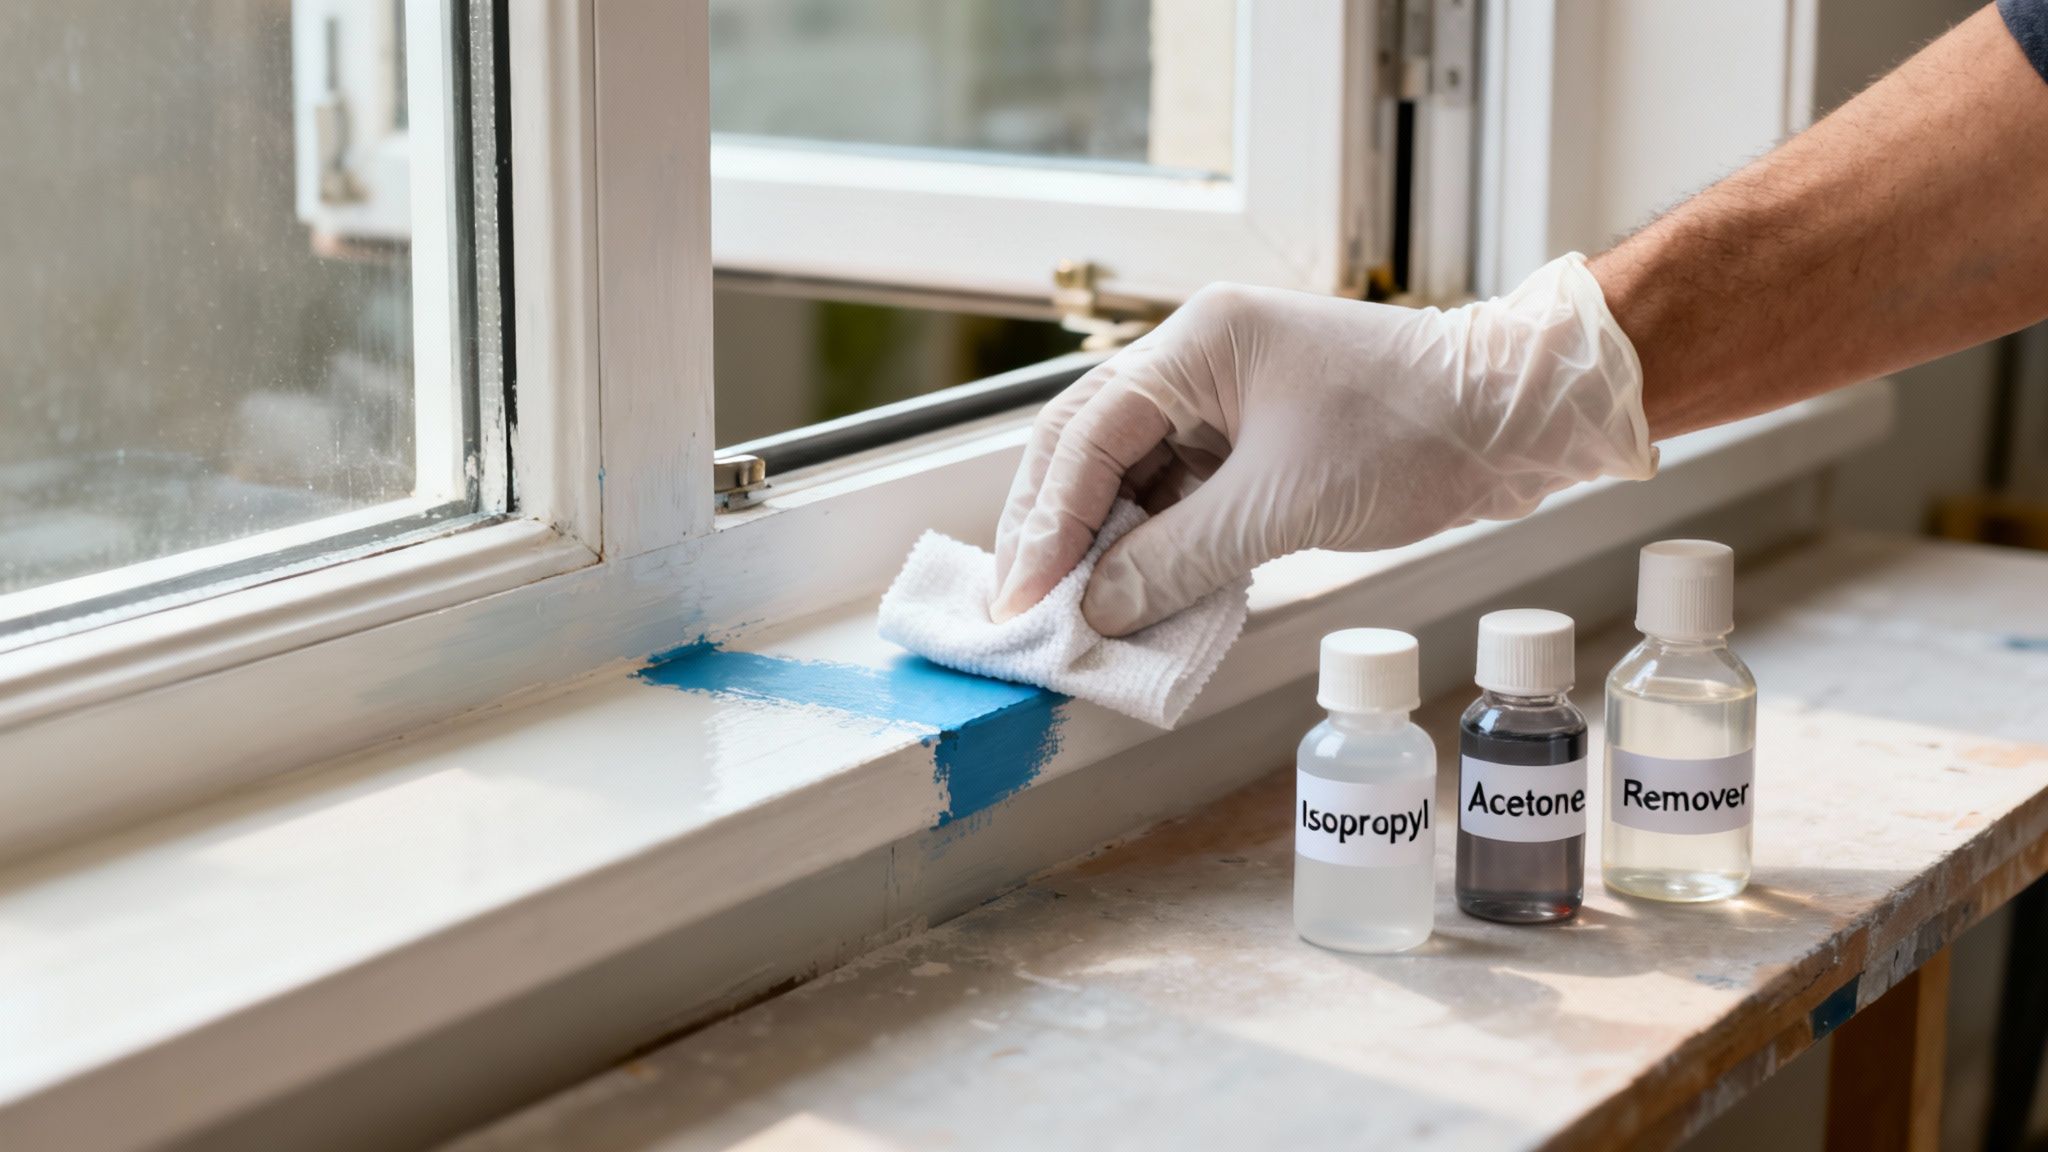
A razor blade gets you most of the way there, but what about those stubborn little paint flecks or that frustratingly hazy film left behind? This is where the right chemical solvent becomes your best friend, dissolving the last traces of spray paint that scraping just can’t touch.
But let's be clear: walking down the cleaning aisle and grabbing the strongest-looking can is a recipe for disaster. Choosing the right solvent is a careful balancing act. You need something tough enough for the paint but gentle enough for the specific type of glass you’re working with. The wrong choice can turn a simple cleanup into a costly, permanent mistake.
From Gentle Helpers to Heavy Hitters
You might be surprised to learn that your first line of attack could already be in your house. It’s always best to start with the mildest option and work your way up.
- Isopropyl Alcohol (Rubbing Alcohol): This is my go-to starting point. It’s surprisingly effective on many common latex and acrylic spray paints, and it’s generally safe for all types of glass. Plus, it evaporates quickly and is less likely to damage rubber or vinyl window seals.
- Acetone (Nail Polish Remover): When alcohol doesn’t cut it, acetone is the next step up. It works wonders on tougher enamel and lacquer-based paints. But be warned: use it with extreme care. Acetone will melt plastic frames, vinyl seals, and—most critically—any kind of tinted window film almost instantly.
- Mineral Spirits: For stubborn, oil-based paints, mineral spirits are a solid choice. This solvent requires excellent ventilation and a steady hand, as it can easily damage surrounding materials if it drips.
If these household staples fail, it’s time to look at commercial-grade paint or graffiti removers. These are specifically formulated to break down cured paints, but you absolutely have to read the label. Some are far too aggressive for glass and will cause etching. For a deeper dive into what the pros use, check out our guide to the essential chemicals for window cleaners.
To make the choice a little easier, we've put together a quick reference table.
Solvent Selection for Different Paint and Glass Types
Here's a quick comparison to help you choose the most effective and safest solvent based on the spray paint and glass surface you're dealing with.
| Solvent Type | Best For (Paint Type) | Safety on Tinted/Coated Glass | Pro Tip from Sparkle Tech |
|---|---|---|---|
| Isopropyl Alcohol | Latex, Acrylic | Generally Safe. Always spot test first. | Start here. It's often all you need and has the lowest risk of damaging the glass. |
| Acetone | Enamel, Lacquer | UNSAFE. Will destroy films and some coatings instantly. | Only for standard, uncoated glass. Keep it far away from frames and seals. |
| Mineral Spirits | Oil-Based Paint | High Risk. Can damage coatings and tints. Test required. | Apply with a cloth, never directly to the glass, to prevent drips onto sensitive areas. |
| Graffiti Remover | Cured, Heavy-Duty Paints | Varies. Check the product label specifically for glass use. | Look for newer, low-VOC formulas. They are often safer for specialty glass. |
Remember, this table is a guide. The golden rule is to always, always test a small, hidden area first.
The Spot Test: Your 5-Minute Insurance Policy
I can’t say this enough: you must perform a spot test before going all-in with any solvent. This is the single most important step to prevent ruining a window, especially if you’re working with specialty glass.
Pick a small, out-of-the-way spot on the window, like a bottom corner that’s usually hidden by blinds. Apply a tiny amount of your chosen solvent with a cotton swab, let it sit for a minute, and wipe it away. Now, inspect that spot carefully under good light.
Look for any haziness, peeling, discoloration, or softening of the glass surface. If you see any kind of negative reaction, stop immediately and switch to a milder solvent. This quick five-minute check can literally save you from a thousand-dollar replacement.
This is absolutely non-negotiable for Low-E windows, solar panels, and any kind of tinted glass. The delicate metallic coatings and polymer films on these surfaces can be permanently etched or dissolved by the wrong chemical.
Safe Application and Fresh Air Are Key
Once your spot test comes back clean, you’re ready to tackle the main job. Good technique and safety are just as important as choosing the right chemical.
First, get some air moving. Open windows and doors to create a cross-breeze. Fumes from solvents like acetone and mineral spirits are no joke. I also highly recommend wearing nitrile gloves to protect your skin and safety glasses to guard against accidental splashes.
Next, apply the solvent to a clean microfiber cloth, not directly onto the glass. This gives you total control and stops the liquid from running down and damaging the window frame or sill below. Work on a small section at a time, rubbing gently in a circular motion. Let the solvent do the work—there's no need for aggressive scrubbing. The chemical is designed to break down the paint, so give it a moment to work its magic.
Handling Delicate Surfaces Like Tinted Windows and Solar Panels
Working with standard glass is one thing, but when you run into spray paint on tinted windows, Low-E coated panes, or solar panels, you need a completely different game plan. The tools you’d normally reach for—a sharp razor blade and strong solvents—can cause irreversible damage to these sensitive surfaces.
Think about it: a metal blade will absolutely shred the delicate film on a tinted window, leaving you with a peeled, scratched-up mess. The same goes for the anti-reflective coating on a solar panel. Scratch that, and you're not just dealing with a cosmetic issue; you're actively reducing its ability to generate power. Recognizing what not to do is just as important as knowing the right way to tackle the job.
Safe Techniques for Tinted Windows
If you're dealing with spray paint on tinted glass, your new mantra is "go slow and be gentle." That tint is just a thin polymer film, usually on the inside of the window, and it’s surprisingly easy to ruin with the wrong chemical or a bit of rough handling.
Forget metal scrapers. Your go-to tool here is a plastic razor blade. They’re stiff enough to get under the paint but won’t dig in and tear the film. Just like with regular glass, keep the area slick with plenty of soapy water to avoid friction.
When it comes to solvents, start with the weakest one first and work your way up.
- Warm, soapy water is your first stop. Let a soaked cloth rest on the paint spot for a few minutes. This can soften it enough to lift it off with your plastic blade.
- Next up is isopropyl alcohol. If soap doesn't cut it, a cloth lightly dampened with rubbing alcohol is a great next step. It handles most paints well and is typically safe on quality tint films.
- Stay away from the harsh stuff. Never use acetone, mineral spirits, or any cleaner with ammonia. These chemicals will make the tint bubble, turn cloudy, or even start to dissolve.
The challenges of working on tinted windows are similar to what you’d face if you were trying to remove the film itself. You might find some useful insights in a DIY guide to removing tinted window film from a car, as it covers similar precautions.
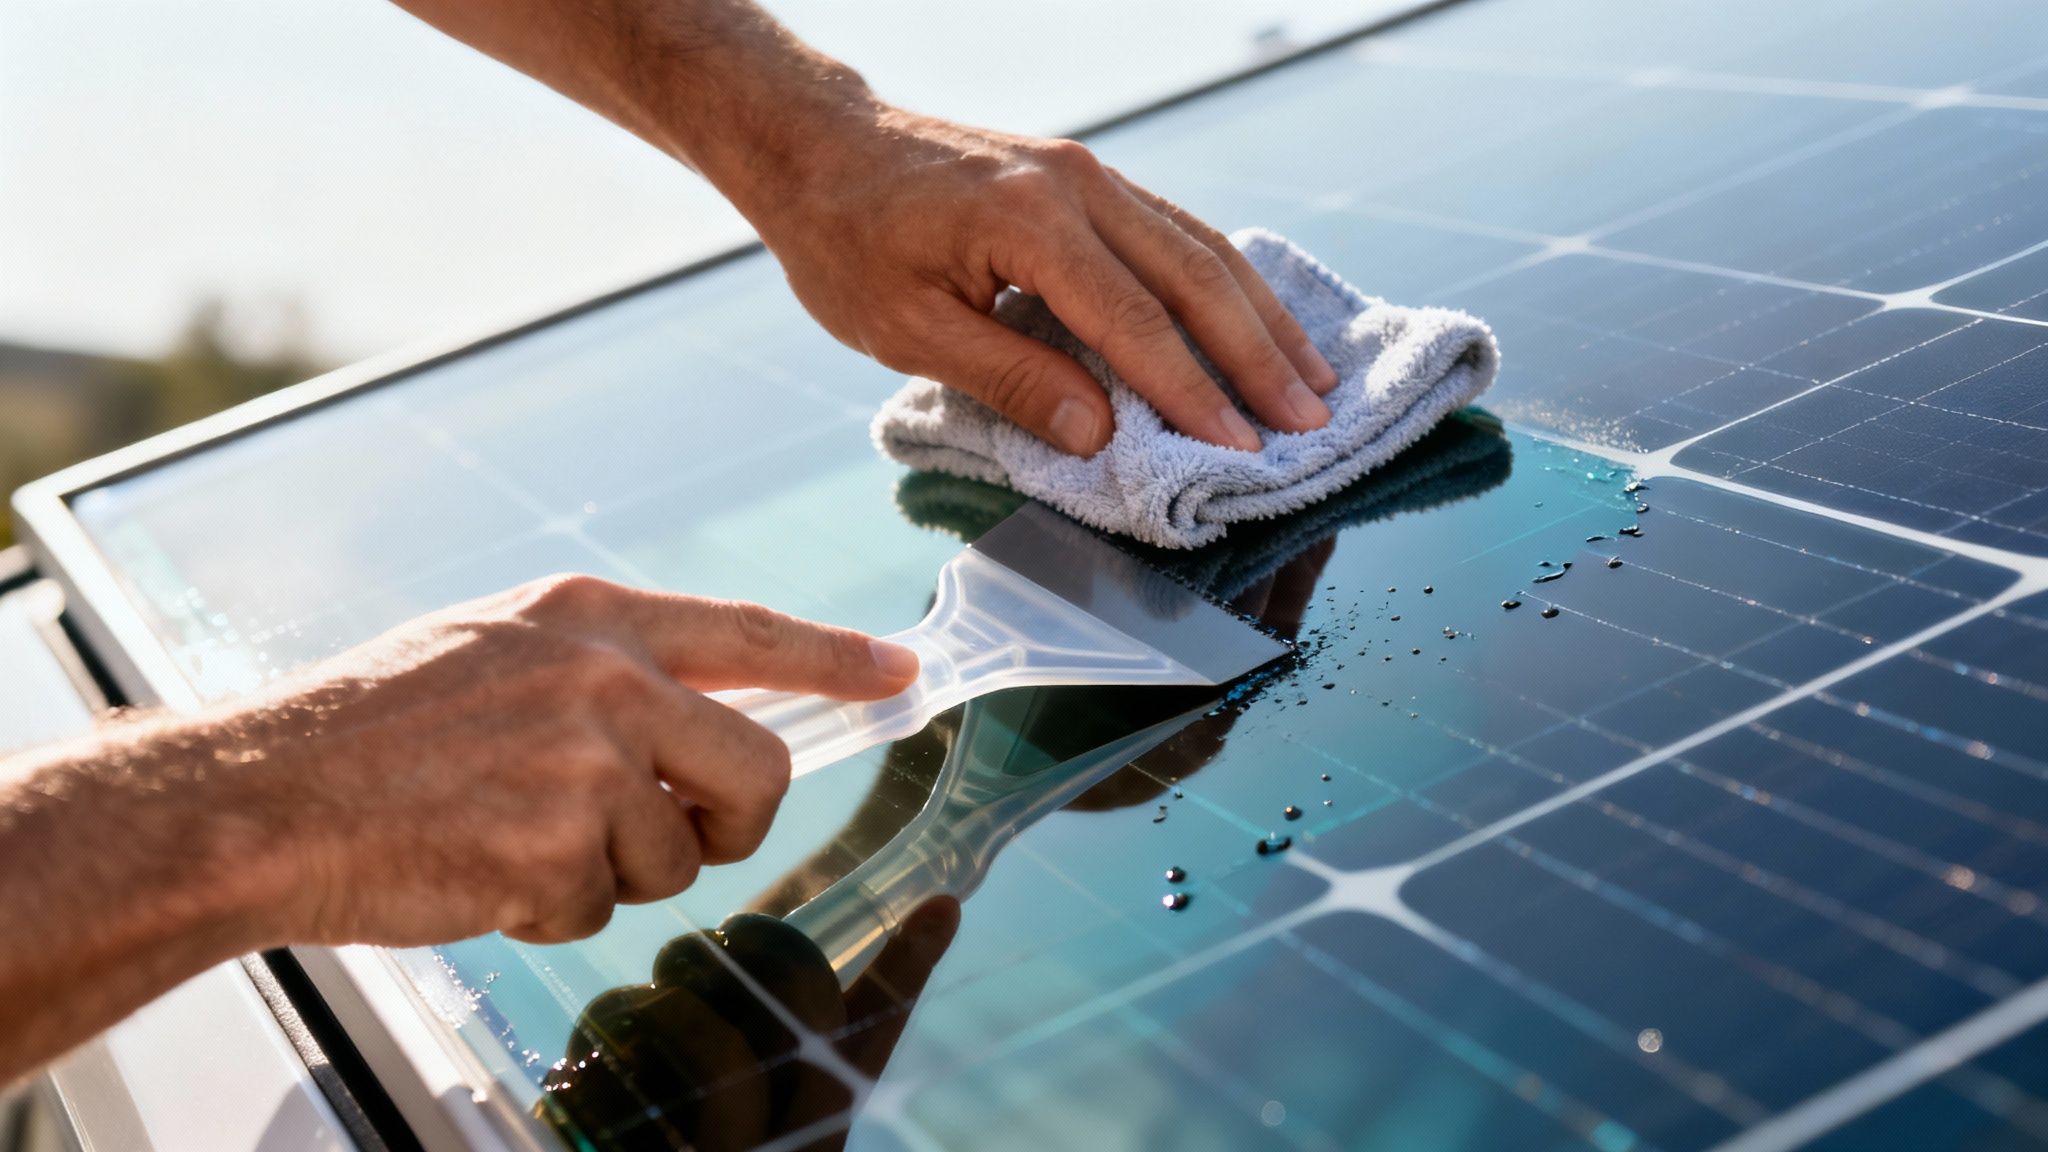
Protecting Your Solar Panel Investment
Getting spray paint off a solar panel isn’t just about making it look good—it’s about protecting your investment and ensuring peak performance. Any paint or grime on the surface casts a shadow on the photovoltaic cells, which directly lowers the panel's energy output.
In a sunny state like Arizona, with over 4.5 million solar panels, even a small patch of spray paint can block up to 30% of sunlight from reaching the cells. That’s a huge drop in efficiency. While a pro might carefully use 0000 steel wool, which has an 85% efficacy on latex paints, it’s not for amateurs—we’ve seen micro-scratches plague 20% of DIY attempts. A much safer bet for a homeowner is a 70% concentration of rubbing alcohol; it can lift 88% of oil-based sprays in about ten minutes without leaving any haze.
Crucial Takeaway: Never, ever use anything abrasive on a solar panel. That means no scouring pads, no rough sponges, and definitely no metal scrapers. You'll scratch the anti-reflective coating, which hurts performance and could even void your warranty.
Your best bet is to check the manufacturer’s cleaning instructions. If you can’t find them, stick with isopropyl alcohol on a clean, soft microfiber cloth. For a more detailed guide, check out our post on how to clean solar panels the right way.
If the paint covers a large area or has been baked on by the sun for weeks, the risk of doing more harm than good is high. In these cases, calling in a professional isn’t an expense—it’s insurance for your investment.
Final Cleanup and Knowing When to Call a Professional
Getting the heavy lifting done—scraping off paint chips and dissolving stubborn residue—feels like you've crossed the finish line. But the job isn't truly finished until the glass is perfectly clear and streak-free. This final cleanup is what separates a decent DIY job from a professional-looking result, erasing any lingering smudges or solvent films left behind.
Think of it this way: you haven't just traded one problem (paint) for another (a hazy, streaky window). Fortunately, achieving that crystal-clear finish doesn't require any expensive chemicals. Your best tools for this final polish are simple, effective, and probably already under your sink.
Achieving a Flawless, Streak-Free Finish
After all that work, the glass is probably covered in a film of solvent residue, soap, and microscopic paint particles. Just wiping this away with a dry cloth will only smear the mess around. You need a proper cleaning solution and technique to get it right.
A simple bucket of warm water with a few drops of dish soap is all you need. This mix is perfect for cutting through any remaining oily residue from solvents without leaving streaks.
Here’s my go-to process for that final polish:
- Wash the Glass: Grab a clean microfiber cloth or a strip washer and wash the entire window with your soapy water. This lifts any remaining grime and neutralizes leftover chemicals.
- Use a Quality Squeegee: This is the real secret to a streak-free shine. Starting at a top corner, press a professional-grade squeegee firmly against the wet glass and pull it down in one smooth stroke.
- Wipe and Overlap: After each pull, wipe the squeegee blade clean with a dry, lint-free cloth. Overlap your next stroke by about an inch—this is crucial for preventing those annoying vertical lines.
- Detail the Edges: Use a dry section of your microfiber cloth to wipe away any water drips from the corners and edges of the glass and frame.
Red Flags: When to Call the Professionals
Sometimes, persistence can do more harm than good. Knowing when to step back and call a professional is key to protecting your property and ensuring the job is done right. If you run into any of these issues, it’s a clear sign to put down the tools.
The biggest mistake homeowners make is underestimating the risk of scratching expensive, custom glass. A single misplaced scrape on tempered or coated glass can cause thousands of dollars in damage, far more than the cost of a professional service call.
Don't hesitate to call a bonded and insured company like Sparkle Tech Window Washing if you're up against these situations:
- The Paint is Fused to the Glass: If the paint has been baked on by years of sun and won't budge with a blade or mild solvents, it might have chemically bonded with the glass. Trying to force it off could lead to permanent etching.
- You're Dealing with a Large Area: Removing paint from one small window is one thing. Tackling an entire storefront or multiple large panes is a massive job that requires specialized equipment and expertise to get done efficiently and safely.
- You Have Expensive or Specialty Windows: For custom-made, Low-E, or historic glass, the risk of a DIY mistake is just too high. A pro will have the right insurance to cover any potential accidents.
- The Glass Shows Signs of Damage: If you notice new scratches or chips after you start, stop immediately. Continuing could make it much worse. If the damage is beyond a simple cleanup, this essential guide to glazing repairs can help you figure out what to do next.
Got Questions About Getting Spray Paint Off Glass?
Even the best-laid plans can hit a snag, and removing spray paint from glass is no exception. Over the years, we've heard just about every question in the book. Here are a few common ones we get from homeowners dealing with tricky situations.
Is It Okay to Use a Pressure Washer on My Windows?
I’m going to give you a hard "no" on this one. It might seem like a quick fix, but a pressure washer can be a window's worst enemy.
That highly concentrated blast of water is powerful enough to shatter the glass outright, especially on older single-pane windows. It can also easily break the window seals or force water between the panes of a double-pane unit. That leads to foggy condensation and a much bigger, more expensive problem than a bit of paint. Stick to the methods that give you control.
What If the Paint Is on the Window Frames and Seals?
This is where you need to switch gears completely. Put the razor blade down and step away from the harsh solvents. Using those tools on frames and seals is a surefire way to strip the finish, gouge the material, or cause permanent damage.
- For Rubber and Vinyl Seals: Try a gentle approach first. A little mineral oil on a clean cloth can sometimes work wonders. Just be sure to test it on a small, out-of-the-way spot first to make sure it doesn’t cause any discoloration.
- For Wood or Metal Frames: Your best bet here is a plastic scraper and a mild solvent that’s safe for the frame's finish. A product like Goof Off might be too aggressive, so start with something gentler and always test first.
The name of the game is removing the graffiti, not creating a bigger repair project. When you move from the glass to the frame, always dial back the aggression and start with the mildest method you can.
How Long Do I Have Before the Spray Paint Is Permanent?
On a non-porous surface like glass, "permanent" isn't quite the right word, but the paint definitely becomes a whole lot harder to remove as it cures. Heat and direct sunlight are your enemies here—they bake the paint onto the glass, causing it to bond much more stubbornly.
For the best and easiest results, you really want to tackle the job within the first 24-48 hours. After that, the paint has cured significantly, and you’ll likely need more elbow grease, stronger solvents, or even professional help to get it off without scratching or etching the glass.
If you're looking at stubborn, cured-on paint, dealing with delicate custom glass, or you just want the peace of mind that comes with a flawless, professional job, don't risk damaging your windows. The experienced, insured, and bonded team at Sparkle Tech Window Washing has the specialized tools and know-how to handle any paint removal task safely.
You can get a free, no-obligation quote by visiting us at https://sparkle.tech/ today.