

You finish the patio, step back, and the brick looks almost right. The lines are clean, the pattern works, but the face of the brick is streaked with gray smears, chalky haze, and a few hard blobs that catch the light from every angle. That's the moment to type how to clean mortar off brick and get told to grab muriatic acid first.
That's backward.
The best results usually come from slowing down and diagnosing the brick and the mortar before you choose a method. A dense new brick can tolerate cleaning that would scar an old handmade brick. Fresh residue often comes off with light mechanical work, while fully cured mortar may need chemistry and tighter control. If you start too aggressively, you can trade a mortar stain for etched faces, washed-out color, and damaged joints.
I've seen more brick ruined by rushed cleaning than by the original mortar smears. Good cleanup is less about force and more about matching the method to the material.
Your Guide to Flawless Brickwork
A lot of brick projects end the same way. The wall is up, the fireplace surround is finished, or the planter finally looks solid and straight. Then the mortar dries on the face, and instead of crisp brickwork you get a patchy, dusty-looking surface that makes the whole job feel unfinished.
The good news is that most mortar residue can be removed. The bad news is that the wrong fix can leave permanent damage. That's why the first question isn't what cleaner to buy. It's what kind of brick you have, how cured the mortar is, and whether you're dealing with a thin film, raised blobs, or old hardened residue.
Some homeowners just want one safe set of instructions they can follow step by step. If that's you, this Phoenix brick cleaning guidance is a useful companion because it stays focused on practical jobsite decisions instead of pushing one harsh solution for every situation.
Practical rule: If you're unsure whether the brick is delicate, act like it is until testing proves otherwise.
A clean-looking result usually comes from a simple sequence. Inspect first. Remove the easiest material mechanically. Pre-wet the brick. Test the mildest cleaner that has a chance of working. Rinse thoroughly. Only step up to stronger methods when the previous one clearly isn't enough.
That's the part many guides skip. They tell you what removes mortar. They don't tell you what removes mortar without wrecking the brick.
Assess the Mess Before You Begin
A lot of brick gets damaged before actual cleaning even starts. Someone sees gray smears, grabs acid, and finds out too late that the brick face is softer than the mortar on it.

Good results come from diagnosis first. You need to know what is on the wall, how firmly it is bonded, and how much abuse the brick can take before you choose a method.
Identify the age and condition of the mortar
Start with the residue itself. Fresh mortar smears behave very differently from mortar that has had time to harden and lock onto the brick face.
Use a simple field check:
- Fresh film or haze usually looks dusty, light, or chalky and may respond to water, a nylon brush, and patience.
- Small raised drips or blobs usually need careful scraping before any washing step.
- Old, hard residue often feels fused to the face of the brick. That is where homeowners get into trouble by forcing the job.
The wall matters too. New masonry can still be curing. Older walls may already have weak joints, past repairs, or surface wear that limits what you can safely use. If the mortar in the joints scratches easily, crumbles, or looks recessed, treat the whole area gently until a test spot proves otherwise.
Read the brick before choosing the cleaner
This is the decision point many guides skip.
Brick is not one uniform material. Dense, smooth-faced brick usually tolerates careful cleaning better than old, sand-faced, handmade, or heavily textured brick. Weathered brick can lose its outer fired surface faster than people expect. Once that face is scarred, you do not clean your way back from it.
Practical trade guidance on surface-specific brick cleaning risks warns that acid can etch brick, lighten color, and damage mortar joints, especially on older or more delicate masonry. That is why the safest approach is to start with the least aggressive option that still has a real chance of working.
Use your eyes and your fingertips. Look for flaking, pitting, sandy texture, soft corners, hairline cracks, or color variation that suggests age and weathering. If the surface looks fragile, assume it is.
If you are unsure whether the brick is soft or sensitive, clean it like it is until a test patch says otherwise.
Separate mortar residue from everything else on the wall
Many post-build walls have more than one problem at once. Mortar haze can sit next to saw dust, dirt, paint flecks, silicone, or general site grime. If you misread that mix, you can choose the wrong cleaner and get poor results even if the brick itself survives.
If the wall looks broadly dirty, not just mortar-marked, it helps to sort out what belongs to masonry cleaning versus general post-project cleanup. A broader construction debris removal approach can help you identify what should be brushed, scraped, washed, or handled as a separate material.
Before you move on, check three things:
Brick sensitivity
Old, porous, flaky, or textured brick gets the gentlest test first.Residue type
Haze, ridges, blobs, and fully cured smears each call for a different level of force.Nearby risk
Metal, glass, painted trim, plants, and finished concrete can all be damaged by runoff or overspray.
Get this part right and the rest of the job gets much easier. Get it wrong and even a strong cleaner can leave you with a worse wall than the one you started with.
Gear Up With the Right Tools and Safety
The wall has already told you a lot. Now the setup needs to match it.

If the brick looked soft, aged, or uneven in your inspection, build your kit around control instead of speed. That usually means hand tools first, plenty of water for pre-wetting and rinsing, and protection for anything nearby that could be stained, scratched, or etched. A careful setup takes a few extra minutes. It can save the face of the brick.
What to have on hand
Start with tools that let you work in small increments:
- Plastic or wood scrapers for shaving off proud mortar without gouging the brick.
- A nylon or stiff bristle brush for loosening haze and light residue after wetting.
- Buckets and clean water for pre-wetting, mixing cleaner if needed, and thorough rinsing.
- Chemical-resistant gloves and wrap-around eye protection if there is any chance you will use a masonry cleaner.
- Drop cloths or plastic sheeting to protect finished concrete, metal, painted trim, and plantings below the work area.
- A hose with gentle, controllable flow so you can rinse without blasting water into joints or across nearby surfaces.
If you are using any pressure-assisted rinse near windows or doors, keep the spray angle low and the nozzle under control. This guide to cleaning windows with a pressure washer is useful for understanding how easy it is to damage glass seals, force water where it does not belong, or scar adjacent finishes.
Safety and prep that change the outcome
Test before you commit to a full wall. A small hidden area is enough to show whether your scraper leaves marks, whether water alone is helping, and whether a cleaner is reacting too aggressively.
Pre-wet the brick before using any cleaner. Dry masonry can pull cleaner in fast, which raises the risk of streaking, discoloration, or surface damage. Keep an eye on temperature and sun exposure too. Hot, direct sun can make a cleaner dry on the wall before you can rinse it properly.
One more point from the field. Wear old clothes, closed-toe shoes, and eye protection even for a “small” touch-up. Mortar chips travel farther than people expect, and rinse water tends to carry grit right back at you.
Safety note: If a test spot fumes hard, flashes dry, or changes the brick color, stop. Dilute more, switch products, or stay with a gentler method.
What not to bring to the wall
Leave out anything that pushes the job past what the brick can handle.
That includes metal scrapers dragged across the face of the brick, angle grinders, wire wheels, random household acids, and strong cleaner mixes you have not tested. Those tools can remove mortar fast. They can also scratch fired faces, open up soft brick, and leave you with bright scars that never blend back in.
The best setup is boring. It gives you control, protects the surrounding materials, and leaves room to step up carefully only if the first method falls short.
Choose Your Mortar Removal Method
A good result starts with matching the method to the wall in front of you. Hard, newer brick with a light film of mortar can take a different approach than older, porous brick with smeared joints and fired faces that mark easily. If you skip that diagnosis and jump straight to acid, you can trade a mortar stain for etched brick, washed-out color, or damaged joints.

Use the least aggressive method that still has a real chance of working. Change methods only after the wall gives you a reason.
Method one, dry removal of the bulk
Raised blobs and ridges should come off before you add water. Once mortar gets wet, it can smear across the face and make a small cleanup job bigger.
This is the right starting point when:
- deposits sit proud of the brick face
- the residue is isolated to a few spots
- the brick looks soft, textured, or easy to scratch
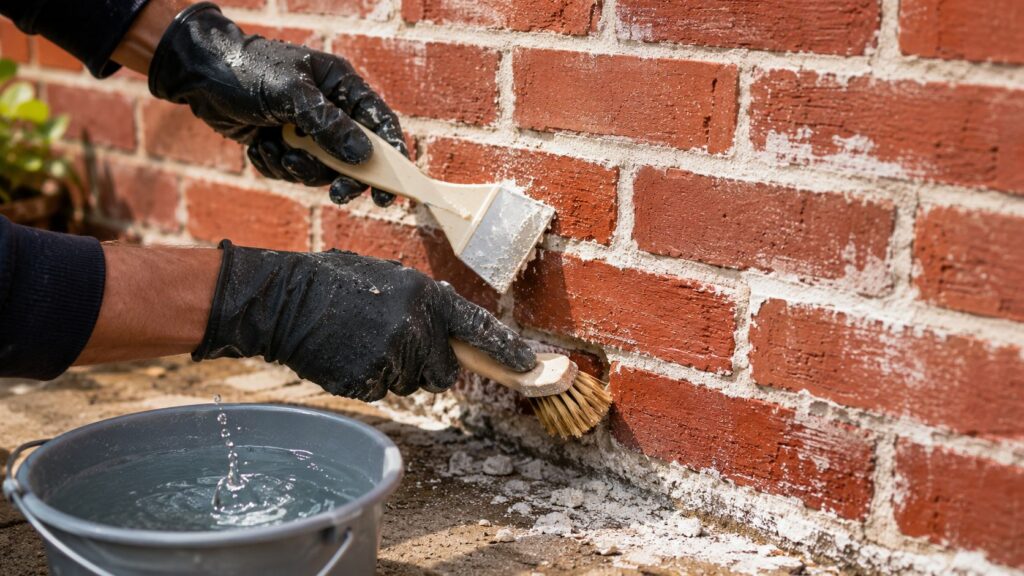
Use a wood or plastic scraper and work from the edge of the deposit inward. Keep the tool angled away from the brick face. The goal is to break the mortar loose without skating across the fired surface. If the scraper starts leaving shiny marks or catching the brick, stop and switch to a gentler approach.
Method two, water and a nylon brush
For fresh smears, thin haze, or mortar that never bonded tightly, plain water and a nylon brush are often enough. This is also the safest way to learn how the brick reacts before you bring in stronger chemistry.
Water and brushing are a good fit when:
- the residue is thin rather than built up
- the brick has an older or softer face
- you are cleaning a small area and can afford to go slowly
This method takes patience. That is usually a fair trade if it keeps the original brick finish intact.
Method three, controlled pressure rinsing
Pressure washing helps most as a rinse step after you have already loosened the mortar. It is not a shortcut for heavy deposits, and it is a poor choice for friable brick, weak joints, or walls that are already shedding surface material.
Use pressure washing only when:
- the brick and joints are sound
- heavy deposits have already been removed by hand
- you can keep the spray fan wide and moving
- runoff will not stain nearby materials
As noted earlier, published masonry guidance allows moderate pressure for suitable exterior brick, but technique matters more than raw force. Hold the wand back, avoid blasting directly into mortar joints, and stop if sand, color, or face material starts coming off. If you want a broader exterior cleanup workflow before you start, these construction cleaning tips are a useful companion.
Place this video here if you want a visual overview before choosing a path:
Method four, masonry cleaners before raw acid
This is the step many homeowners should try before muriatic acid. Buffered or non-acidic masonry cleaners usually give you more control, especially on moderate residue that water alone will not shift.
Manufacturers such as Prosoco recommend a staged approach. Remove bulk mortar first, pre-wet thoroughly, test the mildest cleaner on the most sensitive area, and keep the wall wet enough that the cleaner does not soak in and dry too fast. That sequence matters because the same product can behave very differently on dense new brick than it does on older, thirsty masonry.
Use a masonry cleaner when:
- brushing and water reduce the stain but do not finish the job
- the residue is spread over enough area that hand scraping is inefficient
- you need more cleaning power without jumping straight to raw acid
For many walls, this is the best balance of speed, control, and surface safety.
Method five, muriatic acid when the wall can handle it
Muriatic acid can remove stubborn mortar. It can also etch brick, lighten color, and weaken joints if the wall is soft or the rinse is delayed. That is why it belongs at the end of the sequence, not the beginning.
Use this route only if:
- test spots showed milder methods were not enough
- the brick is hard-fired and in good condition
- the joints are sound
- you can control nearby metal, paint, plants, and runoff
- you can rinse immediately and thoroughly
If you decide the wall can handle it, follow the product label exactly. Fine Homebuilding notes that acid should always be added to water, never the reverse, in its article on removing hardened mortar from brick. Work in very small sections. Do not let the solution dry on the surface. If the test area changes color or texture, stop there and do not continue across the wall.
Brick Cleaning Methods Compared
| Method | Best For | Pros | Cons |
|---|---|---|---|
| Soft brushing and water | Fresh smears and light haze | Lowest risk, simple, good control | Slow, may not remove bonded residue |
| Plastic or wood scraper | Raised blobs and isolated deposits | Good first step, avoids unnecessary chemical use | Easy to slip if rushed |
| Pressure washing | Larger exterior areas on sound brick | Fast rinsing, useful after chemical application | Can damage joints or soft brick if misused |
| Buffered or non-acidic masonry cleaner | Moderate residue on more sensitive surfaces | Better control than raw acid | Still requires testing and careful rinsing |
| Muriatic acid solution | Stubborn old mortar on suitable brick | Strong cleaning power | Highest risk of etching, bleaching, and joint damage |
Final Cleanup and Common Mistakes to Avoid
A lot of DIY jobs go wrong at the finish. The mortar is mostly off, so the cleaner gets left too long, the rinse is rushed, or the wall is scrubbed too broadly. That's when minor residue turns into visible surface damage.

Work smaller than you think you need to
One of the most useful field habits is to reduce your working area until you can fully control it. A practical demonstration advises working in roughly 1 cm² areas at a time, wetting the brick first, applying the cleaner, scrubbing with a nylon brush, and rinsing thoroughly before moving on, as shown in this small-area mortar cleaning demonstration.
That sounds tiny, but the lesson is bigger than the exact patch size. Mortar removal gets safer when the cleaner never has time to dry on the wall.
The mistakes that cause the most damage
These are the ones I'd watch for first:
Cleaning too large an area at once
If you can't keep it wet, scrub it, and rinse it before it flashes dry, the section is too big.Using the harshest option first
Acid feels efficient until it changes the look of the brick.Scrubbing the face with the wrong brush
Nylon is a safer default. A steel wire brush should be limited to isolated hard deposits, not broad face cleaning.Leaving residue in place after the cleaner did its job
Cleaner that isn't rinsed away keeps working.
Rinsing isn't the afterthought. It's part of the cleaning process.
Finish the wall so it looks even
After the residue is gone, inspect from multiple angles while the wall is still damp and again after it dries. Mortar haze can hide in one light and show up in another. If you used an acid-based cleaner, follow the product instructions closely and don't treat the rinse as optional.
For broader post-project cleanup habits around nearby glass, frames, and surrounding surfaces, these construction cleaning tips are a useful reminder that masonry residue rarely stays only on the brick.
A good finish has a consistent look. No chalky film. No etched spots. No bright cleaned patches surrounded by untreated haze.
When to Put Down the Brush and Call a Pro
You start with a small test patch, use the least aggressive method that makes sense for the brick, and still end up with mortar that will not release cleanly. That is usually the point to stop proving a point and start protecting the wall.
Some jobs carry too much risk for trial and error. Historic brick, older lime-based mortar, handmade units, and visibly soft or weathered faces can scar fast if the method is even slightly too aggressive. The same applies when the wall is high, the affected area is large, or rinse water can hit windows, painted trim, metal, or planting beds. On those projects, a mason or masonry cleaning specialist is often the safer hire.
Stubborn residue is another clear line. If you already diagnosed the brick, tested the mild option first, and stepped up carefully without good results, repeated passes usually buy you very little. What I see instead is face damage, color change, and uneven patches that stand out more than the original smear.
Hire for masonry judgment, not just labor. Before you hand over a deposit, read this guide on how to run a contractor background check. Then ask direct questions. What cleaner do they start with. How do they test. How do they handle older or soft brick. What is their plan for runoff control and surface protection.
After the brick is handled correctly, the rest of the cleanup still matters. Fine dust, splatter, and residue rarely stay on the wall alone, so it helps to know what a full construction clean up service includes before you book the wrong kind of help.
Good judgment is part of good workmanship. If stopping protects the brick, stop. If the masonry is done and you want the rest of the property to look finished, Sparkle Tech Window Washing & window screens helps Arizona homeowners with exterior glass, screens, and post-construction cleanup that ties the whole project together.