

The work is finished, but the site doesn't feel finished. You're standing in a new kitchen, bath, addition, or patio project, and instead of enjoying it, you're looking at drywall dust on the floor, broken tile in buckets, wood scraps against the wall, and a pile of packaging nobody claimed on the way out. That's the part many first-time homeowners don't expect.
Construction debris removal is the last real job of the project. Done right, it gets your house back, protects the new surfaces you just paid for, and keeps you from making expensive mistakes at the dump or during cleanup. Done poorly, it drags out for days and leaves dust in places you'll keep finding for months.
In Arizona, this job has its own complications. Heat changes how long you can safely work. Wind carries fine dust farther than people realize. Phoenix-area disposal rules and accepted materials can vary by facility, so a load that's packed in a hurry can become a headache at the scale house or transfer station. The good news is that this is manageable if you treat it like a jobsite task instead of a giant trash run.
From Dusty Mess to Clean Slate
A common scene looks like this. The contractor wraps the punch list, the truck pulls away, and the homeowner walks back inside expecting relief. Instead, there are cutoffs under the saw horses, cardboard stacked in the garage, a row of old fixtures near the curb, and a powdery film on every horizontal surface.
That feeling is normal. It also doesn't mean the project went sideways. It means the visible build is over and the recovery phase starts now.
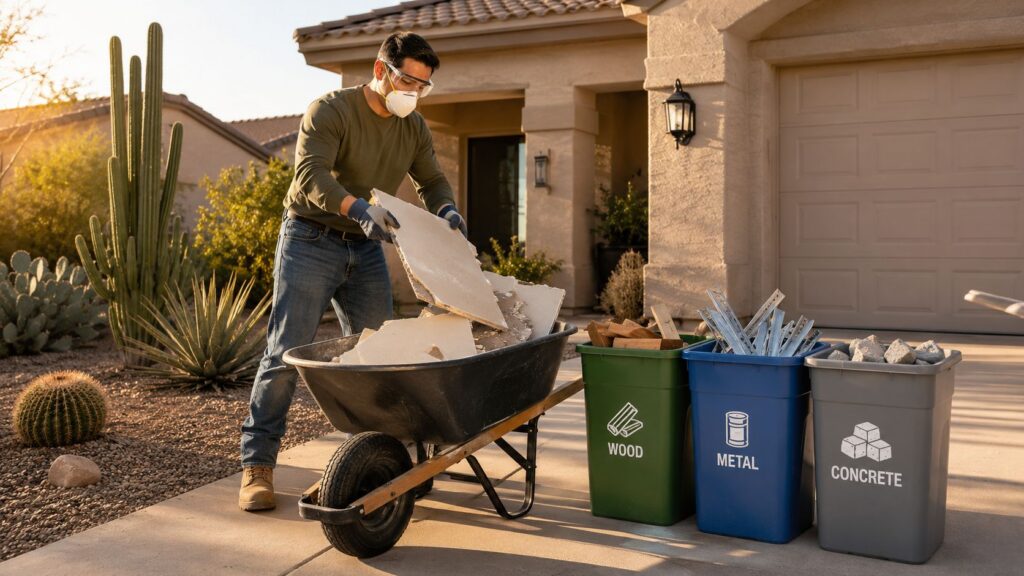
Construction debris removal works best when you stop looking at the mess as one giant pile. Break it into categories, make a disposal plan before you start lifting, and deal with the heavy material first. Most homeowners get overwhelmed because they begin by stuffing mixed debris into random bags. That creates extra trips, torn bags, higher disposal costs, and more dust.
In Arizona homes, the fine dust matters as much as the chunks. Dry conditions let it drift into vents, window tracks, and every edge around new trim. If your remodel stirred up a lot of indoor dust, it's smart to think beyond sweeping and look at your home's air side too. A quick review of Mesa indoor air quality is useful if you're trying to figure out why the house still feels dusty after the visible debris is gone.
Practical rule: The cleanup starts before the first bag is filled. If you don't decide what goes where, the pile decides for you.
Most jobs come down to five decisions:
- What you're dealing with. Clean wood, drywall, concrete, metal, packaging, fixtures, and anything questionable need different handling.
- How you'll protect yourself. Gloves and boots aren't enough when dust, sharp edges, and heavy loads are involved.
- Where you'll sort. Separate lanes or containers save money and reduce rework.
- Which Arizona disposal option fits the job. Dumpster, self-haul, recycler, or hired crew all make sense in different situations.
- When to stop and call for help. Some loads are too heavy, too risky, or too regulated for a homeowner cleanup.
A clean slate doesn't happen by accident. It happens when the cleanup gets the same discipline as the build.
Preparing for a Safe and Organized Cleanup
The fastest way to turn a manageable cleanup into a long weekend is to start moving debris without setup. Before you pick up one piece of scrap, build your work plan.

The scale of this waste stream is part of the reason organization matters. The EPA estimated 600 million tons of construction and demolition debris were generated in the United States in 2018, which was more than twice total municipal solid waste that year, according to the EPA's construction and demolition materials guidance. On a homeowner job, that same lesson applies in smaller form. If you don't organize the site, the debris takes over the space.
Gear that isn't optional
You don't need a full commercial crew setup for a residential cleanup, but you do need basic protection that fits the material you're handling.
- Steel-toed or sturdy work boots keep nails, broken tile, and jagged metal from turning one misstep into an urgent care visit.
- Heavy-duty gloves matter because drywall edge, splintered studs, and cut flashing all slice through cheap garden gloves.
- Safety glasses keep grit and chips out of your eyes when you're breaking down material or sweeping dusty corners.
- N95-rated dust masks are the minimum for dusty interiors, especially with drywall residue, sawdust, and fine masonry dust.
- Long sleeves and durable pants help more than most homeowners expect, especially when you're moving wood with exposed fasteners.
If the home is older and you suspect hazardous material, stop there. Don't guess. Question marks around asbestos, lead-painted material, or chemical contamination are a hard stop for DIY removal.
Sort before you haul
A mixed pile looks efficient because it's all in one place. It isn't. Mixed debris costs more time, creates more dust, and limits what can be recycled or reused.
Set up separate zones for:
- Clean wood
- Metal
- Concrete, brick, or masonry
- Drywall and dusty interior debris
- Cardboard and packaging
- Landfill-bound mixed waste
- Questionable or restricted items that need facility confirmation before disposal
Use tape, marker labels, or simple tarps to define each area. In a garage, I like one wall for recyclable material, one corner for landfill waste, and one clear lane for wheelbarrow traffic. In a driveway, bins, buckets, and contractor bags work if you keep paths open.
If you have to step over debris to reach the debris, the setup is wrong.
Prep the site like a work zone
Before cleanup starts, walk the route from the work area to the truck, trailer, or dumpster. Remove trip hazards. Open gates. Check for soft ground if you're rolling heavy loads across gravel or pavers. In Phoenix summers, decide your work window before the sun decides it for you. Early morning is safer and more productive than trying to muscle heavy debris in afternoon heat.
A few tools make a big difference:
| Tool | Best use |
|---|---|
| Wheelbarrow or garden cart | Moving heavy or bulky debris with fewer trips |
| Flat shovel | Scooping broken drywall, sand, and small rubble |
| Pry bar | Pulling apart nailed assemblies |
| Magnet broom | Picking up stray fasteners after the bulk cleanup |
| Contractor bags | Containing dusty, sharp-edged light waste |
| Push broom and shop vacuum | Final pass after bulk material is gone |
For homeowners trying to line this up with broader upkeep, a seasonal home maintenance checklist helps tie the cleanup into the rest of the post-project work instead of treating it as a one-off chore.
The DIY Debris Removal Process
Once your lanes are set and your safety gear is on, the actual work begins. This part goes faster when you handle material by type instead of attacking the whole mess at once.

Research on on-site sorting points to six critical factors for success: manpower, a market for recycled materials, waste sortability, better management, site space, and logistics. It also notes that failures often come from inadequate sorting space and weak management control, not from a lack of disposal options, as discussed in this research summary on on-site construction waste sorting. For a homeowner, that usually means one thing. Leave enough room to sort, and don't let piles drift back together.
Wood and framing scraps
Wood is usually the easiest category to clean up, but it's also where a lot of hand injuries happen.
Stack longer pieces in the same direction so nails and screws are visible. If a board has a few fasteners and is otherwise clean, pull them with a hammer claw or pry bar before stacking. If it's loaded with twisted nails, bent screws, adhesive, or attached hardware, don't waste half an hour trying to make a perfect salvage pile. Move it to the proper disposal stream and keep the cleanup moving.
A few habits save time:
- Cut awkward lengths down only if needed. Oversized pieces can be easier to stack in a dumpster than in a pickup bed.
- De-nail on a stable surface. Don't hold a board in the air and wrestle with it.
- Bundle trim and narrow scraps so they don't scatter across the driveway in the wind.
Concrete, brick, and heavy rubble
Homeowners most often overdo it with construction debris removal. Concrete doesn't look like much until you start lifting it repeatedly.
Use a shovel or pry bar to break apart small clusters, then move it with a wheelbarrow or cart instead of carrying pieces by hand across the yard. Load in small batches. Heavy debris punishes bad lifting form fast, especially if you're twisting to dump or stepping over uneven ground.
Don't fill any container just because there's room in it. Fill it only to the point where you can still move it safely.
If a slab section or masonry pile requires two people, treat that as the minimum, not the exception. For very dense material, a trailer, specialized dumpster, or professional haul is often the better call because weight becomes the primary issue, not volume.
Drywall, dust, and fine debris
Drywall cleanup is messy because it breaks into sharp, crumbly pieces and creates fine dust that spreads through the house.
Bag drywall scraps in contractor-grade bags without overpacking them. Light bags that can seal are better than giant bags that split in the hallway. Sweep gently instead of aggressively whipping dust into the air, then use a shop vacuum with a fine filter for the detail pass. If you're still in an occupied home, close interior doors to limit migration while you work.
For small off-cuts, joint compound residue, and sweepings:
- Pick up the larger pieces first by hand or flat shovel.
- Bag dusty fragments next before they get ground into the floor.
- Vacuum edges, corners, and vents last once the bulk material is gone.
Metal, fixtures, and reusable pieces
Metal should come out of the mixed pile early. It cuts bags, adds weight, and often belongs in a different disposal stream than general debris. Copper, aluminum, steel framing pieces, old hardware, and removed fixtures should go in a tote, bucket, or dedicated pile.
If cabinets, doors, unopened tile, or usable trim came off the job in good shape, set them aside before demolition leftovers swallow them. Homeowners often throw away the most reusable material because it got buried under trash.
Keep the workflow simple
The cleanest DIY jobs usually follow this rhythm:
- Start with bulky items that open floor space.
- Move heavy rubble second while energy is high.
- Handle wood and metal next to reduce hazards.
- Finish with drywall dust and detail cleanup once the room is open.
That order isn't fancy. It just works.
Navigating Disposal and Recycling in Arizona
Getting debris to the curb is not the same as getting it disposed of properly. In the Phoenix and Maricopa County area, the right outlet depends on material type, load size, and whether you need a simple dump option or a cleaner recycling path.
Roll-off dumpsters, self-haul, and bag pickup
For a moderate or large residential project, a roll-off dumpster is usually the most straightforward choice. It keeps debris contained, reduces repeated truck trips, and lets you clean as you go. The downside is space. Not every driveway handles a large container well, and some neighborhoods or HOAs have rules about placement and duration.
Self-hauling works when the volume is limited and you have the right vehicle. It gives you direct control over sorting and where each load goes. It also means loading, tying down, driving, unloading, and paying attention to acceptance rules at each destination. In summer heat, that gets old fast.
Bag-style pickup services can fit small remodel leftovers, especially if you don't want a dumpster sitting out front. They tend to work best when the debris is light, contained, and not a big masonry or concrete job.
A simple comparison helps:
| Option | Best fit | Main drawback |
|---|---|---|
| Roll-off dumpster | Ongoing remodel debris and larger cleanouts | Needs space and planning |
| Self-haul | Small, sorted loads | More labor and multiple trips |
| Bag pickup | Light, contained debris | Limited for heavy or bulky waste |
Phoenix-area disposal reality
Phoenix-area homeowners usually deal with a mix of landfills, transfer stations, and specialty recyclers. Before loading the truck, confirm what a facility accepts, whether the load must be separated, and whether they have restrictions on specific materials. That's especially important for roofing, treated lumber, dirt, concrete, appliances, and anything that might be considered restricted or contaminated.
Arizona conditions add another factor. Dust control and load securement matter. Fine debris blowing out of a trailer on the freeway is a safety problem and an easy way to turn a cleanup day into a citation or a cleanup at the roadside. Tarp every load. Keep rubble below the side rails. Don't count on "it's only a short drive."
Recyclers can be the smart route
Concrete, asphalt, and scrap metal often make more sense at specialized facilities than in mixed disposal. Clean loads are easier to place and easier to price. If you're tearing out a block wall, old patio slab, or metal fencing, separating those materials up front usually pays off in lower hassle and cleaner unloading.
That same sorting mindset matters for non-construction items too. Remodels often uncover old electronics in garages, offices, or utility areas. If that happens, valuable insights for Arizona IT managers are useful even for homeowners because they explain local electronics recycling considerations that many general cleanup guides skip.
The cheapest haul isn't always the cheapest job. A low-cost pickup that leaves you with mixed loads, rejected material, or missing paperwork can cost more by the end.
Watch the compliance side
Most homeowners think debris removal is just hauling. In some places, the job includes documentation. Austin is one example where affected projects must reuse or recycle at least 50% of construction and demolition debris and track tons landfilled versus diverted with weight tickets, according to the city's construction and demolition recycling ordinance. Arizona requirements aren't identical, but the lesson carries over. If you're working under a permit, contractor scope, or project requirement that calls for proof of diversion, ask about records before you hire a hauler, not after the load is gone.
Knowing When to Hire Professional Removal Services
A lot of homeowners can handle construction debris removal on their own. A lot of them also wait too long to admit when the job stopped being a cleanup and turned into a risk.
The decision usually comes down to four things. Volume, material type, time, and physical strain. If one of those gets out of hand, professional help starts making more sense.

Red flags that should stop a DIY cleanup
Some jobs don't deserve a heroic effort. They deserve the right crew.
- Hazard concerns. If you suspect asbestos, lead-painted debris, chemical residue, or contaminated material, stop and bring in specialists. For owners dealing with higher-risk material, this guide to asbestos abatement for commercial properties is useful because it shows the level of containment and process that hazardous removal requires.
- Major demolition volume. Full-room tear-outs, roofing debris, block wall demolition, and slab breakup can overwhelm a homeowner setup quickly.
- No practical haul route. Stairs, narrow side yards, tight gates, and long carry distances raise the labor and injury risk.
- Deadline pressure. If other trades, inspections, tenants, or move-in dates are waiting on the cleanup, slow DIY hauling can create a cascade of delays.
What pros often do better
Professional crews aren't just selling labor. The better ones bring a workflow.
The EPA distinguishes between debris generation, recycling, energy recovery, and landfilling, and a key performance measure is how well material gets diverted from landfill. When reusable commodities aren't separated early, downstream recovery becomes less economical, as explained in this construction and demolition material performance review. That matters because a good removal crew doesn't just toss everything together and hope the transfer station sorts it out.
Here's the practical difference:
| Decision factor | DIY works best when | Hire pros when |
|---|---|---|
| Volume | The pile is limited and contained | Debris keeps growing or covers multiple areas |
| Material | Mostly clean, non-hazardous waste | Heavy, bulky, sharp, or questionable material is involved |
| Time | You can spread the work out | The site needs to be cleared quickly |
| Equipment | You already have hauling tools and a suitable vehicle | You'd need rentals, extra labor, or repeated dump runs |
A professional quote can look expensive until you add your fuel, dump time, bag costs, rental needs, and the value of losing a full weekend to hauling.
There's also the cleanup quality issue. Some companies load and leave. Others remove, sort, sweep, and give you a usable site at the end. That's worth asking about directly.
If the project is shifting from rough debris removal into finish-stage cleanup, it helps to review what a detailed post-construction service includes through construction clean up starting at $125. That gives you a useful benchmark for the difference between hauling debris and preparing a finished space.
Prepping Your Site for Window and Solar Panel Cleaning
Once the bulky waste is gone, most homeowners think they're done. They aren't. The last phase is detail cleanup, and it's the part that protects the surfaces you just installed.

A significant share of construction waste, estimated at 30%, consists of material discarded before it's even installed because of inaccurate estimates or off-cuts, according to The Constructor's overview of construction waste management. On a residential job, that leftover material becomes the chips, grit, and fine dust that settle on glass, frames, tracks, and panels.
Why the final dust pass matters
Arizona dust is abrasive. So is drywall residue. If you start scrubbing windows or rinsing solar panels before that grit is removed, you risk dragging sharp particles across the surface. That's how a brand-new finish ends up looking worn before you've had a chance to enjoy it.
The same goes for access. Cleaning crews need safe walkways, clear screens, and unobstructed work areas. If debris is gone but tracks are packed with dust and patio paths are still gritty, the property isn't ready for finish cleaning.
The handoff checklist
Before any glass or panel cleaning happens, do these first:
- Vacuum thoroughly with a HEPA-capable machine on floors, sills, tracks, ledges, and corners.
- Wipe hard surfaces in stages so you're lifting dust, not smearing it around.
- Clear access paths to windows, exterior walls, and any solar equipment access points.
- Remove stickers, tape scraps, and packaging leftovers from frames and nearby trim.
- Check for loose fasteners or metal shards near walkways and work zones.
If your project included rooftop work, don't assume rain or a hose will handle the panels. Dust, pollen, overspray, and residue need the right process. Homeowners who want to understand that next step can review this guide on how to clean solar panels.
A proper final cleanup doesn't just make the place look better. It protects the investment and makes follow-up cleaning safer, faster, and more effective.
When the dust has settled but the glass still needs a professional finish, Sparkle Tech Window Washing & window screens can help with window washing, solar panel cleaning, glass railing cleaning, and screen service across Arizona. If you want the site to look as finished as the remodel itself, it's worth bringing in a team that handles the detail work the right way.