

You open the window for a little fresh air, then stop. The screen is torn, bowed, or jammed in the track, and now you're choosing between bugs inside the house or wrestling with a frame that feels like it's welded in place.
That's a common double-hung window problem, especially in Phoenix where screens take a beating from sun, dust, pets, and years of being popped in and out the wrong way. A lot of homeowners make the same mistake. They assume a screen is simple until the frame bends, the spring pin sticks, or the replacement won't seat no matter how hard they push.
The good news is most double hung window screens are serviceable if you know what you're looking at. The bad news is generic guides skip the parts that cause trouble. They'll tell you to “remove the screen carefully” and leave out the one detail that keeps people from wrecking the frame. This guide gets into the part that matters: fit, spring tension, half-screen versus full-screen choices, and when to stop forcing it.
The Role of Your Double Hung Window Screens
A lot of Phoenix homeowners find out what a screen really does the first time one stops cooperating. The window opens fine, but the screen rattles, leaves a gap at the corner, or refuses to come out without a fight. At that point, it is not just a bug barrier. It affects whether the window is usable.
On a double hung window, either sash can open. That gives you more flexibility with airflow, but only if the screen fits the opening correctly and the spring side still has enough give to seat and release the frame. When those springs stick, people start forcing the screen, and that is how corners get bent and tracks get scarred up.
Screens also shape how practical the window feels day to day. A half screen is lighter, easier to remove, and common on older double hung units. A full screen covers the whole opening, which many homeowners prefer after getting tired of exposed space when they switch which sash they open. I get that request a lot. It is one of the most common upgrades, especially when someone is already replacing a damaged frame and wants the window to work better than it did before.
What these screens are doing for you
A good double hung screen helps with a few real-world jobs at once:
- Keeps insects out while the window is open
- Lets air move through the house without leaving the opening exposed
- Blocks some debris like leaves, cottonwood fluff, and windblown dust
- Removes cleanly for washing, repair, or seasonal replacement
- Stays tight in the track so it does not buzz, bow, or pop loose
The fit matters more than many homeowners expect. A screen that looks close can still leave enough of a gap for gnats, flies, and dust to get through. If insects are already collecting around the opening, a sound screen paired with practical effective window fly repellent solutions can make the area a lot easier to manage.
The trouble spots generic guides skip
The screen itself is only part of the system. The frame, pins, tabs, and track all have to work together, and that is where DIY jobs often go sideways.
These are the failures I see most often:
- Bent frame corners from prying with a screwdriver instead of compressing the spring side correctly
- Torn or brittle mesh after years of Phoenix sun and heat
- Stuck spring pins that no longer slide freely, which makes removal feel impossible
- Wrong orientation with the spring side installed on the wrong edge
- Near-match replacements that are just off enough to bind in the opening
Stuck springs deserve special attention because they fool people into thinking the screen is permanently jammed. Usually it is old dirt, corrosion, or a slightly twisted frame keeping the pins from moving the way they should. That is fixable in many cases, but brute force makes the repair more expensive fast.
If you are trying to figure out whether your current screen can be repaired or you need a better-fitting replacement, this guide on how to measure window screen size accurately helps before you spend money on the wrong frame.
A double hung screen should come out with controlled pressure and go back in without a wrestling match. If it does not, there is a reason, and it is usually something specific you can identify once you know where the problem starts.
Getting a Perfect Fit How to Measure for Screens
Bad measurements cause more frustration than bad mesh. If the screen is even a little off, you'll feel it right away when you try to set the top into the track or drop the bottom onto the lip.
Standard screen sizes do exist, and that helps when you're replacing a common residential unit. Affordable Window Screens notes that common full-screen sizes for double-hung windows range from 24 inches by 36 inches up to 48 inches by 72 inches, and proper fit depends on the screen sliding into the top track and resting on the bottom lip with only 1/16 to 1/8 inch of clearance above the lip.
Still, I never tell a homeowner to order by guesswork just because the window “looks standard.”

Measure the opening, not your optimism
If the old screen is bent, don't trust its frame as your reference. Measure the actual screen channel where the replacement has to sit.
Use a metal tape measure, not a cloth one. Write everything down immediately. Screens fail on paper before they fail in the window.
Width
Take the width in three places:
- Top of the screen opening
- Middle
- Bottom
Use the smallest of the three. Window openings are rarely perfect, especially in older homes.
Height
Do the same vertically:
- Left side
- Center
- Right side
Again, use the smallest number.
Half screen and full screen measurements aren't the same job
A half screen usually covers only the lower or upper operable section, depending on the setup. A full screen spans the full screened area of the double-hung frame. That means you need to know what you're replacing before you measure.
| Screen type | What to measure | Common mistake |
|---|---|---|
| Half screen | Only the intended screened sash opening | Measuring the full frame by habit |
| Full screen | Entire screen channel from top track to bottom resting point | Forgetting the bottom lip clearance |
If you're replacing a half screen with another half screen, measure only that opening. If you're trying to upgrade to a full screen, measure the entire channel the new frame would occupy.
Practical rule: Measure the opening twice, on two separate passes. If the second set doesn't match the first, measure a third time before you order anything.
Check the frame style before you buy
Not every double-hung screen mounts the same way. Some sit more flush. Others ride deeper in a channel. Before ordering, look at:
- Top track shape: Is there a clear U-shaped channel?
- Bottom support edge: Is there a defined lip the frame will rest on?
- Spring side: Can you identify which edge compresses?
If you need a visual reference while you work through dimensions, this window screen size measuring guide from Sparkle Tech is a useful companion.
A clean measuring routine
Here's the method that prevents expensive mistakes:
- Open the window fully: Give yourself enough room to see the actual screen seat.
- Wipe the track first: Packed dust can hide the true edge.
- Measure to the nearest 1/16 inch: That level of accuracy matters on screens.
- Label each window: “Kitchen left,” “bedroom south,” and so on.
- Note half or full: Don't rely on memory later.
A screen that's too small rattles and leaks air and insects around the frame. A screen that's too large gets forced, bows in the middle, and starts a whole new repair problem.
Mastering Screen Removal and Installation
Most screens are damaged then. Not during use. During removal or reinstallation.
The key detail is the spring mechanism. If you don't fully compress the spring side, the frame binds in the track. Then people pry, twist, and bend the frame trying to “help” it out.

How removal should feel
For many double-hung setups, the basic method is to tilt both sashes inward about halfway, slide the screen upward, depress the spring pins on one side, and pull the screen out toward the spring side. A demonstration referenced in this YouTube guide notes that failing to fully depress the spring pins is the most common mistake and accounts for about 30% of user-reported installation failures.
That tracks with what I see in the field. The problem usually isn't strength. It's angle and pin compression.
Removal steps that work
For a typical spring-pin screen
- Tilt both sashes inward partway so you can access the screen safely from inside.
- Grip the frame, not the mesh. Use both hands on the side rails.
- Slide the screen upward into the top track.
- Compress the spring side fully. Don't half-push it and hope.
- Pull the opposite edge free once there's enough clearance.
- Angle the screen inward and bring it out carefully.
If it won't move, stop. A screen that needs force is usually hung up on one of three things: the spring isn't fully depressed, the frame is cocked in the track, or the screen is upside down relative to its hardware.
A second helpful visual walkthrough is this screen installation page from Sparkle Tech, especially if you want to compare your screen hardware before putting pressure on it.
Installation is the reverse, but not a mirror image
People hear “reverse the process” and then rush. Reinstalling takes a little finesse.
Place the spring side where it belongs. Set the top edge into the top channel first. Compress the spring side completely, then bring the opposite edge into position and lower the frame onto the bottom resting point.
Later in the section, take a look at this quick visual walkthrough.
What a properly seated screen looks like
You shouldn't see a twisted frame or a bulge in one corner. The screen should sit evenly with no rocking when you press lightly on the rail.
Use this quick check:
- Top edge seated: It's fully nested in the upper channel.
- Bottom edge resting cleanly: No corner is sitting high.
- Spring side released fully: You can feel it snap back into position.
- No rattle: A slight push shouldn't produce movement.
If you need to push harder and harder, you're not “almost there.” You're usually installing it wrong.
Half screens versus full screens during handling
Half screens are easier to manage because they're smaller and lighter in the hand. Full screens give you more coverage, but they demand better alignment. If your frame is older or slightly bowed, a full screen will reveal that problem fast.
That's why a lot of homeowners can remove a half screen just fine, then struggle the first time they try to work with a full one.
Choosing the Right Screen Mesh and Repair Tools
Once the frame fits, the next decision is mesh. Climate, pets, visibility, and sun exposure matter more than people expect.
There's also a practical reason this choice comes up with double-hung windows. Homeowners often start with a damaged half screen and then decide they'd rather upgrade the whole setup. A community discussion highlighting this gap points out that many homeowners are confused about compatibility when moving from half-screen to full-screen configurations, even though demand for better ventilation and insect protection is there.

Mesh choices that make sense
Here's the simple version. The “best” mesh depends on what keeps damaging your current one.
| Mesh type | Best for | Trade-off |
|---|---|---|
| Standard fiberglass | Everyday use, easy handling | Less resistant to clawing and hard impact |
| Aluminum | Rigid feel and solid visibility | Can crease or dent |
| Pet screen | Homes with dogs or cats | Heavier look, slightly less open feel |
| No-see-um mesh | Tiny insects | Airflow feels a bit tighter |
| Solar screen | Strong sun exposure and daytime privacy | Darker appearance from inside |
In Phoenix, solar exposure changes the equation. Mesh that works fine in a mild climate can age faster under harsh sun. If the room gets blasted with afternoon heat, upgrading material can make more sense than replacing like for like.
If you want a more detailed breakdown of options, this guide to window screen material types from Sparkle Tech lays out the practical differences clearly.
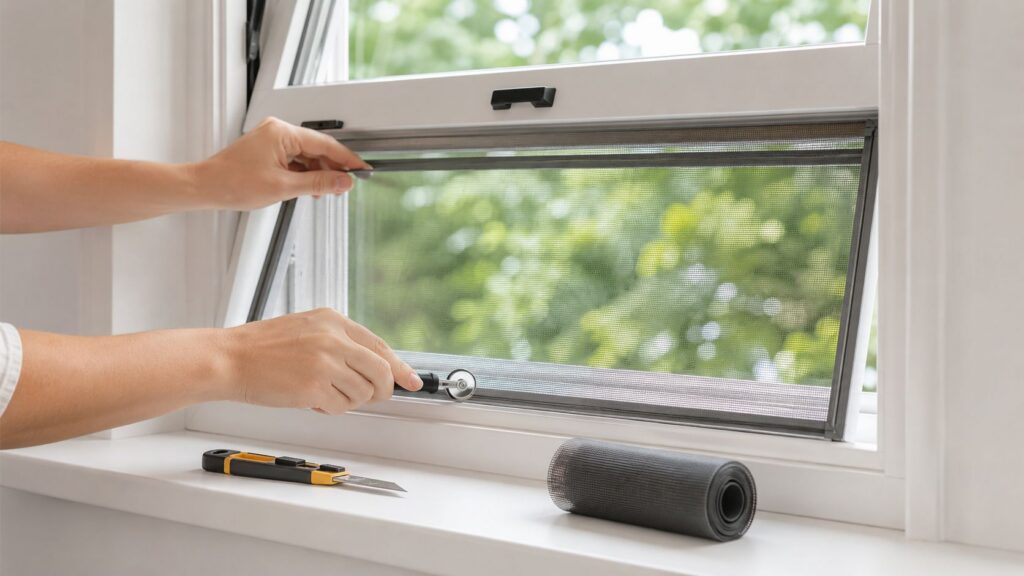
Tools worth buying for a real repair
If you're re-screening a frame instead of replacing the whole screen, keep the tool list short and useful:
- Spline roller: This presses the spline into the groove without shredding the mesh.
- Replacement spline: Match the existing size as closely as possible.
- Utility knife: Use a sharp blade for trimming excess cleanly.
- Screen mesh roll: Buy enough to leave working overhang on all sides.
- Flat work surface: A table is better than the garage floor.
What works and what doesn't
Good results usually come from matching the repair to the problem.
What works:
- Switching to pet screen when animals keep scratching one panel
- Using solar screen where heat and glare are part of the complaint
- Re-screening a square, undamaged frame with fresh spline
What doesn't:
- Installing premium mesh into a bent frame and expecting a tight seal
- Reusing brittle old spline because it “still looks okay”
- Upgrading to full screens before confirming the channel can accept them properly
The frame decides whether the job will turn out well. The mesh only finishes it.
If you're on the fence between half and full, think about how you use the window. If easier handling matters most, half may still be the better fit. If you're tired of partial coverage and want the whole opening screened, full screens can be a strong upgrade when the frame and track allow it.
Tackling Common Screen Repairs Yourself
The two repairs most homeowners can handle are patching a small hole and replacing mesh in an existing frame. Both can save a good screen frame from the trash.
The trick is not rushing the reinstall. Many DIY repairs go fine on the table, then stall when the screen won't slide back in.
Re-screening a frame
If the frame is square and the corners are still solid, re-screening is often worth doing.
Start by removing the old spline from the frame groove. A small flat tool or the tip of a utility knife can lift the end, but use a light hand so you don't gouge the channel. Pull the old mesh off and wipe the groove clean before laying the new material over the frame.
Then work in this order:
- Lay the new mesh flat over the frame with extra material on all sides.
- Press one edge in first with the spline roller and new spline.
- Move to the opposite side and keep the mesh taut, not stretched like a drum.
- Finish the remaining sides while smoothing out ripples by hand.
- Trim the excess with a fresh utility blade after the spline is fully seated.
Wrinkles usually come from uneven tension, not bad mesh. If one corner starts to bunch, pull the spline back out on that section and reset it before finishing the whole frame.
Patching a small tear
Small holes don't always require full re-screening. A patch can buy you time, especially on an otherwise sound screen.
Use a screen repair patch matched to the mesh type when possible. Clean the area first so the patch seats properly. If the tear is near the frame edge or corner, patching tends to hold less reliably, and a full re-screen is often the cleaner fix.
Why the screen won't go back in
This is the question people ask after the repair is done. The mesh looks good. The frame looks fine. But the screen refuses to seat.
A RiteScreen product page for double-hung screens confirms the use of spring mechanisms, but the common troubleshooting questions homeowners ask, like why the screen won't slide back in, usually aren't covered in standard instructions.
Here's what to check first:
- Wrong orientation: The spring side may be flipped.
- Spline bulge: New spline may be sitting proud in one corner.
- Twisted frame: It looked straight on the bench, but torqued during handling.
- Dirty track: Dust or paint buildup is blocking full travel.
- Spring not compressing fully: One pin may be sticky or partially jammed.
A stuck spring checklist
If one side feels dead or won't retract cleanly, don't force the frame.
Try this:
- Press each spring by hand: Compare the feel from one side to the other.
- Inspect the pin opening: Dust and oxidation can make movement rough.
- Look for frame pinch: A slightly bent side rail can trap the spring hardware.
- Test fit without rushing: Set the top edge first, then check how much travel the spring side really has.
If the spring hardware is binding inside the frame, that's the point where DIY often stops making sense. You can replace mesh at home. Hardware and frame correction are a different job.
DIY Repair vs Calling a Professional Screen Service
You finish the repair, carry the screen back to the window, and it still will not seat. One corner hangs up, one spring pin barely moves, and now the frame has a slight bow from being pushed too hard. I see that all the time in Phoenix, especially after a homeowner does a clean mesh replacement on a frame that had a hidden hardware problem from the start.
That is usually the dividing line between a good DIY job and a call for service. Mesh work is one thing. Stuck springs, bent rails, and full-screen upgrades are another.
As noted earlier, double hung windows are a bigger investment than simpler window styles. A poorly fitting screen can turn that investment into a recurring annoyance with rattling, gaps, and constant reinstall attempts.

When DIY is the right call
DIY makes sense when the problem is limited to the screen itself and the frame still sits square.
Good candidates include:
- Small mesh damage: One tear or puncture with no sign of frame distortion
- Loose or brittle spline: The old mesh has failed, but the corners and rails are still solid
- One or two screens: Small jobs are easier to manage on a bench or patio table
- Safe indoor access: You can remove and reinstall the screen without overreaching or fighting the window
Those are reasonable home repairs. With the right spline roller, fresh mesh, and a little patience, many homeowners can get a solid result.
When it's smarter to call a pro
The trouble starts when the issue is not really the mesh.
Here are the jobs that tend to go sideways fast:
| Problem | Why DIY often goes sideways |
|---|---|
| Bent frame | Even a slight twist can keep the screen from sitting flat in the track |
| Stuck or failed spring hardware | New mesh will not fix a spring pin that binds or will not retract |
| Several damaged screens | Tool setup, measuring, and material waste add up quickly |
| Full-screen retrofit questions | Upgrading from a half screen to a full screen can create fit and hardware issues |
| Specialty mesh needs | Some mesh types are harder to tension correctly and can change how the screen fits |
Full-screen upgrades deserve special attention. Homeowners often assume a taller screen will drop right in if the width looks right. That is not how these units work. If the spring placement, frame depth, or top and bottom tolerances are off, the new screen can bind before it ever seats properly.
There is also the bigger home protection issue. If screen gaps are part of a larger bug problem, this Guide for Crown Point homeowners can help you tighten up other entry points around the house.
If you are forcing a screen, shaving a frame because it almost fits, or fighting the same spring pin over and over, stop there and get it checked.
The trade-off homeowners usually miss
DIY saves money only when the first repair holds up. Once you buy mesh, spline, a roller, corner parts, and then replace a frame you bent during reinstall, the savings shrink fast.
A professional service earns its keep when you need:
- A screen that fits the opening correctly
- Spring hardware that moves as intended
- Help choosing mesh that holds up in strong sun
- Cleaner handling of full-screen replacements
- A finished screen that does not bow, rattle, or leave edge gaps
In Phoenix, weak repairs show up fast. Heat dries out old spline, dust packs into tracks, and sticky spring hardware gets worse with use.
If your double hung window screens need more than a simple patch, Sparkle Tech Window Washing & window screens can help with measuring, repair, replacement, and full screen service across the Phoenix valley and throughout Arizona. When a frame is bent, springs are stuck, or you want a clean full-screen upgrade without the trial and error, it makes sense to have an experienced local team handle it right.