

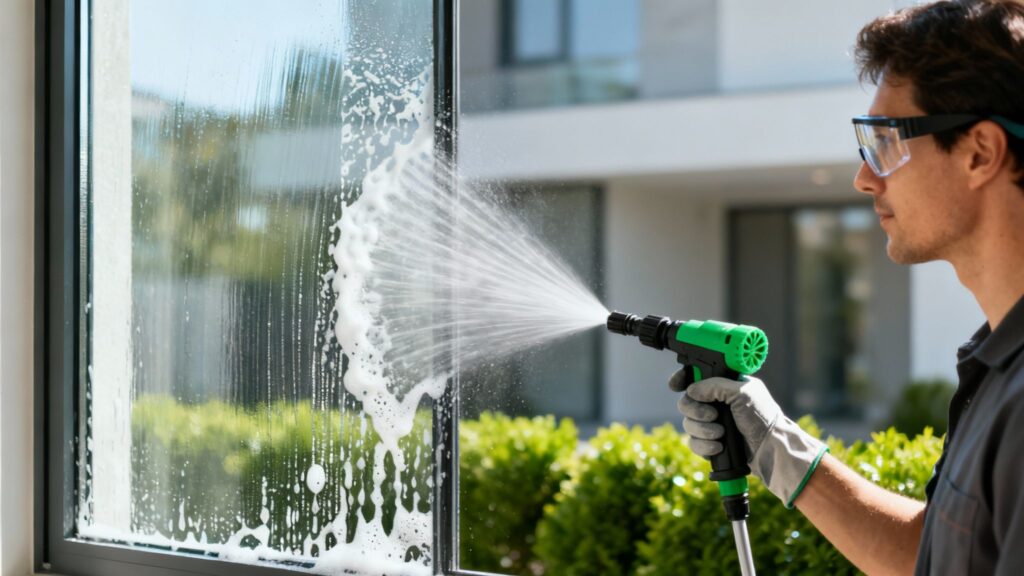
Yes, you can clean your windows with a pressure washer, but let's be crystal clear: this is a high-risk, high-reward job that demands serious caution. The secret isn't brute force; it's finesse. We're talking about using very low pressure—staying well under 1500 PSI—and fitting your machine with a wide-angle nozzle. Anything more, and you're gambling with shattered glass and broken window seals.
Honestly, for most homeowners, especially those with older homes, the risk just isn't worth it. There are safer ways to get sparkling windows.
Should You Pressure Wash Your Windows?
Deciding whether to break out the pressure washer for your windows is a classic risk-versus-reward dilemma. There’s no simple "yes" or "no" here. The right answer depends entirely on the type, age, and current condition of your windows.
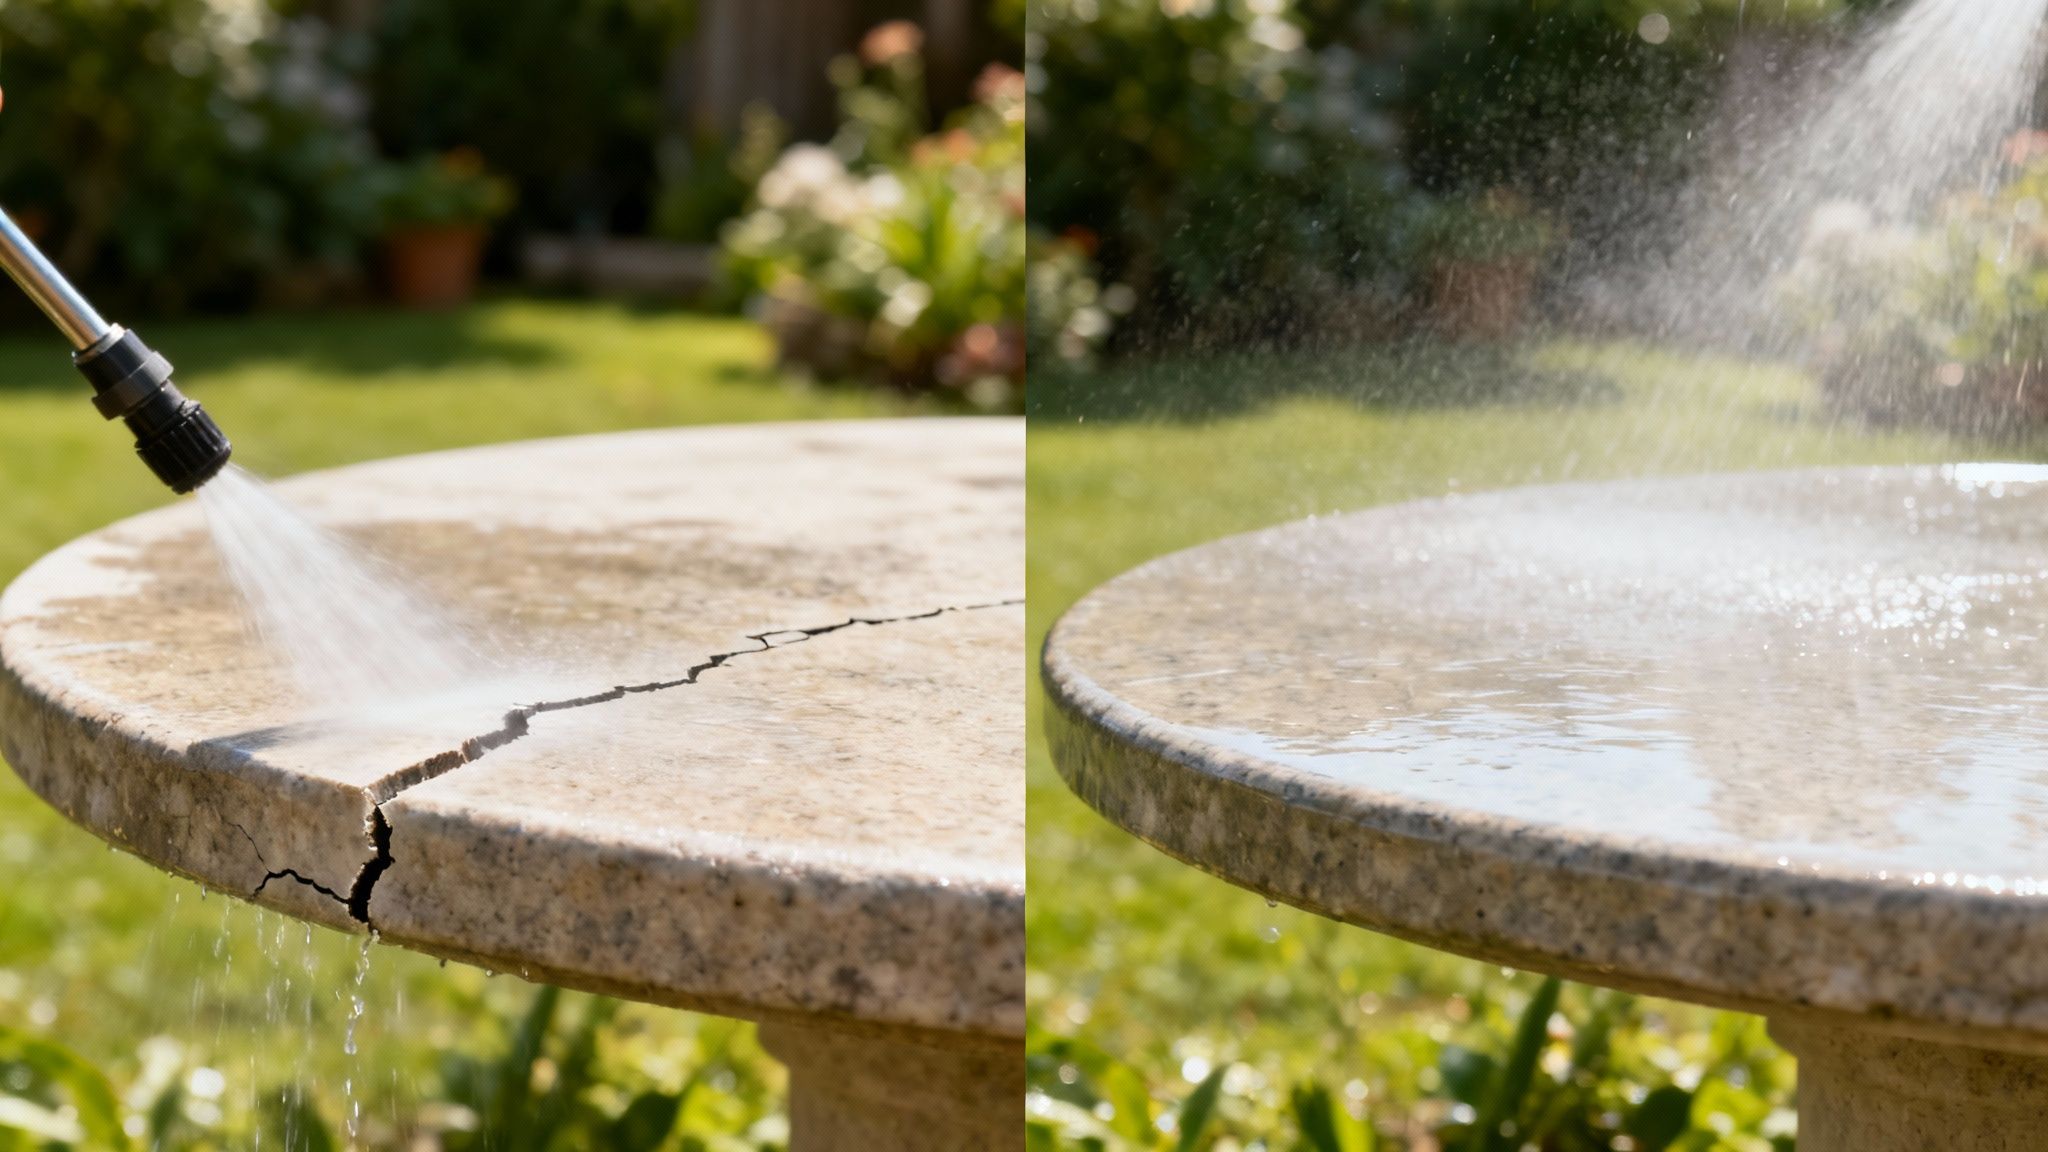
High pressure is an absolute recipe for disaster. It can do more than just crack the glass. It can blast through the seals on double-pane windows, which leads to that dreaded fogging and condensation between the panes—a problem that's never cheap to fix.
Assessing Your Window's Suitability
Before you even think about pulling the trigger on that pressure washer, you need to do a thorough inspection of every window. Think of it as a pre-flight check. Modern, well-sealed vinyl or fiberglass windows are usually your best bet. Their frames and seals are designed to handle rough weather, so they're less likely to let water in when washed gently and correctly.
On the other hand, some windows should be considered a "no-fly zone" for pressure washers.
- Older, Single-Pane Windows: These are often incredibly fragile. Even a low-pressure stream can be enough to crack or completely shatter them.
- Wood-Frame Windows: Wood is like a sponge. Forcing water into the grain can lead to rot, warping, and peeling paint down the line. It's a slow-motion disaster.
- Windows with Damaged Seals: If you can already spot moisture or fog between the panes, a pressure washer will only make it worse. You're essentially injecting more water into a leaky container.
It's telling that in the $2.68 billion professional window cleaning market, manual methods still reign supreme. In fact, fewer than 5% of pros will ever point a pressure washer at a window because the risk of damaging seals and glass is just too high.
To help you make the call, here's a quick guide to see if your windows are up for the task.
Pressure Washer Suitability by Window Type
| Window Type | Pressure Washer Safe? | Key Considerations |
|---|---|---|
| Modern Vinyl Windows | Usually | Check for tight seals. Use a wide (40° or 65°) nozzle and low PSI (under 1500). |
| Fiberglass Windows | Often | Very durable, but still requires low pressure and a safe distance. Seals are the weak point. |
| Double-Pane (Insulated) | With Extreme Caution | Any existing seal failure will be made much worse. Inspect for fogging first. |
| Wood-Frame Windows | No | High risk of water penetrating the wood, causing rot, mold, and paint damage. |
| Single-Pane Glass | No | Extremely fragile and prone to cracking or shattering under direct pressure. |
| Storm Windows | Varies | Can sometimes be washed if removed from the primary window first. Never spray directly when installed. |
Remember, this is just a starting point. Always err on the side of caution. When in doubt, don't spray.
Understanding the Financial Risks
The promise of a quick, sparkling clean is tempting, but the potential fallout can be a real headache. A broken window seal or water forced deep into your wall cavity can kickstart mold and mildew growth, and even cause structural damage that you won't notice until it's a huge problem.
Before you start, it's a good idea to review your homeowners insurance policy, as damage from what might be considered improper maintenance often isn't covered.
If all this sounds a bit too risky, there are fantastic alternatives. For a professional-grade clean without the high-pressure gamble, a water-fed pole window cleaning system is what most experts trust for delicate surfaces. It’s effective, safe, and gets the job done right.
Even as the global pressure washer market grows, its use for delicate jobs like window cleaning remains a niche, expert-only task for a reason. A cautious approach is always the best one.
Choosing the Right Gear for Window Cleaning
When it comes to pressure washing windows, success isn't about raw power—it's about precision and control. The right gear is what separates a sparkling finish from a shattered pane of glass. You can forget about the heavy-duty machines meant for stripping paint off a deck; for windows, you need finesse.
Your best bet is a pressure washer with adjustable settings. I usually recommend electric models because they tend to operate at a lower, more manageable pressure range than their gas-powered cousins. The sweet spot is a machine that can comfortably run well below 1500 PSI. This gives you the control to gently rinse away grime without blasting your window seals into the next county.
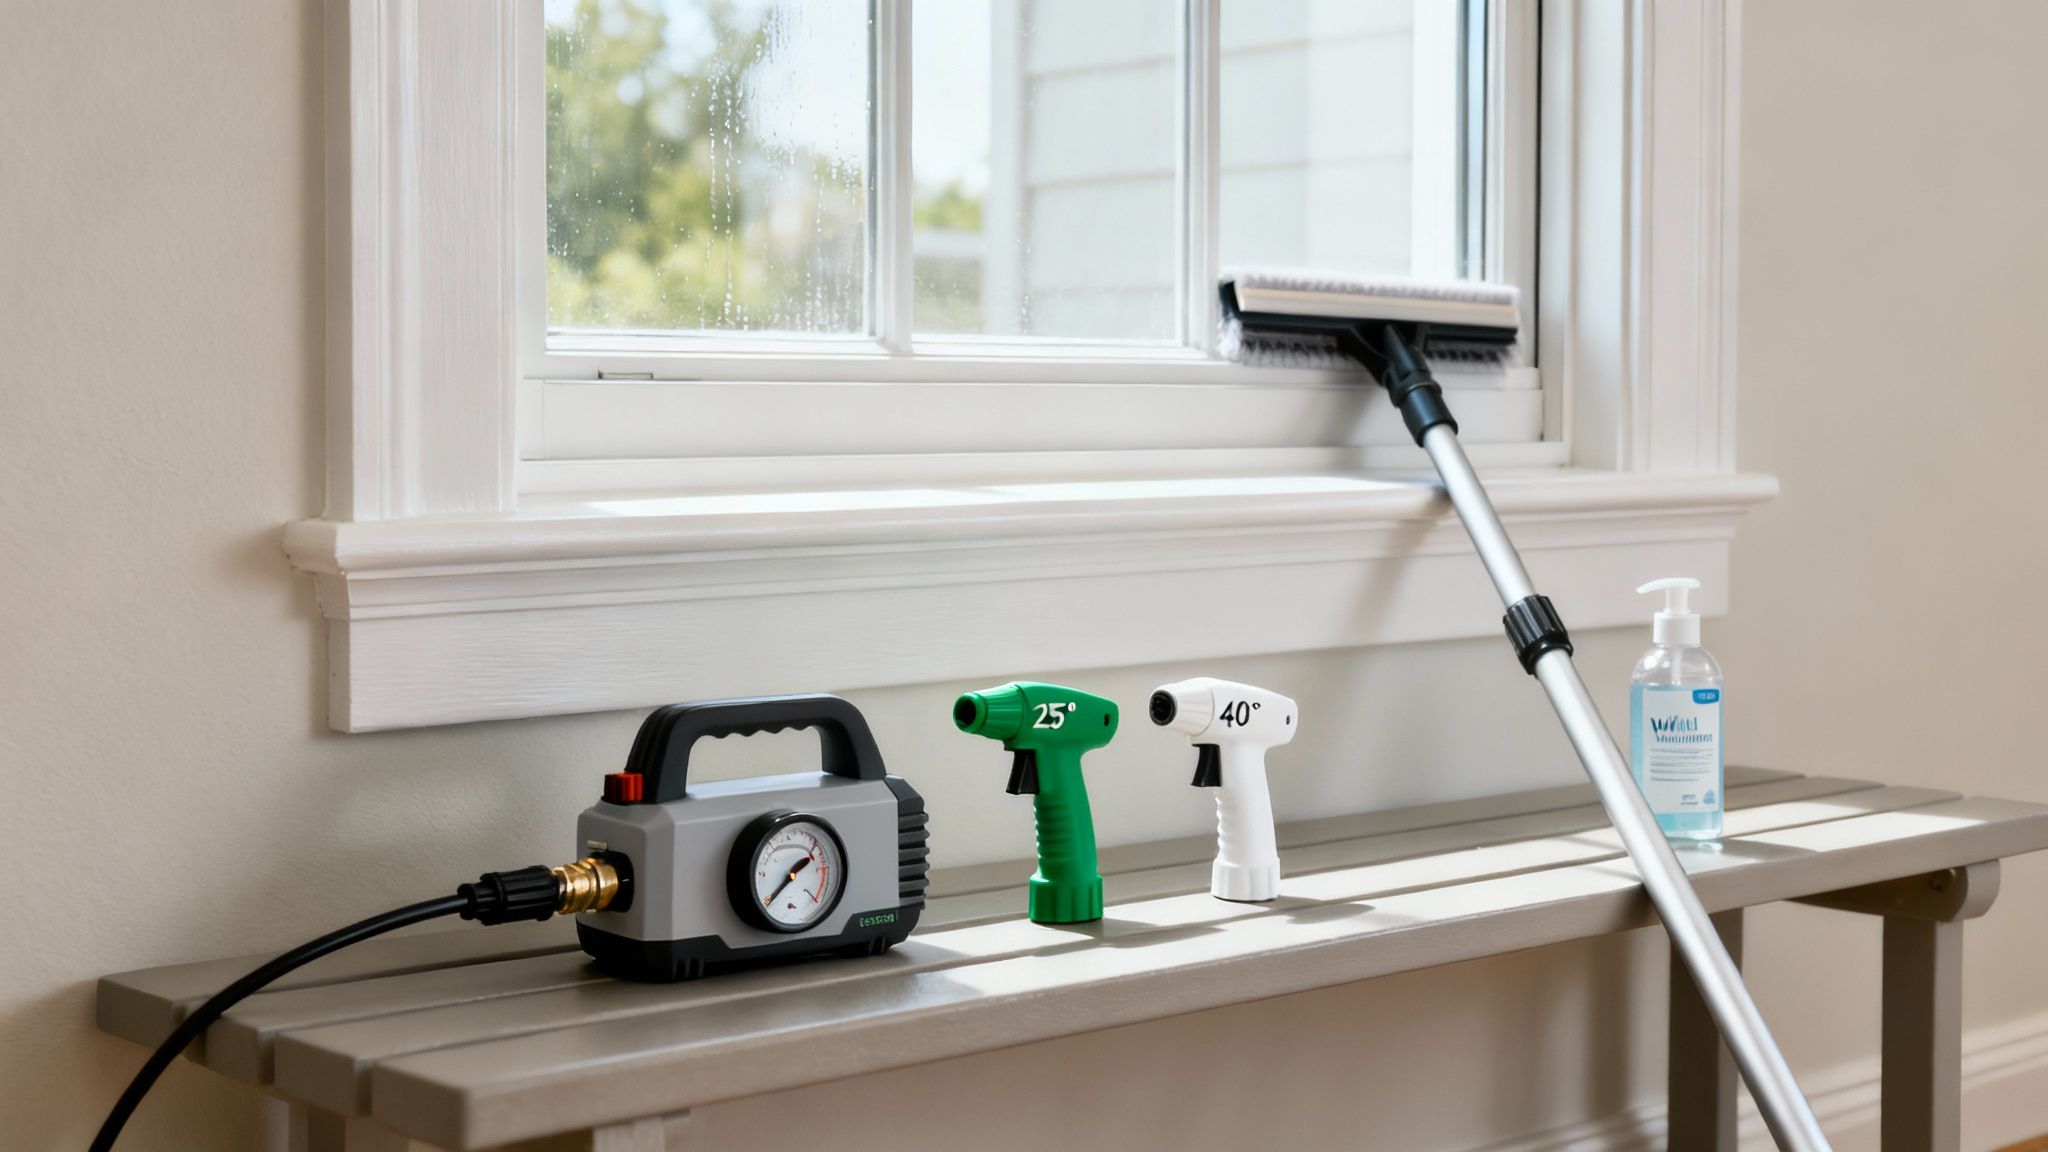
Selecting the Safest Pressure Washer Nozzles
The nozzle you choose is probably the single most important piece of the puzzle. It controls the force and spread of the water, and grabbing the wrong one is the fastest route to a costly mistake. Thankfully, the color-coding system is a universal guide.
For cleaning glass, you're strictly limited to the widest-angle tips. These produce a gentle, fan-like spray, not a destructive, concentrated jet.
- White Nozzle (40-degree): This is your workhorse. It creates a wide, gentle spray that's perfect for rinsing delicate surfaces like glass from a safe distance.
- Green Nozzle (25-degree): You might reach for this one for some really stubborn dirt, but use it with caution. It concentrates the pressure more than the white tip, so you absolutely have to stand further back from the window to compensate.
Crucial Safety Tip: Never, ever use the red, zero-degree nozzle for this job. That tip creates a pencil-thin jet of water that can etch concrete, let alone destroy a window. It has no business being anywhere near glass.
Finding the Right Cleaning Solution
The soap you use is just as critical as the hardware. You're looking for a detergent specifically formulated for pressure washers that is also labeled as safe for glass, siding, and your landscaping. Don't just grab any old household cleaner; many of them contain harsh chemicals that will cause more problems than they solve.
Steer clear of any solutions that contain:
- Ammonia
- Bleach
- Abrasives
These ingredients can leave behind a nasty film, eat away at the protective coatings on modern windows, and damage the caulking around the frame. Worse, the runoff can be toxic to your lawn and garden. Always look for a pH-neutral, biodegradable formula. You can get a deeper dive into the dos and don'ts of window cleaning chemicals to avoid to make sure you’re using something safe.
Essential Safety Accessories
Finally, let's talk about the gear that keeps you safe and makes the job go smoothly. An extension wand is non-negotiable for reaching second-story windows. It lets you maintain the correct angle and distance from the ground, which is far safer than trying to wrestle a pressure washer while perched on a ladder.
And please, always wear safety glasses. It only takes one stray piece of debris or a bit of chemical spray-back to cause a serious eye injury.
Prepping Your Windows and Work Area: The Most Important Step
When it comes to pressure washing windows, what you do before you pull the trigger is what separates a clean finish from a costly disaster. Honestly, the prep work is probably 90% of the job. Skipping it is the fastest way to turn a simple cleaning task into a weekend-long headache.
Before anything else, you need to get up close and personal with every single window. I mean, really inspect them. Look for the little things that high-pressure water loves to turn into big problems.
Are there any tiny, hairline cracks in the glass? What about the seals? If you see any fogging or moisture trapped between the panes, that's a major red flag. Don't forget the frames, either—especially if they're wood. Poke around for any soft spots, rot, or peeling paint that could get blasted away.
I can't tell you how many times I've heard stories of a small, unnoticed chip turning into a spiderweb crack across the entire pane. A five-minute inspection can literally save you hundreds, if not thousands, in replacement costs. It's time well spent.
Once you’ve given your windows a clean bill of health, it's time to clear the deck. Water and detergent are going to get everywhere, so you need to create a safe zone.
Protect Your Home and Garden
Think about everything in the immediate vicinity. That means moving patio furniture, grills, potted plants, and any of those fragile garden gnomes to a safe, dry spot well out of the way.
For the landscaping you can't move, like delicate rose bushes or flowerbeds, grab some lightweight plastic sheeting or a tarp. Gently drape it over them. This protects them not only from the force of the spray but also from any cleaning solutions you're using.
Now, let's talk about the house itself. Water has a knack for getting into places it shouldn't, and you have to be proactive.
- Cover Up Outlets: Water and electricity are a bad combination. Use waterproof electrical tape or a proper outdoor outlet cover to seal any exterior outlets completely.
- Block Door Gaps: Roll up some old towels or a tarp and stuff them firmly against the base of your exterior doors. This is a simple trick to stop water from seeping underneath and into your home.
- Shield Your Vents: Make sure to cover any dryer vents or HVAC intakes. You definitely don't want water being forced into your ductwork.
Don't Skip the Pre-Rinse
Alright, with everything buttoned up, there’s one last thing to do that most people completely ignore: the pre-rinse. But put the pressure washer down for this part. All you need is a regular garden hose with a gentle spray nozzle.
Give each window a good, soft rinse from the top down. The goal here is to wash away all the loose stuff—the dust, pollen, and abrasive grit that has been sitting there for months.
Blasting that gritty layer with a pressure washer is basically like sandblasting your windows. It’s the number one cause of fine scratches on the glass. By rinsing it off first, you let your cleaning solution get straight to work on the stubborn, stuck-on grime, making the whole process safer and much more effective.
Mastering the Technique for a Safe, Streak-Free Wash
Alright, you've done the prep work, and now it's time for the main event. This is where your careful setup really pays off, letting you clean efficiently without breaking anything. The whole process boils down to a simple two-part method: apply your cleaning solution with low pressure, then rinse it all off with a wider, gentler spray.
Here’s a pro tip that might feel a little backward at first: always soap your windows from the bottom up. Why? If you start at the top, dirty suds will run down the dry, grimy glass below, etching in "clean streaks" that are a real pain to get rid of later. Working from the bottom up prevents this entirely.
This simple workflow is the key to a successful project.

Following these three prep steps helps you avoid turning a simple cleaning job into a costly repair, protecting both your windows and your home before the real work starts.
How to Apply the Detergent
First things first, grab your black soap nozzle. This low-pressure tip is specifically designed to pull detergent from your machine and lay it on the surface without any real force.
Find a good distance to stand—about three to four feet away from the window is a solid starting point. Begin applying the soap in steady, overlapping horizontal sweeps, moving from the bottom of the window right up to the top. This technique gives you even, consistent coverage with no missed spots.
Once the window is completely sudsed up, it's time to let the cleaner do its job. Don't rinse it off immediately. Give the solution a few minutes to sit on the glass; this is when the active ingredients get to work, breaking down all that caked-on dust, dirt, and pollen.
We call this "dwell time," and it's a bit of a balancing act. You're aiming for about 3-5 minutes—just enough time for the soap to work its magic. The absolute worst thing you can do is let the soap dry on the glass. It leaves behind a stubborn, hazy film that’s often harder to remove than the original grime.
Keep an eye on the weather. If you're washing on a hot, sunny day, you'll need to work in smaller sections and move a bit faster to keep the solution from drying out before you can rinse.
Rinsing for That Flawless Finish
After the soap has had a chance to work, it’s time to rinse. This is the most critical part of the process, where you can either achieve a perfect result or cause some serious damage.
Swap out that black soap nozzle for a wide-angle rinsing tip. The white 40-degree nozzle is your best friend here—it's the safest choice by a long shot. Before you point it at your window, give it a quick test spray on the driveway or a patch of siding just to get a feel for the pressure.
Here’s how the pros handle the rinse:
- Start at the Top: Unlike soaping, you always rinse from the top down. Gravity becomes your ally, pushing all the dirty suds and grime down and away from the window.
- Keep Your Distance: Don’t get too close. Stand at least four feet back from the glass. This distance gives the water stream room to fan out, which dramatically reduces the impact pressure on the window.
- Use Overlapping Sweeps: Move the wand in smooth, controlled horizontal strokes. Make sure each pass overlaps the previous one by about a third to prevent leaving lines or streaks behind.
- Watch the Edges: Be mindful not to blast the edges of the window frame directly. This is the most vulnerable area where high-pressure water can damage seals or force its way behind your home's siding.
Keep rinsing until every last bubble is gone. A thorough, patient rinse is what separates a spotty job from a truly sparkling, streak-free finish.
Common Window Washing Mistakes to Avoid
I’ve seen it happen more times than I can count. An enthusiastic homeowner gets a new pressure washer, aims it at a dirty window, and ends up with a cracked pane or water seeping into their walls. Learning what not to do is just as important as mastering the right technique. Trust me, sidestepping these common errors will save you from some serious headaches and expensive repairs.
The single biggest mistake? Using the wrong nozzle. It’s so tempting to reach for that red zero-degree tip for a really baked-on bird dropping, but that’s a surefire way to shatter glass. That nozzle concentrates the machine's full power into a tiny, destructive jet that can etch concrete—it doesn't stand a chance against a window.
Do yourself a favor and stick exclusively to the wide-fan nozzles. The white 40-degree or green 25-degree tips are your friends here, dispersing the water into a gentle, effective spray instead of a laser beam.
Using Way Too Much Pressure
Beyond the nozzle, cranking the PSI dial all the way up is another classic blunder. It feels like more power should mean a faster, better clean, but for windows, it’s the exact opposite. High pressure doesn't just risk breaking the glass; it can completely destroy the seals around the panes. This is especially true for double- or triple-pane windows.
Once that seal is broken, moisture creeps in between the panes, creating a permanent, ugly fog that you can't wipe away. The only fix is a full window replacement. Always, always start with the lowest possible pressure setting and only dial it up slightly if you absolutely have to.
As a rule of thumb, always keep the wand tip at least three to four feet away from the window. This distance gives the water spray enough room to lose its forceful punch, turning a potentially damaging blast into a gentle, effective rinse.
Mishandling the Cleaning Solution
Here’s another common pitfall: letting the soap dry on the glass. On a hot, sunny day, this can happen in minutes. Once it dries, the detergent leaves a streaky, chalky film that’s often harder to get off than the original dirt.
The trick is to work in small, manageable sections, especially if you’re in direct sun. Soap up one or two windows, let the detergent sit for a minute or two to break down the grime, and then rinse it off completely before you even think about moving on. This keeps you from creating a whole new cleaning project for yourself.
Other Critical Errors to Sidestep
Even small oversights can cause big issues down the line. Keep these other potential disasters in mind as you work.
- Aiming at the Edges: Never point the spray directly at the edges of the window frame or seals. Water forced into these weak spots can get behind your home's siding, leading to rot, water damage, and even mold growth inside your walls.
- Skipping the Pre-Rinse: Hitting a dusty, gritty window with high-pressure water is like sandblasting it. You're just grinding all that abrasive debris right into the glass. A quick, gentle pre-rinse with a regular garden hose will wash away the grit and prevent scratches.
- Using the Wrong Detergent: Grabbing dish soap or another all-purpose cleaner from under the sink is a bad idea. These can strip away protective low-E coatings on modern windows and almost always leave a streaky film behind. Stick to cleaners made specifically for pressure washers and check that the label says it’s safe for glass.
Knowing When to Hire a Professional
Look, I get the appeal of tackling a project yourself. But when it comes to pressure washing windows, sometimes the smartest move is to pick up the phone instead of the spray wand. Knowing your own limits is just as important as knowing your equipment—it can save you from a nasty fall or a shattered window.
The biggest red flag is height. If you're looking at second or third-story windows, the combination of a ladder, a powerful pressure washer, and trying to keep your balance is a recipe for disaster. Professional window cleaners have the right safety harnesses, stable ladders, and years of experience to do the job without risking their necks.
Assessing High-Risk Windows
It's not just about how high the windows are; it's also about what kind of windows you have. Some glass is simply not meant to stand up to even a low-pressure spray.
You should seriously consider calling in an expert if you're dealing with:
- Historic or Older Windows: These beauties often have thin, single-pane glass and old, brittle glazing putty. A pressure washer can easily blow out the putty, crack the glass, or both.
- Windows with Special Coatings: Many modern windows have special low-E or tinted films. A high-pressure stream can scratch or even strip these coatings right off, ruining their energy-efficient properties.
- Signs of Seal Failure: See any fogging or moisture trapped between the panes of your double-pane windows? A pressure washer will force more water into that gap, making a small problem much, much worse.
A good professional window cleaner does more than just wipe down glass. They have a trained eye and can spot issues you might miss, like a bit of wood rot in the frame or a seal that's about to fail. They can prevent you from accidentally turning a minor repair into a major replacement project.
The Professional Advantage
Hiring a pro isn't an admission of defeat; it’s about getting a superior result safely. Many professional services have ditched high-pressure methods altogether in favor of water-fed pole systems. These use purified water and soft-bristle brushes to scrub windows clean from the ground, leaving a spotless, streak-free shine without any risk.
This low-impact, high-quality approach is a big reason why the window cleaning industry, which employs over 100,000 people in the U.S., still relies on skilled hands over raw power. In fact, globally, fewer than 5% of professional contracts even allow for pressure washer use on glass due to the inherent risks and insurance liabilities. You can see more on this in the full research on pressure washer markets.
To get a better idea of the tools the experts use, take a look at our guide on the specialized equipment for high-rise window cleaners.
Got Questions? We've Got Answers
Even with the best guide, a few questions always come up right before you pull the trigger on that pressure washer. Let's tackle some of the most common ones I hear from homeowners, so you can get started with confidence.
What’s the Right PSI for Washing Windows?
There’s no magic number here, because it really depends on the window itself—its age, material, and how dirty it is. The absolute golden rule? Start low. Always. You should never go above 1500 PSI, and frankly, even that is pushing it for most jobs.
For the average home with modern windows, you'll find that a gentle touch between 500-1000 PSI is perfect. You're aiming for something more like a powerful, focused rainstorm, not a destructive blast.
Is It Safe to Pressure Wash Double-Pane Windows?
You can, but you have to be incredibly careful. The real danger with double-pane windows isn't just shattering the glass; it's wrecking the seal between the two panes.
A high-pressure jet can easily compromise that seal. Once it's broken, moisture gets trapped between the panes, creating that permanent, frustrating fog that you can't wipe away. The only fix at that point is a full window replacement.
To avoid this costly mistake, stick with a wide, 40-degree nozzle and keep your distance—at least four feet away. This reduces the direct force on the window's weakest points.
What's the Best Soap to Use?
This is non-negotiable: only use a detergent specifically made for pressure washers that is labeled as safe for glass. Steer clear of household cleaners like bleach, ammonia, or dish soap. I've seen it tried, and it never ends well.
Those products can cause more harm than good. They might:
- Strip paint or stain from your window frames.
- Leave behind a sticky film that’s almost impossible to remove.
- Kill your lawn, garden beds, and nearby shrubs.
Look for a pH-neutral, biodegradable cleaner. It's the safest bet for your windows and your yard.
How Far Back Should I Stand?
Distance is your best friend when it comes to safety. As a hard-and-fast rule, never stand closer than three to four feet from the window. In fact, I always recommend starting even further back, maybe five or six feet, and only inching forward if the dirt isn't budging.
That extra space gives the water stream time to spread out, turning a potentially damaging pinpoint jet into a wide, effective fan of water.
Feeling a little hesitant? If you'd rather skip the risk and still get that perfect, streak-free shine, let the pros handle it. The team at Sparkle Tech Window Washing has the right gear and the experience to make your windows gleam safely. Get your free estimate today!