

Before you even think about grabbing a scraper, let's talk about what you're up against. The single most important decision is matching the best window paint remover to your specific paint type. What works for a bit of latex overspray—sometimes just soap and water—will do absolutely nothing against stubborn, old oil-based paint. Getting this choice right from the start is the key to getting the job done efficiently without damaging your glass.
Choosing the Right Window Paint Remover
I've seen it countless times: someone grabs the strongest chemical they can find, only to haze up a tinted window or spend hours scraping at paint that won't budge. The truth is, there's no single "best" product. The right choice depends entirely on the situation. Are you cleaning up fresh splatters from a weekend project or tackling decades of caked-on paint on a historic home? The approach is completely different.
Making the wrong call can mean a lot of wasted time and elbow grease, or worse, a permanently damaged window. So, let's break down what you need to consider.
- Paint Type: This is the big one. Latex and acrylic paints are water-based and usually come off without a huge fight. Oil-based paints, on the other hand, are designed for durability and need much more persuasive chemical action to break down.
- Glass Treatment: Do your windows have a special Low-E coating, tinting, or are they tempered? Harsh chemicals and high heat can ruin these sensitive surfaces in an instant. Always know what you're working with.
- Ventilation: If you're working inside, especially in a room with poor airflow, a strong solvent-based remover is a bad idea. Low-odor, bio-based products are a much safer bet for interior jobs.
Match the Remover to the Mess
For light-duty work, like cleaning up a few fresh splatters, always start with the least aggressive option. You'd be surprised how often a sharp, new razor blade lubricated with a bit of soapy water is all you need to lift fresh latex paint right off the glass.
But when you're facing a real challenge—multiple layers of paint, or tough old enamel—it's time to bring in a dedicated window paint remover.
Pro Tip: Always, and I mean always, test your remover on a small, hidden corner of the glass first. This simple five-minute step can save you from a massive headache by confirming the product won’t etch, cloud, or otherwise damage the glass or any special coatings.
Choosing the right paint remover can feel overwhelming with all the options on the shelf. The table below breaks down the most common types to help you narrow down the best fit for your project.
Paint Remover Types At a Glance
| Remover Type | Best For | Pros | Cons |
|---|---|---|---|
| Citrus-Based | Fresh latex or acrylic paint, light adhesives | Low-odor, biodegradable, safer for indoor use | Slower acting, may not work on old or oil-based paints |
| Solvent-Based | Old, thick layers of oil-based and enamel paints | Fast-acting and highly effective on tough jobs | Strong fumes (requires good ventilation), can damage plastic/vinyl |
| Bio-Based/Soy-Gel | Multiple paint layers, lead-based paint (encapsulates it) | Low-VOC, stays wet longer for deep stripping, very effective | Can be messy to clean up, requires longer dwell times |
| Caustic (Lye-Based) | Heavy-duty stripping on masonry or metal (use with extreme caution on windows) | Very powerful and fast-acting | Highly corrosive and dangerous, can easily burn skin and etch glass |
Ultimately, a solvent-based remover offers speed for tough jobs, but a bio-based gel might be the safer and more effective choice for thick layers if you have the time. Always check the label to ensure compatibility with glass.
Understanding Your Options
To make it even simpler, we've put together a flowchart. Think of it as a decision tree that walks you from identifying the paint to picking a product that balances power with safety.

As you can see, figuring out what kind of paint you're dealing with is the first critical step. If you want to dive deeper into the chemistry behind these products, our guide on the essential chemicals for window cleaners is a great resource.
The market for these products is growing fast, largely because of new regulations pushing for safer, more environmentally friendly options. The paint remover market was valued at USD 1.45 billion in 2025 and is expected to climb to USD 1.93 billion by 2030. This is great news for us, as it means more effective and less hazardous products are becoming available all the time.
Of all the steps involved in stripping paint from windows, this first one—prepping your workspace—is the one people most often rush. Don't make that mistake. Getting your setup right from the start is the single biggest factor in doing the job safely and getting a clean, professional finish.
Paint removal is a messy business, far messier than painting itself. Before you pop the top on any remover, you need to think about protection: first for yourself, then for everything around you.
Gear Up for Safety
This is the non-negotiable part of the job, especially if you're working with chemical strippers. The right personal protective equipment (PPE) is your first and best line of defense.
- Chemical-Resistant Gloves: Your everyday latex or vinyl gloves won't cut it here; they can degrade and fall apart in minutes when exposed to solvents. You absolutely need butyl or nitrile gloves rated for chemical work.
- Safety Goggles: Splashes happen. A good pair of wrap-around safety goggles will protect your eyes from chemicals that can cause serious damage. Your prescription glasses are not enough.
- Respirator: A simple dust mask does not protect you from chemical fumes. You need a proper respirator fitted with organic vapor cartridges. Your lungs will thank you.
Protect Your Surroundings
With your own safety handled, it's time to protect your home. A little prep work here saves a massive cleanup headache—or worse, a costly repair bill—later on.
First, get some air moving. Open up every window and door you can. If possible, stick a box fan in a nearby window, facing out, to actively pull the fumes out of the space.
Next, cover up everything. Lay down heavy-duty plastic sheeting on the floor and over any furniture in the splash zone. Use painter’s tape to secure the plastic right up against the base of the window sill. This creates a perfect channel to catch all the drips and peeled paint. You’ll also want to carefully tape off the window frames, mullions, and any other surface you want to keep paint-free.
Here's a pro tip we live by at Sparkle Tech: always have a bucket of clean water and a stack of clean rags within arm's reach. If a stray drop of remover lands on a painted wall, wood trim, or your floor, you can wipe it up immediately before it has a chance to stain or strip the finish.
This focus on safety has become a major talking point in the industry. The 2024 EPA ban on methylene chloride in consumer products has really pushed North American companies to innovate. We're now seeing a huge pivot toward safer, often bio-based, formulas that are better for pros and DIYers alike. This shift is a big deal, and you can read more about its impact in the latest market research on paint removers.
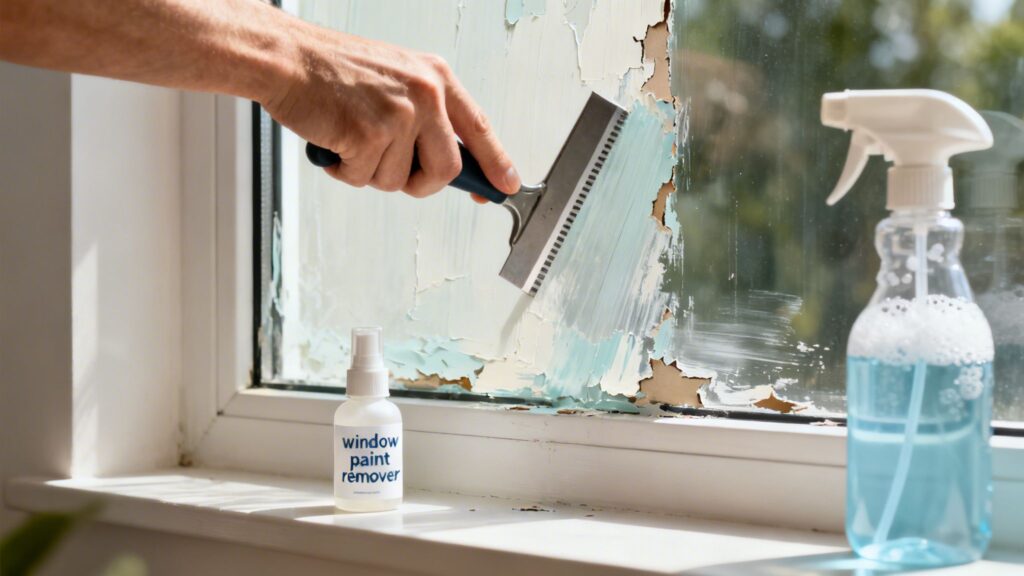
Your Two Go-To Methods: Scraping and Solvents

Alright, with your work area safely prepped, it's time to choose your weapon. When it comes to getting paint off glass, you're almost always going to use one of two methods: mechanical scraping or a chemical solvent. The real trick is knowing which one is right for the job and how to use it without wrecking your windows.
If you’re just dealing with a bit of overspray or some fresh latex paint splatters, a simple scraper is usually all you’ll need. This is a classic, low-tech approach that works wonders when you do it right.
The Finesse of Scraping Paint
Scraping paint off glass isn't about brute force; it’s all about technique. There are two rules I live by here: keep it wet and keep the angle low. Never, and I mean never, try to scrape a dry window. That’s the fast track to a permanently scratched pane of glass.
Always keep the surface slick with some soapy water in a spray bottle. This lets the blade glide instead of bite. Then, hold your scraper at a shallow 30- to 45-degree angle. This helps the blade get under the paint to lift it off in clean sheets. Use a new, sharp blade for every job—a dull or nicked one is just as bad as a dry window when it comes to causing scratches.
Crucial Safety Note: A razor scraper is perfect for standard glass, but it’s a hard "no" for anything else. Never use one on tinted, coated (like Low-E), or plexiglass windows. You'll risk stripping the film or gouging the surface. For those delicate jobs, we have a whole different strategy. Check out our post on removing paint on glass without razors for safer alternatives.
When to Bring in a Window Paint Remover
For the really tough stuff—like thick, old, or stubborn oil-based paint—a chemical remover is going to save you a world of frustration. These solvents are designed to break down the paint’s structure, making it soft and easy to lift off.
Don't be stingy with the application. Use a cheap, disposable brush to slop on a nice, thick layer. A thin coat will just dry out before it gets a chance to do its job.
This is where you need a little patience for what's called "dwell time." You have to let the product sit and work its magic, which usually takes at least 20-30 minutes (always read the label). You'll know it's ready when you see the paint start to bubble up or turn into a soft, paste-like gunk.
- A Pro Tip for Dry Climates: If you're in a hot or arid area, your remover can evaporate too quickly. I've found that laying a piece of plastic wrap over the wet remover works wonders. It traps the active ingredients against the paint, letting them work much more effectively.
The demand for safer, more effective removers has exploded. The global market, which was USD 1.0 billion in 2022, is projected to climb to USD 1.5 billion by 2032. With North America making up a 40% market share, regulations like the 2024 ban on methylene chloride are pushing manufacturers to create better, non-toxic alternatives.
While we're talking about paint, the core principles of working carefully on glass apply to other tasks, too. For example, this DIY guide on how to remove car window tint shares some similar techniques for careful surface work.
Once the dwell time is up, grab a plastic putty knife and gently scrape away the softened paint. Have a rag ready to wipe up the messy residue. For windows with multiple layers of old paint, don’t be surprised if you need to repeat the process.
Dealing With Stubborn Paint and Special Glass
So, you've tried scraping and soaking, but you’ve got paint that seems practically welded to the glass. This is where you might need to bring out the bigger guns, but it's also where you need to be extra careful. For those really stubborn, thick layers of ancient paint, a heat gun can work wonders.

The trick is to gently warm the paint, not cook it. You want to apply just enough heat to soften it into a putty-like consistency that peels away easily. Keep the heat gun moving in a constant, sweeping motion, holding it several inches away from the surface. When you get it right, the paint will practically lift off.
But this method comes with a serious risk.
CRITICAL WARNING: Never hold a heat gun in one spot on the glass. This can cause thermal shock—a rapid temperature change that creates immense stress and can instantly crack the pane. The danger is even greater on a cold day when the glass is frigid to begin with.
How to Work With Special and Treated Glass
Before you even think about applying a tool or chemical to a window, you have to know what you’re working with. Not all glass is the same, and using the wrong method on a specialty surface can cause permanent damage. What started as a simple paint removal job can quickly turn into a full window replacement.
Here’s what to look out for with common types of treated glass:
- Tinted Windows: That tint is actually a delicate film applied to the interior side of the glass. Using a metal scraper or a harsh, ammonia-based solvent will almost certainly scratch, bubble, or discolor the film. Your best bet here is a mild soap-and-water solution and a plastic scraper, if you must scrape at all.
- Low-E Coated Glass: Low-emissivity (Low-E) coatings are invisible layers of metal oxide that provide insulation. While they're pretty durable, they aren't immune to scratches from metal blades or damage from abrasive cleaners. Always hunt for the manufacturer’s specific cleaning guide before you start.
- Plexiglass or Acrylic: This stuff isn’t glass—it’s plastic, and it’s notoriously easy to ruin. It scratches at the slightest provocation, and most chemical paint strippers will make it cloud over, craze, or even start to melt. You absolutely must use a product specifically made for use on plastics.
A Safer Approach for Sensitive Surfaces
When you're not 100% sure what kind of glass you have, always start with the gentlest method possible. For glass that you suspect is tinted or coated, I find a citrus-based remover paired with a fresh plastic razor blade is often the safest combination. It might take a bit more elbow grease, but it's worth the patience to protect an expensive window.
The science behind these glass treatments is pretty fascinating. If you want to dive deeper into how these surfaces are engineered, you can learn more about the difference between hydrophilic and hydrophobic glass in our other guide. Understanding the properties of the glass itself helps clarify why some removal techniques are safe and others are a recipe for disaster.
In the end, correctly identifying the glass is the single most important part of the job. If you have any doubt about whether your window has a special coating, it’s always smarter to assume it does and proceed with the utmost caution.
Final Cleanup for a Professional Finish
You’ve done the hard part and gotten the stubborn paint off the glass. That’s a huge win. But don’t pack up your tools just yet—the final cleanup is what separates a decent DIY job from one that looks truly professional. This last push ensures your windows are spotless and the area is safe.First thing's first: deal with the mess. Carefully gather all the paint-soaked rags, used tape, plastic sheeting, and of course, all those little paint chips. Get everything bundled securely into a heavy-duty trash bag.
Handling Hazardous Waste Safely
Now, a crucial point. If you're working on a house built before 1978, you have to assume the paint contains lead. This isn't something you can just toss in the regular bin.
Lead-based paint waste is considered hazardous material. You'll need to contact your local sanitation department or a hazardous waste facility to find out their specific rules for disposal. This isn't just red tape; it's a serious health and safety issue.
Improperly dumping lead paint debris can contaminate the soil and water, and it often comes with hefty fines. Taking this extra step is non-negotiable for protecting your family, your pets, and the environment.
Achieving a Streak-Free Shine
With the debris safely out of the way, it's time to make those windows sparkle. Forget the paper towels. For a truly pro finish, you need a quality squeegee, a couple of fresh microfiber cloths, and a simple cleaning solution. Honestly, a bucket of water with a few drops of dish soap is all you need.
Here’s how the pros get that perfect, streak-free shine:
- First, get the window nice and wet. Use a sponge to apply your soapy water generously over the whole pane of glass.
- Start in a top corner with your squeegee tilted at about a 45-degree angle. Pull it straight across the top edge of the glass.
- Now, work your way down the window in an overlapping "S" pattern. This technique pulls all the dirty water down without leaving lines.
- The real secret? Wipe the squeegee blade clean with a microfiber cloth after every single pass. This tiny step is what prevents those annoying, dirty streaks from ruining your work.
While you're admiring your crystal-clear glass, you might notice other parts of your home's exterior that could use a touch-up. A fresh look can really boost curb appeal, and it's worth knowing the current cost to paint screen doors if you're planning a more complete refresh.
Common Questions About Removing Paint From Glass

Even after you've learned the basics, trying to get paint off glass can throw a few curveballs your way. We get a lot of calls from people who are halfway through a project and hit a frustrating snag. Here are the answers to some of the most common issues you might run into.
Can I Use Steel Wool to Remove Paint From Windows?
This question comes up all the time, and my short answer is: proceed with extreme caution. In general, I tell people to avoid standard steel wool because it’s an abrasive that can easily leave a web of fine, permanent scratches on your glass.
If you have an incredibly stubborn paint speckle that a razor just can’t seem to lift, you might be able to use a super-fine #0000 grade steel wool. But—and this is a big but—it must be used with plenty of lubrication, like very soapy water. Honestly, a fresh, sharp razor blade held at a low angle is almost always the safer and better choice for standard glass.
Never use any kind of abrasive pad, especially steel wool, on specialty glass. This means any tinted, Low-E coated, or plexiglass surfaces. You will strip the coating or film right off, causing irreversible damage.
How Do I Know if Old Paint Contains Lead?
This is a serious one. If your home was built before 1978, there's a real possibility that older layers of paint contain lead. You can’t tell just by looking, and messing with it can create a major health hazard.
The only way to know for sure is to pick up an EPA-recognized lead test kit from a hardware store. They're inexpensive, easy to use, and will give you a definitive answer.
If that test comes back positive—or if you have a strong suspicion—stop what you are doing immediately. Do not scrape, sand, or otherwise disturb the paint. That creates toxic dust that can be inhaled. This is the point where you absolutely must call a certified professional to handle the removal and disposal safely.
What Is the Best Way to Remove Paint From Window Frames?
The right method here depends entirely on the frame material. This is not a one-size-fits-all job, and grabbing the wrong product can do some serious, often permanent, damage.
- For Vinyl or Aluminum Frames: Steer clear of aggressive chemical strippers and heat guns. Harsh solvents can discolor or even weaken the vinyl, while high heat can cause it to warp and buckle. Your safest bet is a gentle, citrus-based remover paired with a plastic scraper.
- For Wood Frames: You have a few more options here, including stronger chemical removers and even heat guns. That said, you have to test your window paint remover on a hidden spot first. Make sure it doesn't lift the wood's underlying stain or finish before you go all in.
No matter what kind of frame you have, always take the time to meticulously protect the glass with painter's tape before you start.
My Window Paint Remover Isn't Working. What Am I Doing Wrong?
It’s a common frustration when you’ve applied a remover and nothing seems to be happening. Before you give up, it usually boils down to one of three things.
First, you might be fighting the paint with the wrong weapon. A remover made for modern latex paint won't make a dent in old-school oil-based enamel. Check the paint type and make sure your product is a match.
Second, you might not be giving it enough "dwell time." Patience is key here. Most removers need at least 20-30 minutes to penetrate and break down the paint. For thicker, older layers, it could take even longer.
Finally, the remover might be evaporating before it can finish its job, especially in hot or dry weather. Here's a pro tip: cover the area with plastic wrap after you apply the remover. This traps the active ingredients against the paint, giving them more time to work their magic.
When the job is too big, the windows are too high, or the risks are too great, don't hesitate to call in the professionals. Sparkle Tech Window Washing provides fully insured services across Arizona, and we can handle the toughest paint removal challenges safely and effectively. Get your free quote today at https://sparkletechwindowwashing.com.