


To tackle hard water stains on your windows, you need to dissolve the mineral deposits that get left behind after water evaporates. For lighter, newer spots, a simple 50/50 mix of white vinegar and water often does the trick. The mild acid in the vinegar is usually enough to break down the calcium and magnesium. If you're dealing with tougher, more baked-on stains, you might need to step up to a commercial hard water cleaner or even a gentle polishing compound to get your glass clear again.
Why Your Arizona Windows Have Stubborn White Spots
Ever look at your windows and wonder where those milky, chalky spots came from? The ones that just won't wipe away no matter how hard you scrub? The culprit is a combination of Arizona’s water and our relentless sun. Those stubborn marks aren't dirt—they're mineral deposits, mostly calcium and magnesium, that are left behind every single time water dries on the glass.
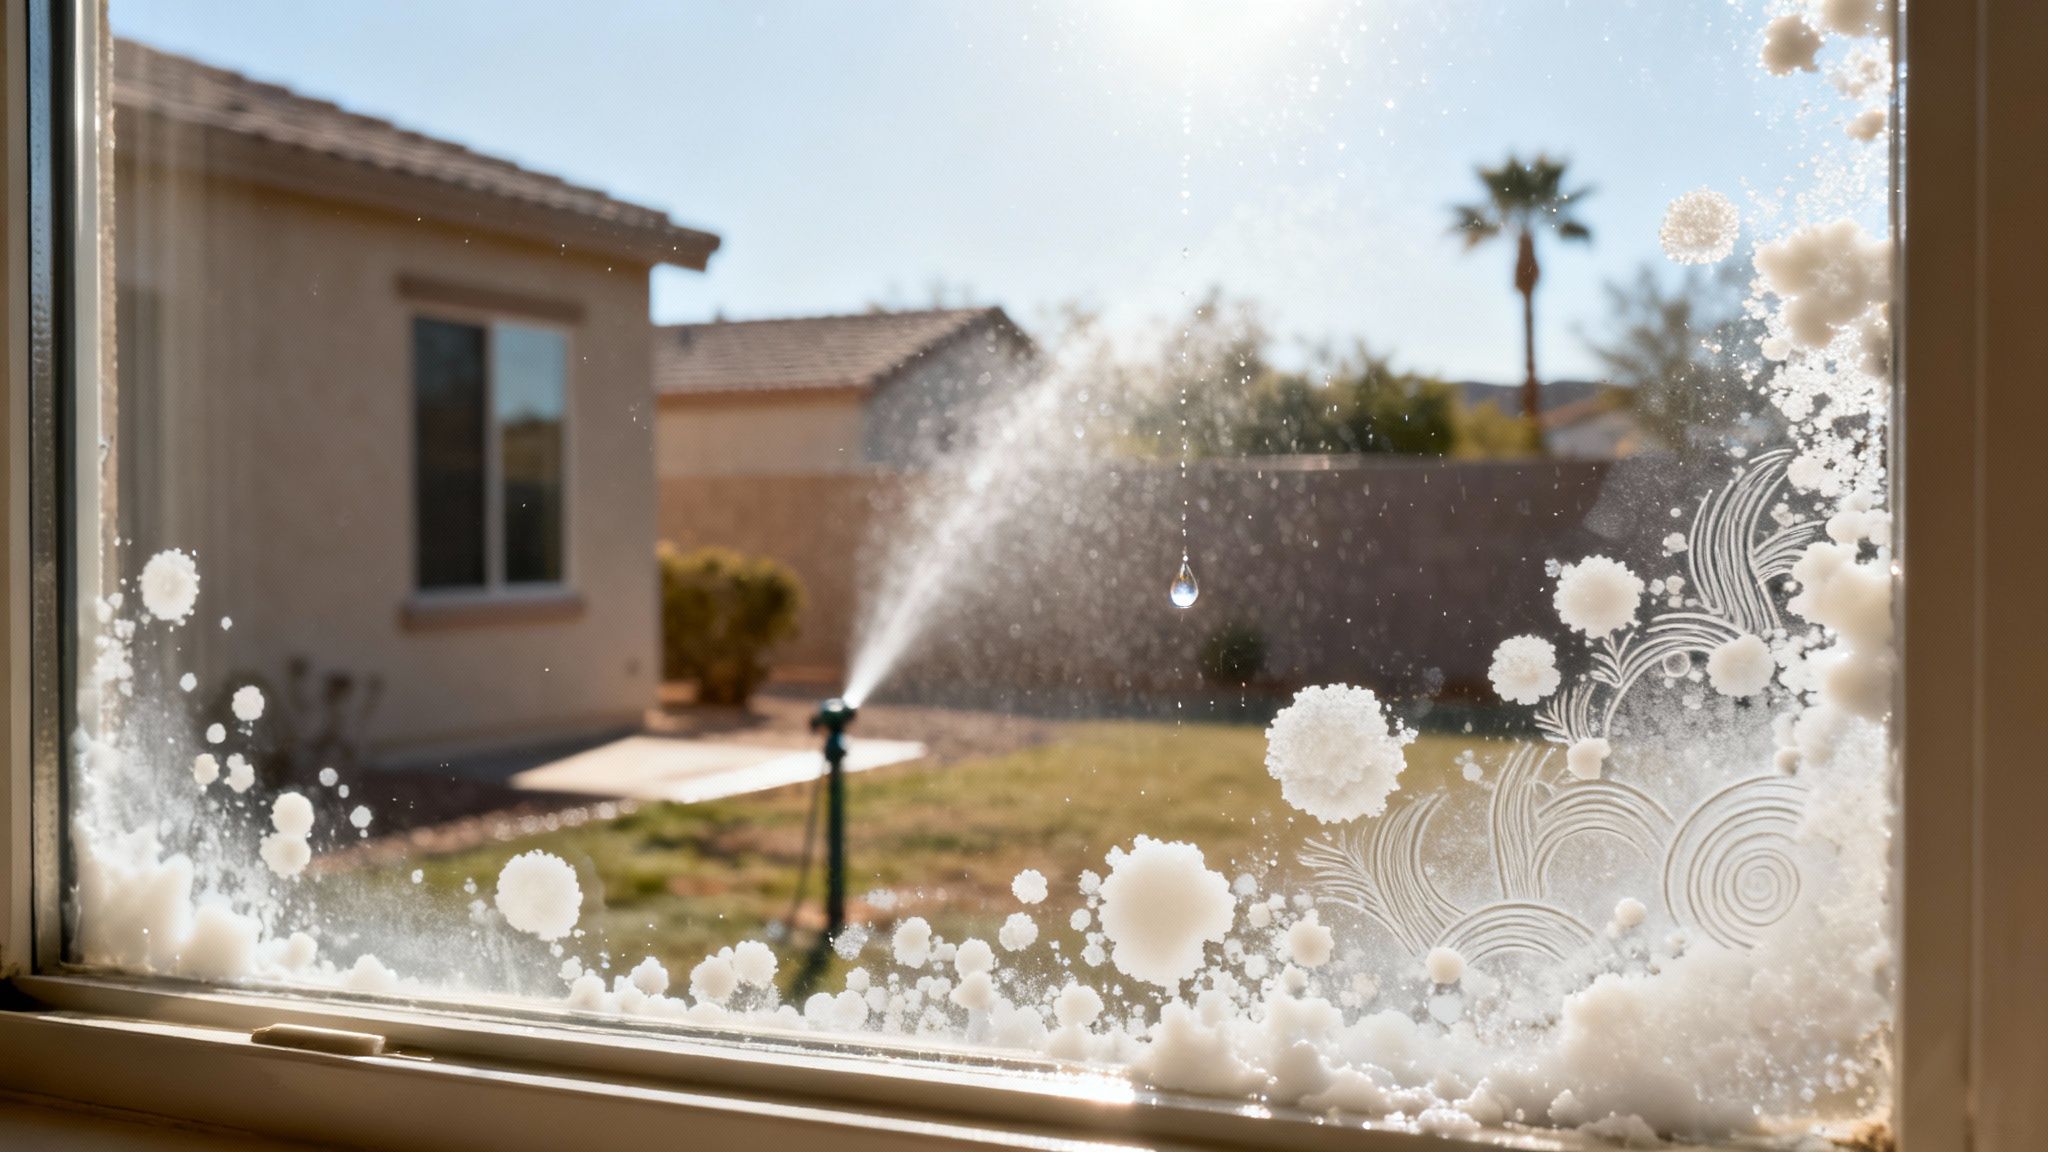
And this isn't just an Arizona problem. Hard water is a challenge for homeowners all over. In fact, about 85% of American households are dealing with hard water. As the water evaporates, it leaves behind minerals that get harder and harder to remove. Professional window cleaners in hard water areas say up to 60% of their jobs involve stain removal, and the problem gets significantly worse if the stains sit for more than 6-12 months. You can find some great insights on hard water challenges from G&S Window Cleaning, a team that sees this every day.
The Role of Sun and Time
Here in Arizona, the sun is a huge factor. It acts like an accelerator, basically baking those mineral spots right onto the glass. What started as a stray droplet from a sprinkler or a quick rinse with the hose quickly turns into a tough, bonded stain. Every time the window gets wet and dries again, another layer is added, making the buildup thicker and nearly impossible to remove with regular glass cleaner.
Think of it this way: a drop of water left on a cool, cloudy day might leave a faint ring. But that same drop under the intense Arizona sun is like putting it in an oven—it fuses the minerals directly to the surface.
From Surface Stain to Permanent Damage
If you let these mineral deposits sit for too long, they don't just stay on the surface. They can actually start to corrode the glass itself. This process is called etching, where the alkaline minerals physically eat into the glass, creating tiny pits and imperfections. Once your glass is etched, the damage is pretty much permanent and can't be fixed with cleaners.
Key Takeaway: Hard water spots are more than just an eyesore. They're a progressive problem that can lead to permanent glass damage if you don't take care of them quickly and correctly.
Knowing what you're up against is the first step. The goal isn't to scrub harder, but to use the right solutions to chemically dissolve the specific minerals clinging to your glass. This insight helps you choose the right approach, whether it's a simple vinegar spray for a new stain or a more powerful compound for a long-term problem, so you can restore your view without scratching or damaging the window.
Assembling Your Hard Water Stain Removal Toolkit
Before you even think about tackling those stubborn white spots, let's talk about gear. This is non-negotiable. Grabbing the wrong tool, like an old kitchen sponge or—worse—coarse steel wool, can turn a simple cleaning task into a permanent, costly mistake. Remember, the goal is to dissolve the minerals, not physically scrape them off the glass.
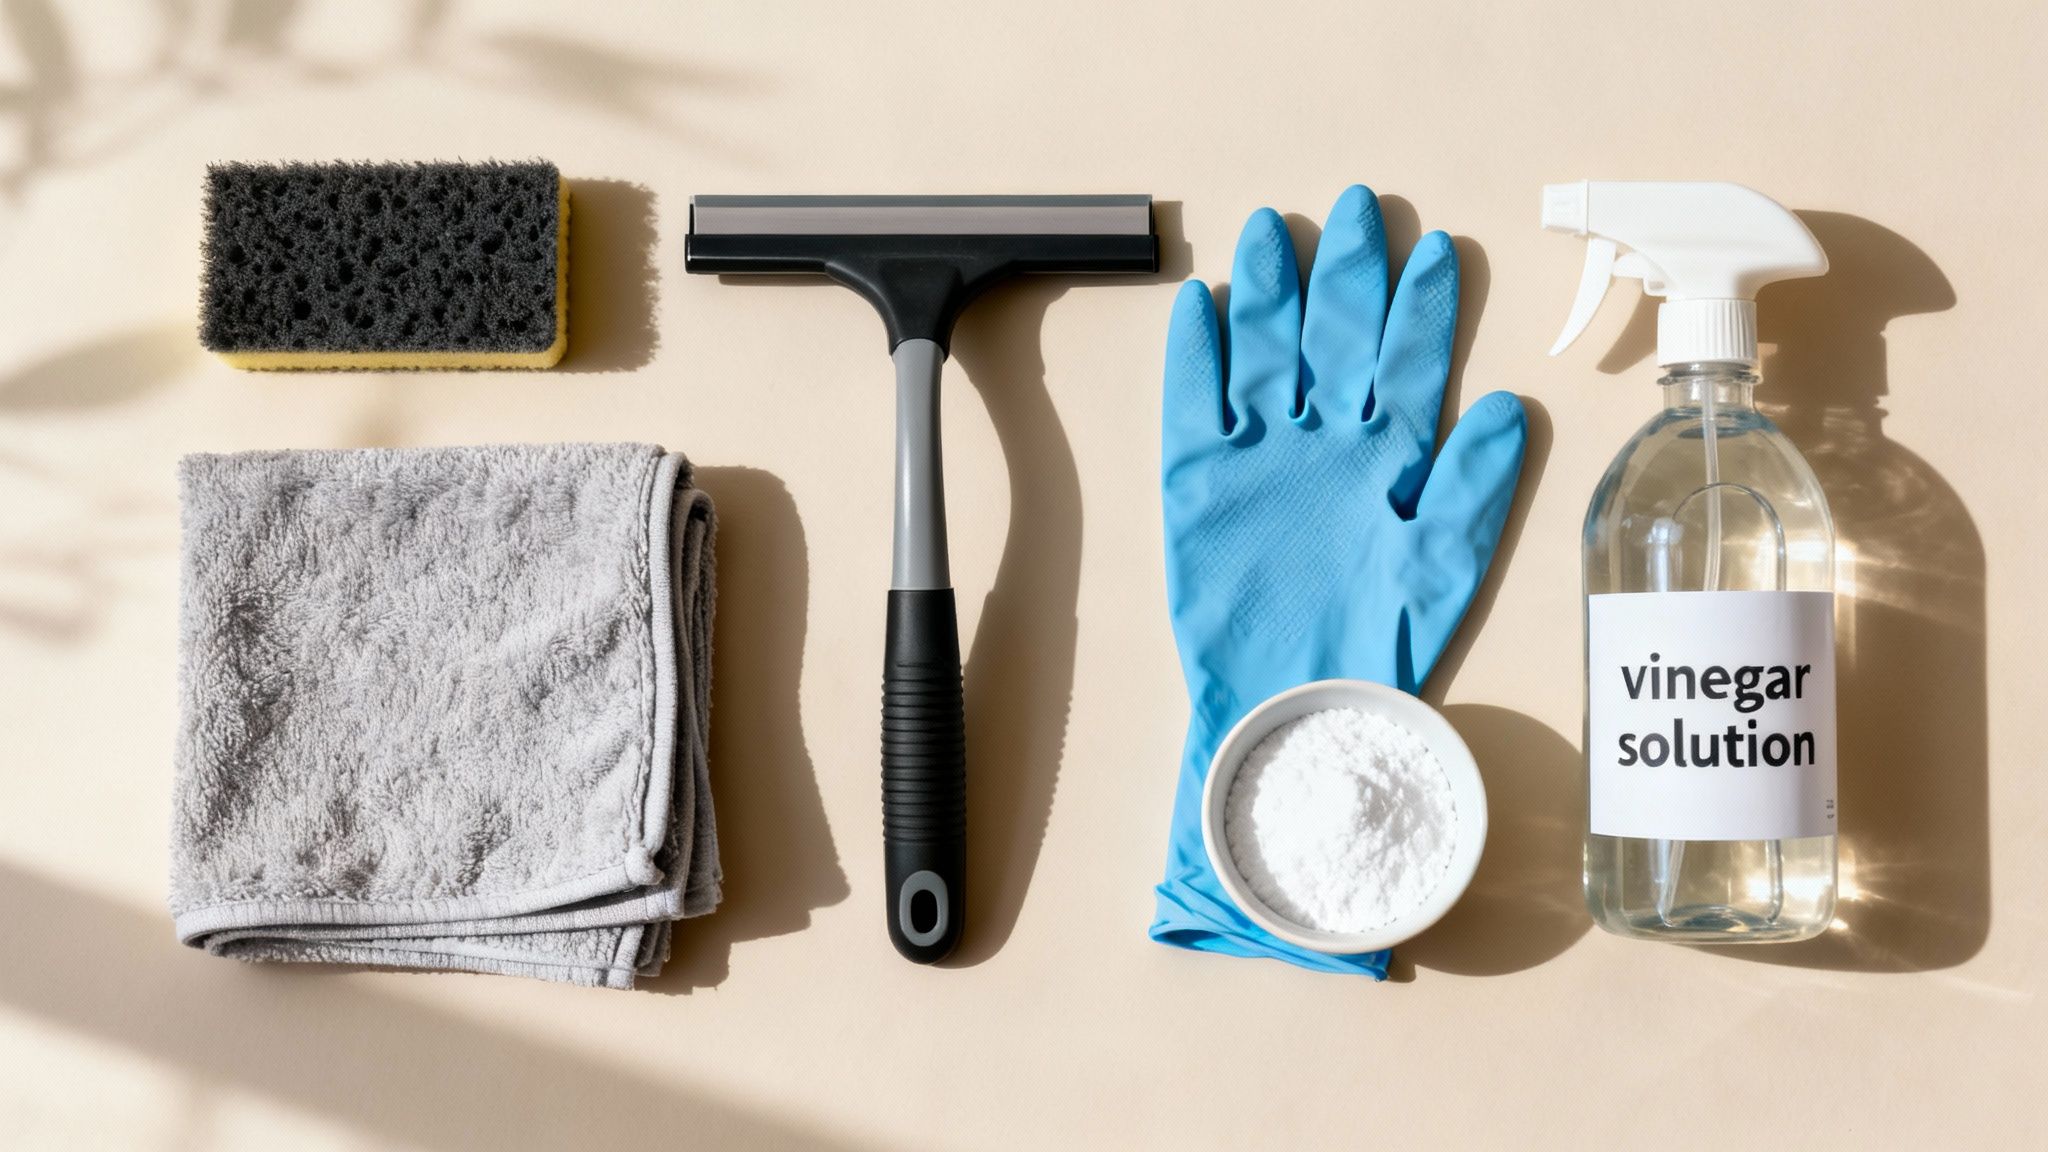
Taking a few minutes to gather the right supplies sets you up for a successful, damage-free outcome. We'll walk through everything you might need, from basic household items to the more specialized tools required for tougher jobs.
Everyday Essentials For Lighter Stains
For most minor to moderate hard water stains, you can get fantastic results with items you probably already have around the house. These tools are perfect for routine cleaning and for catching new spots before they have a chance to set in.
Your basic kit should include:
- Spray Bottles: You'll want at least two. One is for your cleaning solution (like a vinegar and water mix), and the other is for plain, clean rinse water.
- Non-Scratch Scrub Pads: Look for pads specifically made for delicate surfaces. A white nylon pad is a great choice because it offers just enough friction to work without marring the glass.
- Plenty of Microfiber Towels: These are the unsung heroes of window cleaning. Keep separate towels for scrubbing, rinsing, and drying to avoid smearing grime around and to guarantee a streak-free finish.
Don't forget to protect yourself, especially when you're working with acidic solutions like vinegar or commercial-grade cleaners. A simple pair of rubber gloves will keep your hands safe from irritation. It's also smart to know what's in your cleaners; you can learn all about the dos and don'ts of window cleaning chemicals to avoid in our detailed guide.
Pro Tip: Always apply your cleaning solution to your towel or pad first, not directly onto the window. Spraying a hot, sun-drenched window can cause the liquid to evaporate almost instantly, leaving behind even more residue.
Stepping It Up With Professional-Grade Tools
When you're up against stains that have been baking in the sun for months, your everyday supplies might not cut it. This is where investing in a few professional-grade tools can save you a world of time and frustration. These items are designed for efficiency and a truly flawless finish.
Consider adding these to your arsenal:
- A High-Quality Squeegee: A professional squeegee with a sharp, pliable rubber blade is the secret to a perfect, streak-free shine. A 10 or 12-inch model is versatile enough for most residential windows.
- Fine-Grade Steel Wool (#0000): This might sound intimidating, but #0000 (quadruple-aught) steel wool is incredibly fine. When used correctly with plenty of lubrication, it can shear off tough mineral deposits without scratching the glass. Always test it on a small, hidden area first!
- Glass Polishing Compound: For stains that are starting to feel rough to the touch (a sign of etching), a cerium oxide-based polishing compound is your next move. It gently abrades the mineral buildup without harming the glass itself. This is often the last-ditch effort before calling in a professional.
Deciding between your household items and more specialized gear can be tricky. The table below breaks down which tools are right for your specific situation.
Essential Vs Professional Hard Water Removal Tools
| Tool Category | DIY Household Option | Professional-Grade Option | When to Use It |
|---|---|---|---|
| Scrubbing | White Non-Scratch Pad | #0000 Steel Wool | Use steel wool for heavy, layered mineral buildup that a simple pad can't remove. |
| Drying | Microfiber Towels | Professional Squeegee | A squeegee provides a faster, more consistent streak-free finish, especially on large panes. |
| Tough Stains | Baking Soda Paste | Glass Polishing Compound | A polishing compound is for old stains that have begun to etch the surface of the glass. |
Ultimately, having both types of tools on hand ensures you're ready for any level of hard water buildup, from a light haze to years of caked-on minerals.
DIY Tricks for Light to Moderate Mineral Stains
If you've caught those chalky white spots early, you're in luck. For mineral stains that haven't been baking onto your glass for years, you often don't need to reach for harsh chemicals or specialized equipment. In fact, some of the most effective solutions are probably sitting in your kitchen pantry right now. The key is understanding a little bit of the science and using the right technique to get that perfect, streak-free result.
But before you start, let's get one crucial rule straight: always work on a cool window that's out of direct sunlight. Trying to clean hot glass is a recipe for disaster. The cleaning solution will evaporate almost instantly, leaving behind a nasty, concentrated residue of cleaner and the very minerals you're trying to remove. Trust me, it can make the problem even worse.
The Classic Vinegar and Water Solution
This is the go-to method for a reason—it just works. A simple mix of white vinegar and water is incredibly effective against fresh mineral deposits. The magic here is the acetic acid in the vinegar, which is a mild acid that's perfect for dissolving alkaline mineral deposits like calcium and magnesium. It basically breaks the chemical bond holding the stain to the glass, letting you wipe it right off.
Here’s how I tackle it:
- Mix Your Solution: I always combine equal parts distilled white vinegar and water in a spray bottle. Pro tip: use distilled water. Tap water contains minerals, and you don't want to be putting more minerals back onto the window you're trying to clean.
- Spray and Wait: Lightly spray a section of the window. Now for the most important part: let it sit. You need to give it at least five to ten minutes of "dwell time" for the acid to work its magic. Just don't let it dry on the glass.
- A Little Agitation: Once the solution has had time to sit, grab a non-scratch scrub pad or a balled-up microfiber cloth and gently scrub the area. Use small, circular motions with light pressure. You'll actually feel the gritty texture of the minerals starting to break down.
Rinse the section well with clean water before moving on to the next. Patience really is your best friend here. Rushing the process won't get you anywhere; you have to give the vinegar time to do its job.
When You Need a Gentle Abrasive Paste
Sometimes, a simple spray isn't quite enough for spots that feel a bit more textured and stubborn. This is where a gentle abrasive can give you the extra muscle you need without scratching the glass. My favorite DIY abrasive is a simple paste made from baking soda and vinegar. It gives you the perfect one-two punch of chemical action and physical scrubbing power.
The baking soda acts as a micro-abrasive to physically lift the deposits, while the vinegar keeps working to dissolve them.
Heads Up: When you mix baking soda and vinegar, it's going to fizz. This is a normal chemical reaction. Just wait for the fizzing to die down before you try to apply the paste.
To make it, just put a few tablespoons of baking soda in a small bowl and slowly stir in just enough vinegar to create a thick paste, almost like toothpaste. Dab this directly onto the stubborn spots, let it sit for about ten minutes, and then gently scrub with your non-scratch pad. The mild grit is often just enough to dislodge buildup that a liquid solution couldn't handle on its own.
Mastering the Streak-Free Finish
Great, you've dissolved the hard water stains! But the job isn't done. The final step is just as critical, because if you dry the window improperly, you'll just trade mineral spots for a whole new set of streaks. This is where a high-quality squeegee becomes your most valuable tool.
For a professional-grade shine, follow these steps:
- Work on a Wet Surface: After rinsing, make sure the glass is still wet. A squeegee glides best on a lubricated surface.
- Create a "Dry Edge": Take a clean microfiber towel and wipe a narrow, one-inch dry strip down one side of the window pane. This gives your squeegee a clean place to start and stops it from dragging water back across the glass.
- Use the Overlap Method: Place your squeegee blade in that dry strip, angled slightly down. Pull it across the window in one smooth, continuous motion. For the next stroke, overlap the previous one by about an inch.
- Wipe Your Blade: This is the secret trick that separates the pros from the amateurs. After every single pull, wipe the rubber blade of your squeegee clean with a microfiber cloth. This stops you from dragging dirty water and dissolved minerals across the clean glass.
By combining the dissolving power of a simple household acid with the right application and drying techniques, you can knock out most light to moderate hard water stains yourself, restoring that beautiful clarity to your windows.
What to Do When Stains Are Stubborn or Etched
Sometimes, that trusty vinegar solution just won't cut it. When you’ve scrubbed and sprayed with no results, it’s a sure sign you're up against something more serious than a simple surface stain. This is where you have to graduate from kitchen chemistry to more powerful, commercial-grade solutions and even polishing compounds.
It’s important to set realistic expectations here. If the minerals have already physically etched into the glass—creating a permanent haze or tiny pits—no cleaner on earth can reverse that damage. However, for even the most caked-on surface deposits, these advanced methods can work wonders and bring back a level of clarity you thought was long gone.
Upgrading to Commercial Hard Water Removers
Commercial hard water removers are specifically formulated with mild acids and fine abrasives that pack more punch than household vinegar. They're designed to dissolve the stubborn calcium and magnesium deposits that have bonded to the glass over time. For the really tough jobs, you might need to look into a Super Strong Descaler or a similar professional-grade product.
When you're working with these chemicals, safety is not optional.
- Always wear gloves and eye protection. These formulas can easily irritate your skin and eyes.
- Make sure you’re in a well-ventilated area to avoid breathing in any fumes.
- NEVER mix different chemical cleaners. This is a recipe for creating a dangerous toxic reaction.
The golden rule? Always test any new product on a small, hidden corner of the glass first. Apply a dab, follow the directions, and rinse it off. Then, check for any scratching, discoloration, or other negative effects before you commit to the entire window. This one simple step can save you a world of hurt.
Important Insight: Time is your biggest enemy. Professional-grade solutions and polishing compounds have a 70-90% success rate on recent stains. But for stains that are over a year old, that effectiveness plummets to just 20-40%. Once a stain has been sitting for 18-24 months, it often becomes permanent etching, and removal is next to impossible.
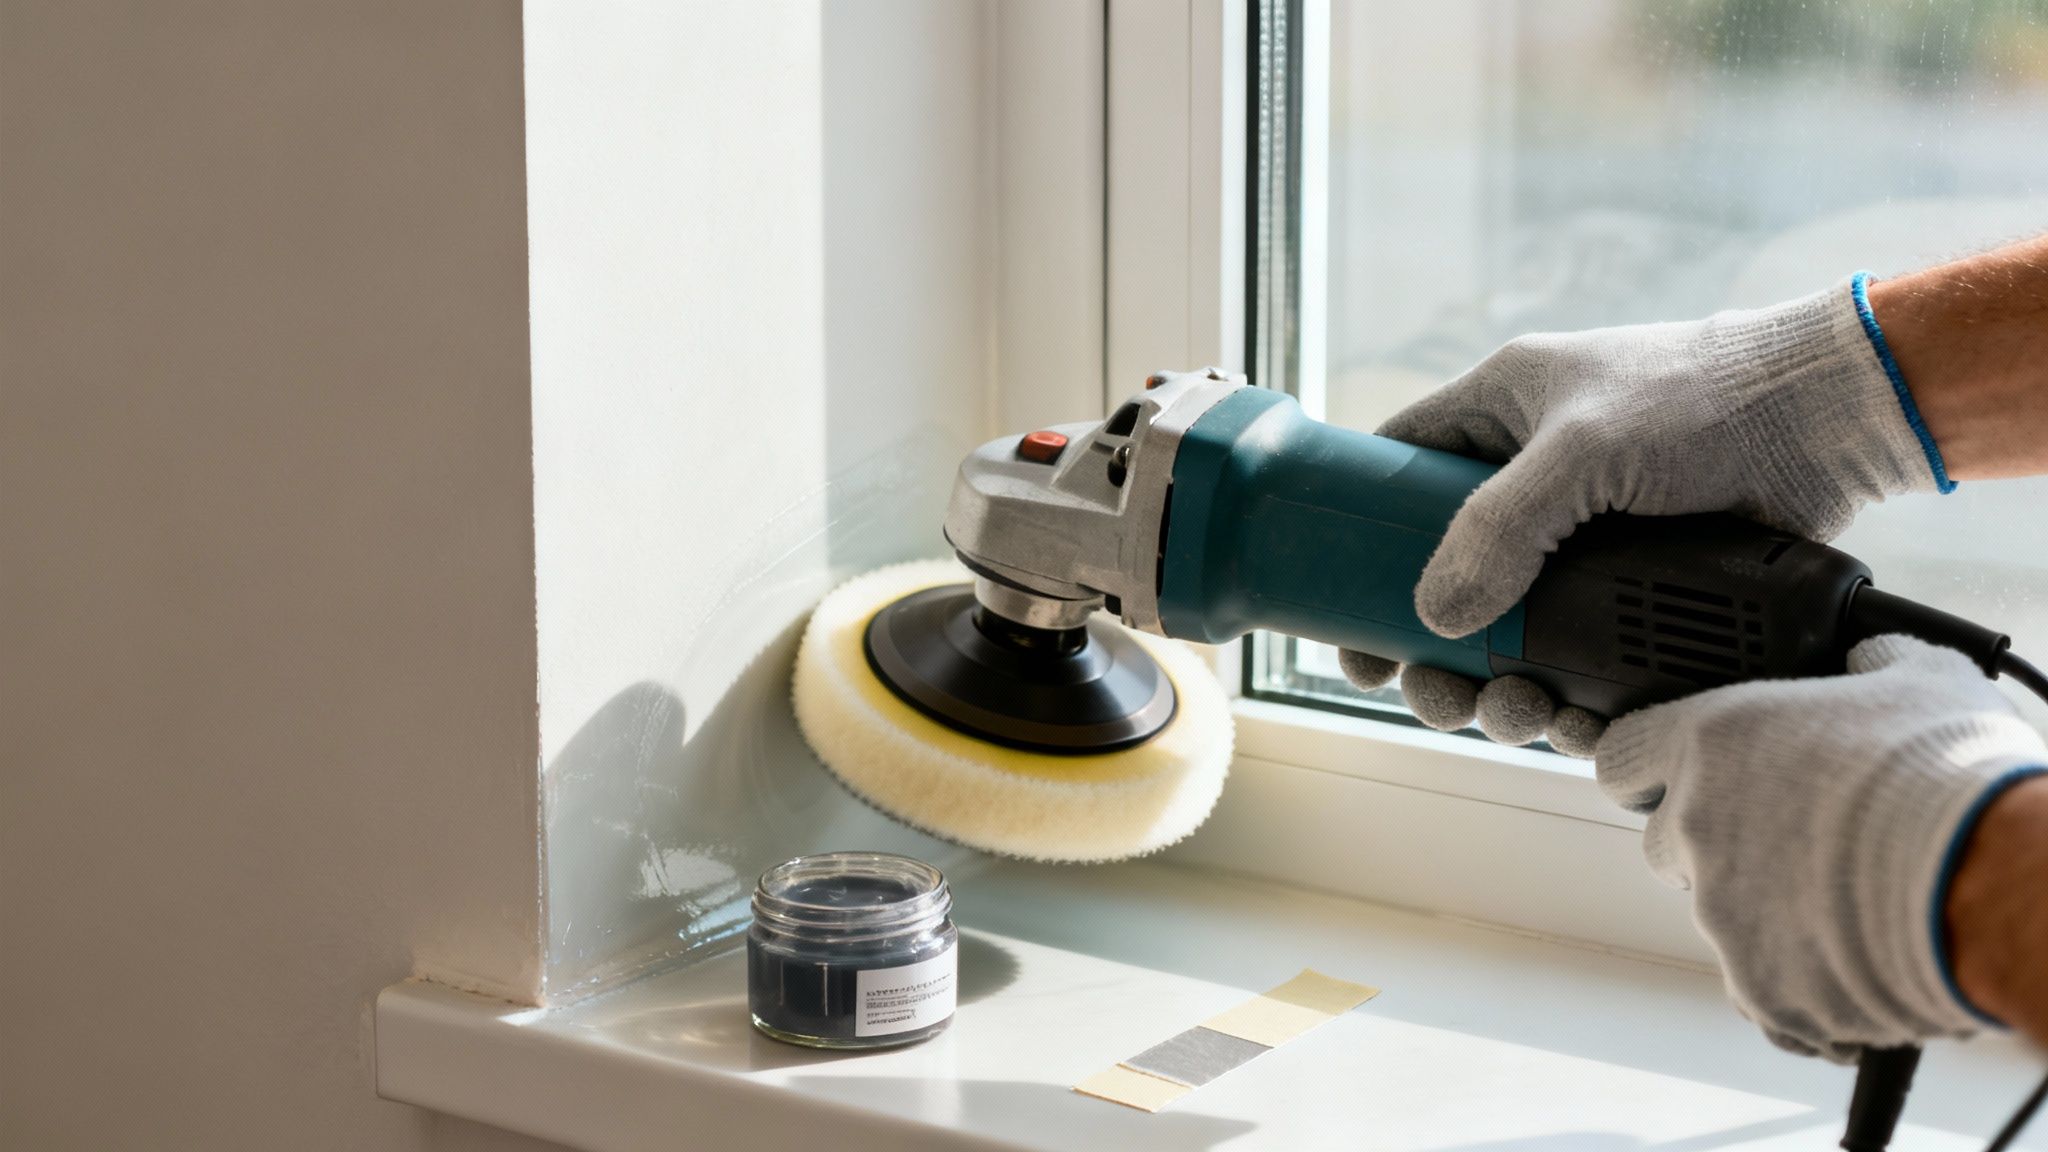
Using Polishing Compounds for Heavy Buildup
If commercial cleaners still aren't getting the job done, it's time to bring out the polishing compounds. These products, which often contain cerium oxide, are essentially super-fine abrasives. They work by gently grinding away the mineral buildup without scratching the glass itself. Think of it like exfoliating your windows—you're removing that tough, outer layer of bonded minerals to reveal the smooth, clear glass underneath.
For small, isolated spots, you can apply these compounds by hand. Just grab a microfiber applicator pad, work the paste into the stain with firm, circular motions, and be prepared for some serious elbow grease.
When to Bring in an Orbital Buffer
Let's be real: trying to hand-polish a large picture window or a whole house full of stained glass is an exhausting, thankless job. This is the perfect time to grab an orbital buffer fitted with a soft foam pad. The tool delivers the consistent speed and pressure needed to break down heavy deposits far more effectively and efficiently than you ever could by hand.
If you go this route, follow these tips to avoid accidentally damaging your glass:
- Use the Right Pad: Stick with a soft foam finishing or polishing pad. Aggressive cutting pads are for car paint and will haze or scratch your windows.
- Start Slow: Keep the buffer on a low-speed setting. High speeds create heat, which can stress the glass and even cause it to crack, especially on a sunny day.
- Keep It Moving: Never let the buffer sit in one spot. Use slow, overlapping passes to polish the surface evenly and prevent hot spots.
- Let the Tool Do the Work: You only need light, consistent pressure. The compound and the pad's motion are what remove the stain, not brute force.
Once you’re done polishing, give the window a thorough rinse with clean water to get all the compound residue off, then squeegee it dry for a final inspection. This is often the last-ditch effort before calling a pro, and when done right, it can save windows you thought were ruined for good.
Keeping Future Hard Water Stains at Bay
You’ve put in the elbow grease to get your windows crystal clear. The last thing you want is a repeat performance of those chalky, white spots. Fortunately, keeping hard water stains from coming back is a lot easier than scrubbing them off in the first place. It really just comes down to being proactive.
The most common culprit, especially for us here in Arizona, is a sprinkler head gone rogue. Seriously, take five minutes to watch your irrigation system in action. If you see a sprinkler head misting your windows or glass doors, adjust it. That one simple fix can eliminate the primary source of the problem before it even starts.
Create a Protective Barrier with a Sealant
Once your windows are clean and dry, it's time to protect them. This is where a hydrophobic glass sealant or wax becomes your best friend. I've found this to be one of the most effective ways to stop stains in their tracks.
These products create an invisible, slick coating on the glass. Water can't cling to the surface and evaporate; instead, it beads up and rolls away, taking those pesky minerals with it. You'll find these sealants at most auto parts or home improvement stores, and applying them is usually as simple as wiping them on with a microfiber cloth.
If you're curious about the science behind it, our guide on the difference between hydrophilic and hydrophobic glass breaks it down nicely.
The Pro's Secret Weapon for Spotless Windows
Ever wonder how professional window cleaners get that flawless, long-lasting shine? It's not some secret chemical—it's the water they use. The pros often rely on a deionized (DI) or reverse osmosis (RO) water purification system. This equipment strips out all the minerals like calcium and magnesium before the water ever hits the glass.
This is the ultimate preventative strategy because it tackles the problem at its source. When you rinse windows with pure water, there are literally zero mineral deposits left behind to cause spots as the water dries.
This method is incredibly effective. In fact, professional window cleaners using pure water systems report a 95%+ success rate at preventing stains on windows they maintain regularly. You can see more on the impact of pure water cleaning from Clean & Clear MN, a team that specializes in this tech.
While investing in a full DI system is probably overkill for most homeowners, you can borrow the concept. Try using a gallon of distilled water for your final rinse—it's also mineral-free and works wonders as a DIY alternative.
By combining these simple strategies, you can stop fighting a losing battle against hard water. A few small adjustments and a protective coating will keep your windows looking fantastic, saving you from scrubbing the same stubborn stains time and time again.
When You Should Call a Window Cleaning Pro
It’s great to tackle home projects yourself, but when it comes to hard water stains, you need to know when to throw in the towel. Pushing too hard with the wrong paste or a harsh scrubbing pad can quickly turn a simple cleaning job into permanent, costly damage. Knowing when to step back is just as important as knowing how to scrub.
There are a few situations where calling a pro is just the smart move. For starters, think about safety. If you’re looking at second-story windows or any glass that’s just plain awkward to reach, don't risk it on a wobbly ladder. A professional crew has the proper safety gear and experience to handle heights without a second thought.
Assessing the Severity of the Stains
The age and stubbornness of the stains are also a huge factor. If those milky-white spots have been baked onto the glass for over a year, they've probably started to etch the surface. At that point, your vinegar solution isn't going to cut it, and you could easily scratch the glass trying to force it.
A professional service like Sparkle Tech uses specialized polishing compounds and equipment that can often buff out light etching, something you just can’t replicate with DIY methods.
Expert Tip: Think of it this way: what's the cost of a professional cleaning versus the cost of a brand-new window? If you're unsure, getting a pro's opinion first can save you a massive headache and a lot of money down the road.
Letting severe hard water stains sit also has consequences you might not expect. That heavy mineral film isn't just ugly; it can block up to 40% of the natural light from entering your home. For a business, this can translate into real money, with energy costs jumping 15-25% from inefficient windows. In fact, keeping windows professionally cleaned can lower a building's HVAC load by 10-15%.
This flowchart breaks down how a little prevention goes a long way.
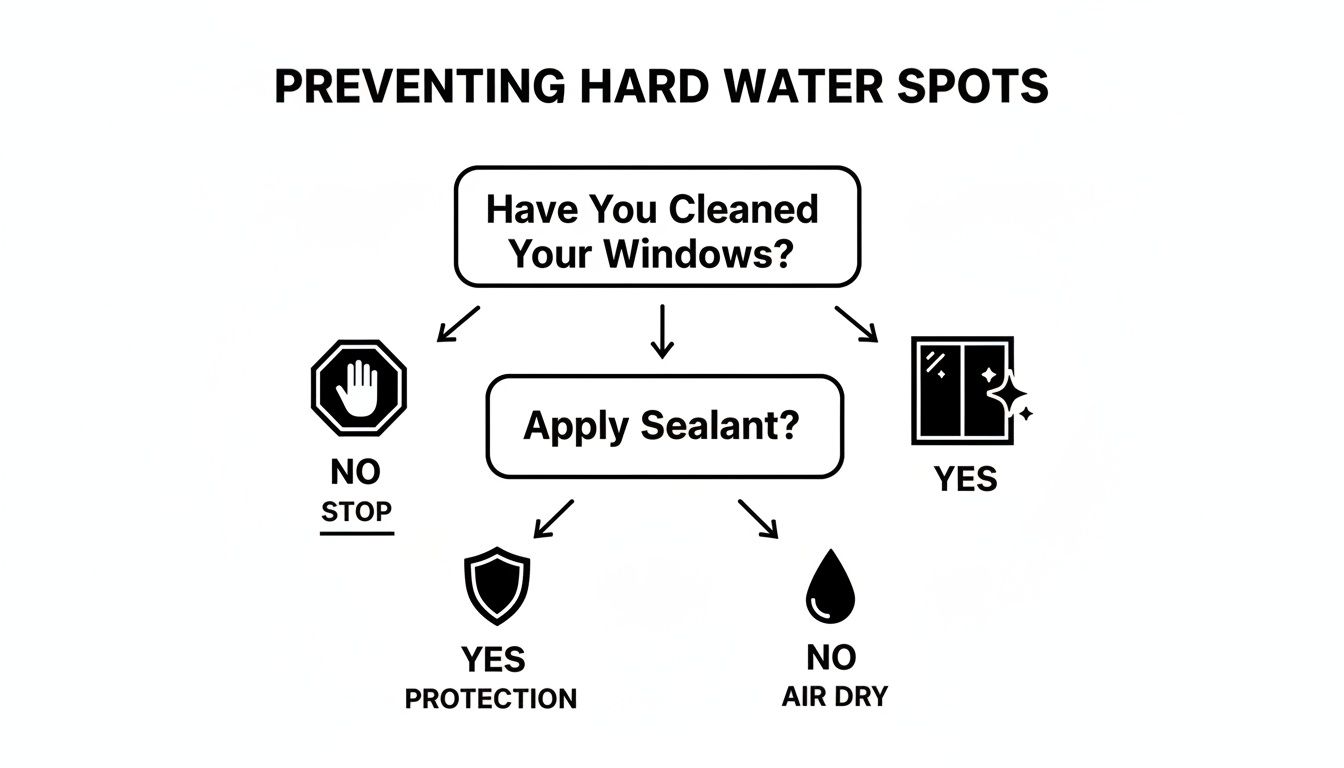
As you can see, cleaning is only half the battle. Applying a good sealant afterward is what really protects your glass from future mineral buildup.
The Value of Time and Expertise
Finally, be honest about your time and the results you're after. A professional can get your windows looking flawless in a fraction of the time it would take most of us. They have the technique and tools to remove every last spot without leaving streaks.
If you've got a huge job ahead of you, or if you simply want that perfect, crystal-clear finish, knowing when to call a professional window washing company is often the best call you can make.
Got Questions About Hard Water on Your Windows? We've Got Answers
People often ask us about the best ways to deal with hard water, and a few questions pop up time and time again. Let's tackle them.
Can I Just Scrape the Stains Off with a Razor Blade?
This is a big one, and our answer is always a firm "no." While you might see a professional window cleaner use a blade for something specific like paint splatter, it's a tool that requires a practiced hand. It is incredibly easy to misjudge the angle or pressure and end up with a permanent scratch or deep gouge in your glass.
For DIY projects, it's much safer to stick with chemical solutions and non-abrasive scrubbing pads. You'll get the job done without risking irreversible damage to your windows.
How Often Should I Clean My Windows to Prevent This?
Prevention is always easier than a cure. If your windows are constantly getting hit by sprinklers, the best thing you can do is grab a squeegee and give them a quick wipe-down after the water shuts off. It only takes a minute and saves a massive headache later.
For general upkeep here in a hard-water area like Arizona, a deep clean every three to six months is a great schedule. This stops those mineral deposits from baking onto the glass and becoming a much bigger problem.
What's the Difference Between a Spot and Etching?
It's a crucial distinction. A hard water spot is a surface-level problem—it's just a mineral deposit sitting on top of the glass. With the right technique, you can clean it off.
Etching, on the other hand, is physical damage. The corrosive minerals have actually eaten into the surface of the glass, creating a cloudy, hazy, or pitted look that won't just wipe away.
Severe etching is a whole different ballgame. It can't be removed with standard cleaning methods and usually requires professional glass polishing. In the most extreme cases, the window itself might need to be replaced. Knowing the difference helps you decide when to DIY and when it’s time to call in a pro.
If you're facing stains that have become etched or are just too stubborn for you to handle, the experienced team at Sparkle Tech Window Washing has the professional-grade tools and know-how to restore your glass safely. Get a free quote for your window cleaning needs today!