

You walk out to your car and catch it in the light. A few white specks on the side glass. Maybe a streak across the windshield. Maybe dried celebration paint that looked harmless for a day and now feels welded to the surface. The first instinct is usually to scrub harder or grab the nearest blade.
That’s where people get into trouble.
When someone asks me how to get window paint off car glass, my answer is simple. Start with the least aggressive method first. Glass is durable, but the surrounding trim, rubber seals, tint, and painted panels are easy to damage with the wrong solvent, the wrong blade, or the wrong technique. Speed matters less than control.
Most paint on automotive glass is removable. The question is whether you can remove it without trading paint spots for scratches, edge damage, or chemical staining. That’s the standard worth holding.
That Sinking Feeling When You See Paint on Your Car
It usually happens in ordinary situations. Road paint flicks up from a fresh lane marking. Overspray drifts from a nearby project. A festive window marker stays on too long and stops behaving like a temporary coating. By the time you notice it, the mess looks worse than it probably is.
The good news is that paint on glass is often manageable. The bad news is that many DIY attempts fail because the person starts with the harshest tool in reach. A dry paper towel, a kitchen scraper, aggressive solvent splashed directly onto the panel. That approach can turn a cleanup job into a repair job.
Practical rule: If your method feels fast, forceful, or improvised, it’s probably too aggressive for the first pass.
A better approach is deliberate. Check what’s on the glass. Try the gentlest compatible option. Escalate only if the paint stays put. Stop the moment the risk to the glass, trim, or surrounding finish starts rising faster than your progress.
That mindset matters because not every painted spot should be attacked the same way. Fine overspray and thick blobs are different problems. Fresh material and fully cured material are different problems. Exterior glass and rubber seals are definitely different problems.
If you stay patient, protect the surrounding surfaces, and use the right method in the right order, you can usually get the glass clean without adding damage. That’s the standard professionals work toward every time.
First Steps Assessment and Essential Preparation
Start with a close inspection before you touch the glass. The goal is to identify what kind of paint you have, where it has spread, and which surface is at risk if you choose the wrong method first.

Identify what you’re dealing with
A light mist of overspray calls for a different plan than a dried paint blob. Fresh paint that still softens or smears responds differently than fully cured material. If the contamination crosses from glass onto rubber seals, textured trim, or painted body panels, the job gets riskier fast.
Check three things right away:
- Paint thickness: Fine overspray usually allows a gentler first pass. Raised specks, drips, or heavy patches often need more than wiping.
- Surface spread: Glass-only contamination is simpler. Paint on trim or adjacent paint limits which chemicals and tools are safe.
- Paint condition: Smearing suggests fresher material. Hard, brittle residue usually means a more stubborn bond.
If you’re considering acetone, review how to use acetone on glass safely before opening the bottle. Acetone can work on glass, but poor ventilation, sloppy application, and contact with nearby trim can create a second problem.
Gather the right supplies
Set up everything before you begin. Stopping midway to grab a towel or tape usually leads to rushed decisions and contaminated tools.
Keep this kit within reach:
- Clean microfiber towels: Dirty or dropped towels can trap grit and drag it across the glass.
- Glass cleaner or dedicated lubricant: Needed for safe wiping and later mechanical removal.
- Painter’s tape: Protects rubber seals, trim, and painted edges around the window.
- A soft applicator cloth or cotton pad: Better for controlled solvent use than spraying directly onto the glass.
- Optional solvent: Rubbing alcohol, acetone, or paint thinner may help in specific cases, but each one brings compatibility risks. Test first in a small, hidden spot and keep it off anything that is not glass unless you know it is safe.
Protect the areas that get damaged first
Mask off the perimeter before any removal attempt. Tape the rubber seals, trim pieces, and nearby painted panels that sit close to the work area. Then wash or wipe away loose dust and grit from the glass itself.
That step prevents a common detailing mistake. Dirt left on the window turns a towel, clay bar, or razor pass into an abrasive one.
Use a least aggressive first sequence. Clean the surface, test the mildest suitable option, and escalate only if the paint stays put without signs of collateral risk. If paint has spread onto body paint, aged trim, aftermarket tint film, or damaged seals, stop and reassess before continuing.
Good prep is the key to controlled removal without creating scratches, trim staining, or solvent damage.
Using a Razor Blade The Professional Way
A razor blade is effective on cured, stubborn paint. It’s also the tool most likely to punish bad technique.

When a blade makes sense
Use a blade only when the paint is clearly bonded enough that wiping and gentler methods aren’t doing the job. This is most common with thicker dried spots on exterior glass.
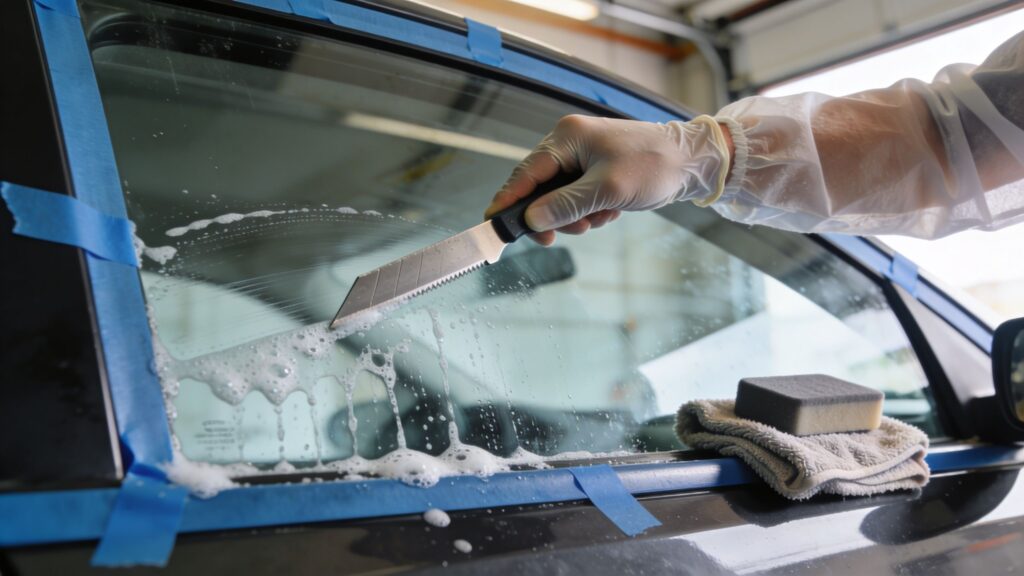
According to this automotive glass paint removal method, dense paint layers should be addressed with a specialty razor blade designed for paint removal before chemical treatment, and the glass should be lubricated first with products such as detailing spray or glass cleaner to reduce friction and scratching risk. That same guidance stresses two essential principles: keep the blade flat against the glass and use straight, even scraping lines.
The method that protects the glass
This is the professional sequence:
- Flood the area with lubricant. Never scrape dry glass.
- Use a proper paint-removal razor blade. Not a pocketknife, not a chipped utility blade, not something you found in a drawer.
- Hold the blade flat and low. Don’t lift the corners.
- Push in straight, even lines. No digging, no chopping motions.
- Wipe residue away and inspect. Then repeat only if needed.
What doesn’t work well is improvisation. A blade corner can leave a deep scratch fast. A dry pass can grind dirt into the surface. Short hacking motions create uneven pressure and increase the chance of damage.
If you want another technician-focused reference on handling a scraper correctly, this overview of safe razor blade techniques is worth reading.
What to avoid without exception
Never use a razor blade on painted body panels. Never scrape over dry contamination. Never force a blade over trim edges or rubber seals. And never assume all glass is a free-for-all if there are coatings, films, or edge vulnerabilities involved.
For readers who already suspect a blade is more risk than they want to take, these alternatives to removing paint on glass without razors are often the smarter starting point.
A short demonstration helps if you’ve never done this before:
Keep the motion boring. Boring is safe. The second scraping feels dramatic, the odds of a mistake go up.
If the blade removes paint cleanly and the glass underneath stays clear, continue patiently. If the paint only partly moves, or the surface starts looking hazy, stop and reassess rather than pushing harder.
Safer Alternatives Solvent and Clay Bar Methods
Paint on glass does not always call for a blade. In the shop, I start with the least aggressive method that has a real chance of working, especially when the contamination looks like misted overspray, light transfer, or a thin haze you can feel more than see.

Solvent first for light contamination
A solvent-on-cloth approach is usually the best starting point for fresh transfer or fine overspray on bare glass. The goal is simple. Soften the paint residue without attacking trim, tint film, rubber, or surrounding painted panels.
Use care with solvent choice. Rubbing alcohol is the mildest place to start. Acetone and paint thinner can work faster, but they also raise the risk if they touch the wrong material. Apply the product to a clean microfiber or applicator, not straight onto the window. That keeps runoff under control and gives you a smaller test area.
Use this method in a tight pattern:
- Test a small spot first: Check both paint removal and material compatibility.
- Keep the towel damp, not dripping: Excess solvent migrates into seals and edges.
- Hold the towel on the spot briefly: Let the solvent soften the paint before wiping.
- Wipe with light pressure: If you have to scrub hard, this method is probably not enough.
- Stop at the first sign of trim staining or smearing: That is your cue to change approach, not push harder.
If paint starts transferring onto the towel and the glass clears without haze, continue in small sections. If the residue only smears around, or nothing changes after a few controlled passes, stop there. More force usually creates a bigger cleanup problem.
Clay bar for broad, fine contamination
Clay is slower, but it is often the safer call when overspray extends beyond the glass or sits close to delicate edges. That is the trade-off. You give up speed to reduce the chance of scratching glass, marking trim, or damaging nearby paint.
Use a fine or mild detailing clay with plenty of lubricant. Keep the surface wet and move the clay in short, straight passes. Fold the clay often so you are not dragging captured grit back across the glass. If the clay starts grabbing hard, add more lubricant and lighten up.
Clay makes the most sense when:
- The contamination is widespread but thin
- Overspray crosses from glass onto painted surfaces or gaskets
- You want one method that can treat several materials with lower risk
- The paint feels bonded, but not raised or chunky
Do not force clay through heavy, sharp, or crusted paint deposits. It will not cut them cleanly, and trapped debris can mar the surface.
Which method fits the job
| Situation | Best starting method | Main trade-off |
|---|---|---|
| Fine overspray on glass | Solvent on cloth | Requires careful compatibility testing |
| Light contamination across glass and nearby surfaces | Clay bar with lubricant | Slower, but lower risk |
| Thick, raised, cured paint on glass only | Razor blade | Highest skill requirement |
I use a simple decision rule here. If the paint is thin and responds to chemistry or clay, stay with the gentler method. If it is raised, fully cured, and isolated to plain glass, a blade may be justified. If the contamination sits near aftermarket tint, aging rubber, sensitive trim, or you cannot identify the paint type, the smart move is to stop and get a professional involved.
The safest method is the one that removes the paint without creating a second repair. Speed comes second.
Final Cleaning and Restoring Glass Clarity
Once the paint is gone, the job isn’t finished. Residue from solvent, lubricant, or loosened paint can leave the glass smeary or patchy.

Clean the surface like you mean it
Do a final wash of the treated area with a standard car-safe wash process, then dry the glass. That finishing step matters because professional paint-removal guidance calls for a final wash and window drying after residue removal in the acetone-based process described here in the earlier cited automotive training reference.
After that, use a clean microfiber towel and a glass cleaner that won’t leave its own film behind. Wipe in one direction on the inside and another on the outside if you want to spot streaks quickly.
Check for residue and marring
Look at the glass from multiple angles. If you still see shadowy paint traces, don’t assume they’ll disappear later. Reinspect the specific area and decide whether it’s leftover contamination or actual surface damage.
A few final checks help:
- Run a clean fingertip lightly across the glass: You’re feeling for bonded residue, not pushing hard.
- Check edges near seals: Residue tends to hide there.
- Look in side light: That’s where smears and blade marks show up first.
If the glass looks dull rather than dirty, a glass polishing step may help restore clarity. Keep that separate from paint removal. Don’t treat polish like a substitute for proper removal technique.
For readers working through broader vehicle cleanup after a messy project, this guide on how to clean your car engine is a useful reminder that every part of the vehicle needs its own method. Glass, paint, plastics, and engine components all respond differently to chemicals and agitation.
A clean finish should look invisible. If you can still see the work area immediately, there’s usually more cleanup to do.
When to Stop and Call a Professional
Knowing when to quit is part of doing this right.
If the paint isn’t responding to the least aggressive method, and the next step would increase the risk sharply, that’s your signal. A lot of people keep going because they’ve already invested time. That’s how scratches happen.
Red flags that mean stop
Stop the DIY process if you run into any of these:
- The contamination extends onto painted panels or textured trim
- The glass has film, tint, coating, or uncertain surface condition
- The paint won’t move without increasing pressure
- You’re seeing haze, drag marks, or possible scratching
- You’re no longer sure it’s paint at all
Sometimes what looks like paint is etching, adhesive residue, or another form of surface damage. More effort won’t fix the wrong diagnosis.
Why professional help is the cheaper decision
A professional has better process control, better tool discipline, and experience reading surfaces before damage happens. That matters more than brute force.
If your issue is part of a broader vehicle-condition problem, this article on full-service automotive repair in Fort Worth is a good reminder that some car problems are cheaper to solve early, before a minor issue becomes component damage or replacement.
When you’re on the fence, use this standard: if your next move feels like a gamble, stop and get outside help. This is exactly the kind of judgment covered in this guide on knowing when to call a professional window washing company. The principle is the same. Once risk overtakes progress, DIY stops being the smart option.
A failed cleanup on glass rarely stays a glass problem. It turns into trim damage, paint damage, or replacement cost.
There’s no prize for finishing a risky job yourself.
Frequently Asked Questions About Window Paint Removal
Can I use a kitchen knife or box cutter instead of a proper razor blade
No. A proper single-edge razor gives you a flat, predictable contact point on glass. Kitchen knives and box cutters are harder to control, easier to tilt, and far more likely to catch an edge, scar the glass, or cut surrounding trim.
Will Goo Gone or WD-40 work
Sometimes, but they are not my first choice on automotive glass. Both can leave an oily film that makes inspection harder and creates extra cleanup around seals and trim. If you try either one, use a small test spot first and keep the product off painted surfaces and rubber as much as possible.
What’s the safest way to remove paint from rubber window seals
Use a soft microfiber or applicator pad with a cleaner that is safe for rubber. Work slowly and avoid scraping. Rubber seals mark easily, and once paint gets into textured material, aggressive rubbing often makes the area look worse instead of cleaner.
If the seal is stained rather than coated, full removal may not be realistic with DIY methods.
Can I remove paint from the car’s body using the same process
No. Automotive paint is much softer than glass, so the process changes. A razor blade can damage clear coat fast, and stronger solvents can stain or dull the finish. For painted panels, use products and techniques made for automotive paint, such as a clay bar with proper lubricant or a paint-safe decontamination method.
What if the paint is very light and barely visible
Light overspray is where patience pays off. Start with the mildest option that can move the contamination, then inspect in good light before stepping up to anything stronger. I see plenty of avoidable scratches from people reaching for a scraper just because the paint is faint and they want it gone fast.
How do I know the job is done
Check the glass with both your eyes and your fingertips. It should look clear in direct and angled light, feel smooth across the surface, and show no residue near the edges or lower corners. If you still see smearing, rough spots, or a dull patch that does not wipe away cleanly, stop and reassess before doing more.
If you’d rather not risk scratching glass or damaging trim, Sparkle Tech Window Washing can help you figure out the safest next step. When paint, overspray, or stubborn residue is on automotive glass, a careful assessment and the right removal method matter more than force.